Seite/
Page
5
ERGOCRIMP Handzange
PN 539 635-1
411-18087 / Rev. E
ERGOCRIMP Hand Tool
PN 539 635-1
411-18087 / Rev. E
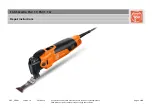
Sechskantmutter
Nut
Abschrägung
Chamfer
Matrizenbe-
festigungs-
schrauben
Die retaining
screws
Positioniereinheit
Locator assembly
Bild / Figure 2
5
Matrizen, Ein- und Ausbau
Wählen Sie den gewünschten Matrizensatz aus.
5
Die Installation and removal
Select the desired die assembly.
Matrizen - Einbau
1. Öffnen Sie die Zangengriffe und entfernen Sie die
beiden Befestigungsschrauben aus den
Crimpbacken.
2. Positionieren Sie die Crimper-Matrize für Draht-
und Isolationscrimp in der feststehenden Crimp-
backe, so daß die Abschrägungen nach außen
zeigen.
3. Drehen Sie eine Matrizen-Befestigungsschraube
durch Backe und Matrize, ziehen Sie aber die
Schraube noch nicht fest.
4. Positionieren Sie die untere Matrize in der beweg-
lichen Crimpbacke der Handzange. Drehen Sie
eine Matrizen-Befestigungsschraube durch Bak-
ke und Matrize, ziehen Sie die Schraube aber
noch nicht fest.
Obere Matrize
Upper die
Untere Matrize
Lower die
Sechskantmutter
Nut
Die - Installation
1.Open the tool handles and remove the two die
retaining screws from the tool jaws.
2.Move the wire and insulation crimper dies, with
the chamfers facing the front of the stationary
jaws.
3.Insert a die retention screw through the jaw and
die and tighten the screw so that the die is held
in place, but do not tighten the screw completely
at this point.
4.Place the lower die in the moving jaw of the tool
frame. Install a die retention screw through the
jaw and die and tighten the screw so that the die
is held in place, but do not tighten the screw
completely at this point.
Kontaktabstützung
Contact guide