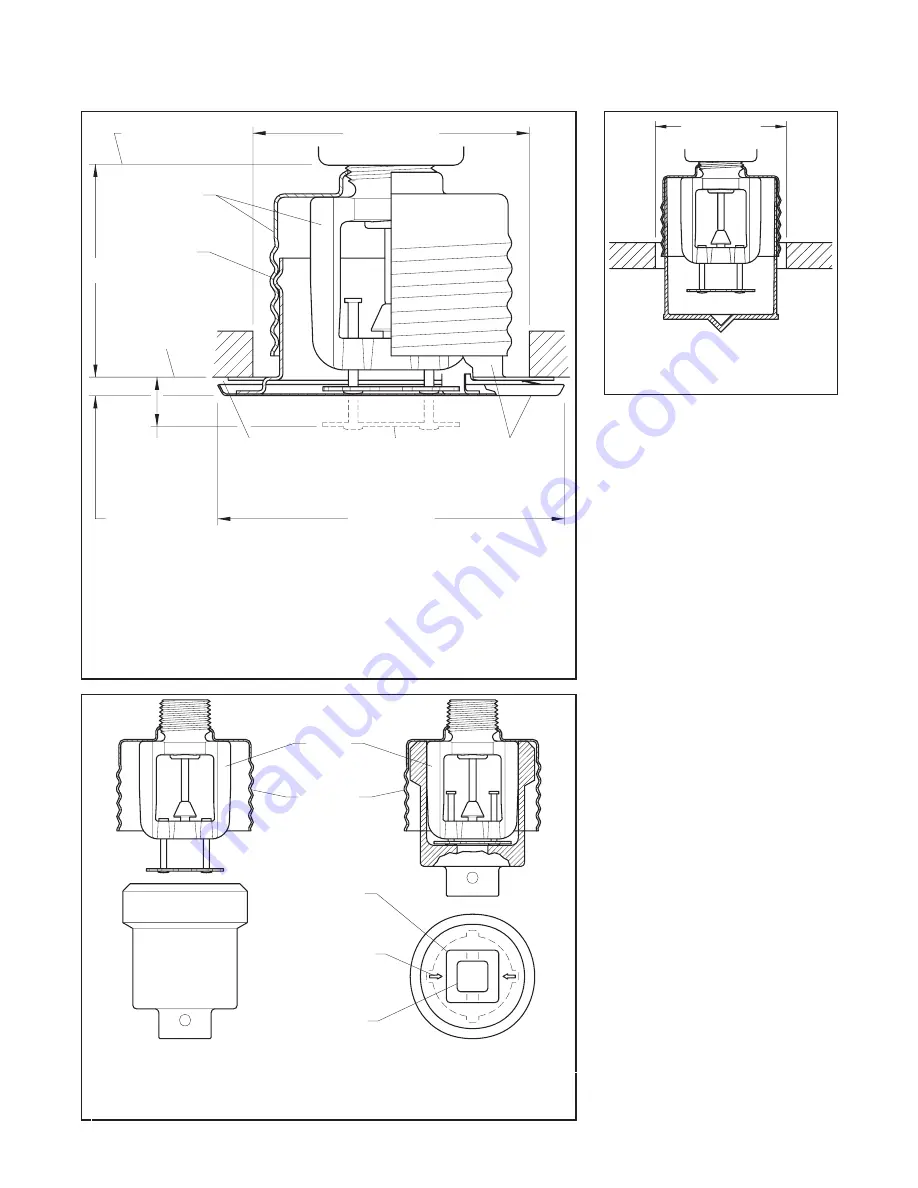
until it bottoms out against the Support
Cup. The Protective Cap helps prevent
damage to the Deflector and Arms dur-
ing ceiling installation and/or during
application of the finish coating of the
ceiling. It may also be used to locate
the center of the clearance hole by
gently pushing the ceiling material up
against the center point of the Protec-
tive Cap.
NOTE
As long as the Protective Cap remains
in place, the system is considered to
be “Out of Service”.
Step 6
. After the ceiling has been com-
pleted with the 2-1/2 inch (63,5 mm)
diameter clearance hole and in prepa-
ration for installing the Cover Plate As-
sembly, remove and discard the Pro-
tective Cap, and verify that the
Deflector moves up and down freely. If
the Sprinkler has been damaged and
the Deflector does not move up and
down freely, replace the entire Sprin-
kler assembly. Do not attempt to mod-
ify or repair a damaged sprinkler.
Step 7.
Screw on the Cover Plate/Re-
tainer Assembly until its flange just
comes in contact with the ceiling. Do
not continue to screw on the Cover
Plate/Retainer Assembly such that it
lifts a ceiling panel out of its normal
position. If the Cover Plate/Retainer
Assembly cannot be engaged with the
Support Cup or the Cover Plate/Re-
tainer Assembly cannot be engaged
sufficiently to contact the ceiling, the
Sprinkler Fitting must be repositioned.
TFP260
Page 3 of 4
FIGURE 2
SERIES RFII CONCEALED SPRINKLER
INSTALLATION DIMENSIONS
A: 3-1/4" (82,6 mm)
C: 2-3/8" to 2-5/8" (60,3 to 66,7 mm)
B: 3/16" (4,8 mm)
D: 1-3/4" to 2-1/4" (44,5 to 57,2 mm)
COVER PLATE
PROFILE DEPTH
DIMENSION B
1/2" (12,7 mm)
THREADED
ADJUSTMENT
D
SPRINKLER
FACE OF
FITTING
RETAINER
ASSEMBLY
MANUFACTURER
3/32" (2,4 mm)
PRESET GAP
FACE OF CEILING,
RETAINING RING
MOUNTING
SURFACE
SUPPORT CUP
SPRINKLER
ASSEMBLY
DIAMETER
CLEARANCE HOLE
DEFLECTOR
IN DROPPED
POSITION
(4,8 to 17,5 mm)
3/16" to 11/16"
REFERENCE
COVER PLATE
COVER PLATE
DIAMETER
DIMENSION A
DIMENSION C
FIGURE 3
RFII SPRINKLER WRENCH
FRAME
ARM
SUPPORT
CUP
7/8" (23 mm)
SQUARE
1/2" SOCKET
ACCEPTS
DRIVE
ARROWS WITH
ALIGN
FRAME ARMS
FIGURE 4
DISPOSABLE PROTECTIVE CAP
CLEARANCE
HOLE
OBSOLETE


