background image


Instruction Sheet


408-78172  


Rev. A 

 5 of 8 


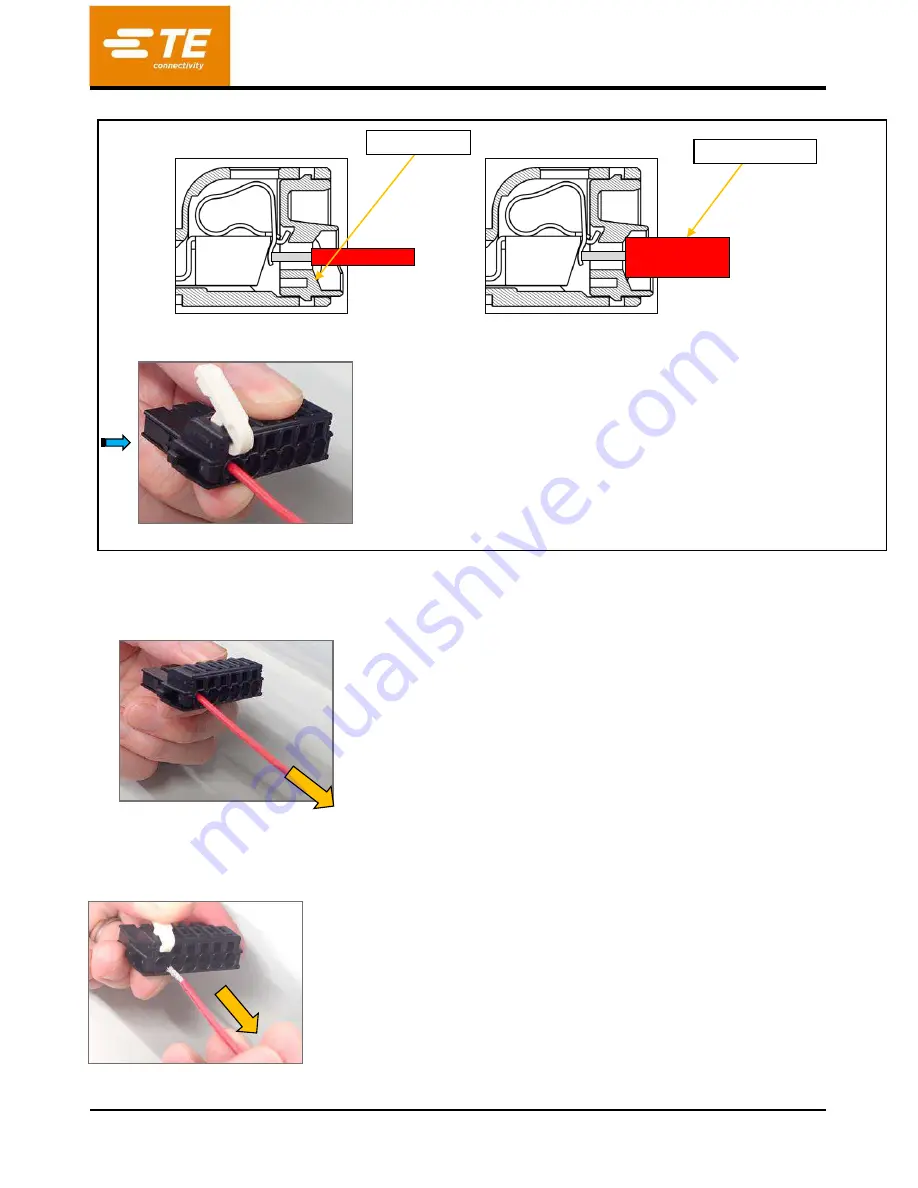
 Cable insulation Diameter < 2.4mm 


Cable insulation Diameter 

 2.4mm


  Completed 

 
Fig.4 

cable connection (End)


3-3 Confirmation for cable connection (Fig.5) 

Pull the cable softly and confirm that cable does not come off. (Do not pull strongly)


Fig.5 

Confirmation


3-4 Cable extraction (Fig.6)  

Push the opener until 

cable guide hole opens to the required size.

 Extract the cable.  


Fig.6 Extract cable 
 

Guiding Taper 

Cable Insulation 

Summary of Contents for D2950

Page 1: ...LOC B 1 Introduction This Instruction Sheet describes the handling method of the D2950 field installable spring clamp connector Receptacle Assembly and Header Assembly Please refer to following Product Specification for a detailed product performance D2950 FIELD INSTLLABLE SPRING CLAMP CONNECTOR Product Specification 108 140221 2 Composition Dynamic D2950 is composed of the Receptacle Assembly and...

Page 2: ...Instruction Sheet 408 78172 Rev A 2 of 8 Receptacle Assembly Header Assembly Fig 1 Receptacle Assembly and Header Assembly Header Contact Retention Leg Date Code Circuit Mark ...

Page 3: ...m Fig3 If there is twist bend or feazing Please correct them After correcting check strip length If there is excessive deformation do not use the cable Check the cut surface of conductor and insulation are flat AWG Area of conductor mm2 AWG22 0 32 AWG20 0 52 AWG18 0 82 AWG16 1 3 AWG14 2 1 Insulation Diameter 3 8mm Max Fig 2 Applicable Cable Fig 3 Strip Length 8 0 5 ...

Page 4: ...2347681 1 and Receptacle Assembly About 30N is enough for AWG14 cable Insert the cable to cable insertion hole Fig 4 1 Cable insulation Diameter 2 4mm The cable should be inserted until aligning cable insulation and end of guiding taper straight line 2 Cable insulation Diameter 2 4mm The cable should be inserted until cable insulation contact the guiding taper Opener 2347681 1 Set hook Set hinge P...

Page 5: ...le connection End 3 3 Confirmation for cable connection Fig 5 Pull the cable softly and confirm that cable does not come off Do not pull strongly Fig 5 Confirmation 3 4 Cable extraction Fig 6 Push the opener until cable guide hole opens to the required size Extract the cable Fig 6 Extract cable Guiding Taper Cable Insulation ...

Page 6: ...le type PCB is recommended Refer to Drawing for layout and thickness 4 2 Mount Header Assembly to PCB Insert straight until the Header Assembly is fixed to PCB by retention leg Fig 7 Confirm that there is no float and not tilt Fig 8 Set to PCB Push straightly Completed Fig 7 Mount to PCB Fig 8 Bad example PCB Retention Leg Float and Tilt ...

Page 7: ...g Receptacle Assembly and Header Assembly Fig 9 Insert Receptacle Assembly straightly to Header Assembly until click sound is heard Do not touch the lock lever when inserting Insert straightly Completed Fig 9 Mating 6 Unmating Receptacle Assembly and Header Assembly Fig 10 Unmate connector after lock lever is depressed completely If unmating connector without lock lever is depressed completely the...

Page 8: ... fix the position 100 mm from the Receptacle Assembly Fig 11 7 2 Avoid mounting to which cable is pulled in excess 7 3 Don t use Opener for D3900 and 3950 1981045 1 There is possibility of damage the Receptacle Assembly Opener Part Number for Dynamic D2950 2347681 1 Fig 11 Fix position of cable 100mm ...

Reviews: