Twin Star Home ODP30667-TT401 Manual Download Page 4

4

B673

OPERATION/UTILISATION/OPERACIÓN
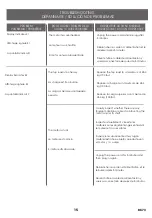
Lock Button:

1. Press this button to lock the touch-screen.  This will prevent accidentally engaging the controls after the desired height has 

been set. Press the button again to unlock the touch-screen.

2. Press and hold this button, then plug in the power cord until the screen light to reset to the default setting.
3. To change between INCHES and CM press and hold this Lock button for 5 seconds.

Silent Mode:

All operations are performed under this default mode.

Display:

1. The display will indicate the height of the desk (inches). After five seconds without input, the digital readout will automatically 

fade away.

2. When the desk has reached the lowest setting, the display will indicate “bot”.
3. When the desk has reached the highest setting, the display will indicate “top”.
4. Touch and hold one of the memory buttons (H1-H4) for 3 seconds when the desk is at the desired height in order to save it as a 

memory preset.  The table will automatically return to the set height when the corresponding memory button is touched.

5. Touch and hold the 

 button to lower the desk and release when it arrives at the desired height. The desk is at the lowest 

height setting when “bot” is displayed. 

6. Touch and hold the 

 button to raise the desk and release when it arrives at the desired height.  The desk is at the highest 

height setting when “top” is displayed.

USB Ports:

There are 3 USB ports suitable for charging devices with 2.4A charging power requirement (or lower). The USB ports will pause 
charging temporarily when the height of the desk is being adjusted and the motor is in use.

Bouton de verrouillage

1. Appuyez sur ce bouton pour verrouiller l’écran tactile. Ceci évitera d’activer accidentellement les contrôles après le réglage 

de la hauteur désirée. Appuyez sur ce bouton de nouveau pour déverrouiller l’écran tactile.

2. Maintenez ce bouton enfoncé,puis branchez le cordon d’alimentation jusqu’à ce que l’écran s’éteigne pour revenir au 

réglage par défaut.

3. Pour passer des PO aux CM, appuyez sur ce bouton de verrouillage pendant 5 secondes.

Mode silencieux 

Toutes les opérations ont lieu avec ce mode par défaut activé.

Affichage

Control Panel/Panneau de commande/Panel de control

3 USB Ports(2.4A for 

each port)
Trois ports USB (2,4 A 

pourchaque port)
3 puertos USB(2.4 A 

para cada puerto)

Lock Button
Bouton de verrouillage 
Botón de bloqueo

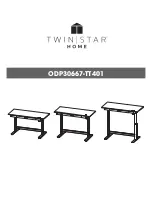
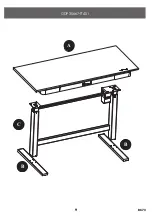
Summary of Contents for ODP30667-TT401

Page 1: ...ODP30667 TT401...

Page 2: ...e priv e et nous ne communiquerons jamais vos informations personnelles d autres organisations Les informations que vous fournissez sont utilis es uniquement pour vous offrir des services en lien avec...

Page 3: ...s pr cautions de base devraient toujours tre respect es afin de r duire les risques d incendie les chocs lectriques et les blessures humaines comme suit Avertissement Assurer que l unit est d sactiv e...

Page 4: ...to lower the desk and release when it arrives at the desired height The desk is at the lowest height setting when bot is displayed 6 Touch and hold the button to raise the desk and release when it ar...

Page 5: ...n nuevamente para desbloquear la pantalla t ctil 2 Mantenga presionado este bot n luego enchufe el cable de alimentaci n hasta que la pantalla se encienda para restablecer la configuraci n predetermin...

Page 6: ...televisi n lo cual puede ser determinado cuando se apaga y enciende este aparato se recomienda al usuario que intente corregir la interferencia con alguna s de las siguientes medidas Reorientar o reub...

Page 7: ...ertaines tapes sont plus faciles effectuer avec l aide MISE EN GARDE Avant l assemblage et ou l installation vous devez d baller minutieusement toutes les pi ces Localisez et mettez de c t le jeu de q...

Page 8: ...8 B673 MAXIMUM LOAD 6 9 kg 15 2 lbs CHARGE MAXIMALE DE 6 9 kg 15 2 lbs CARGA M XIMA 6 9 kg 15 2 lbs MAXIMUM LOAD 45 4 kg 100 lbs CHARGE MAXIMALE DE 45 4 kg 100 lbs CARGA M XIMA 45 4 kg 100 lbs...

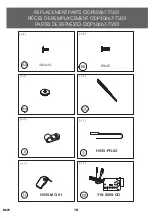
Page 9: ...9 B673 ODP30667 TT401 A C B B...

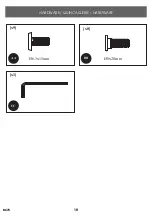
Page 10: ...10 B673 HARDWARE QUINCAILLERIE HARDWARE AA CC BB 6 3x15mm 8x20mm x9 x1 x8...

Page 11: ...remove the dampening pads Attention Il est interdit de retirer les tampons de mouillage Atenci n No quite las almohadillas de amortiguamiento DO NOT REMOVE PADS NO QUITE LAS ALMOHADILLAS NE RETIREZ P...

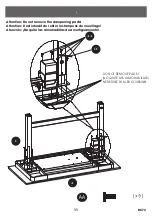
Page 12: ...12 B673 2 BB B B CC...

Page 13: ...an angle Pour pr venir le stress ou le dommage qui pourrait tre caus aux supports de connexion assurez vous que tous les c bles sont branch s et ne sont pas en angle Para evitar la tensi n o el da o s...

Page 14: ...14 B673 4...

Page 15: ...on d alimentation et le r ins rer apr s 5 minutes Desenchufe el cable de alimentaci n y vuelva a conectarlo despu s de 5 minutos Reduce the top load to a maximum of 45 4 kg 100 lbs R duire la charge u...

Page 16: ...s el ctricas sueltas entre el cable de alimentaci n al adaptador o desde el adaptador al motor Ensure that the power adapter is the same as supplied with the desk according to the specifications descr...

Page 17: ...ur l ameublement REMARQUE Cuidado Mantenimiento Use un pa o suave y limpio que no raye la superficie cuando elimine el polvo El uso de cera para muebles no es necesario Si elige utilizar la cera reali...

Page 18: ...18 B673 REPLACEMENT PARTS ODP30667 TT401 PI CES DE REMPLACEMENT ODP30667 TT401 PARTES DE REPUESTO ODP30667 TT401 H555 PO 02 Y18 S269 CO H555 MO 01...

Page 19: ...19 B673 REPLACEMENT PARTS ODP30667 TT401 PI CES DE REMPLACEMENT ODP30667 TT401 PARTES DE REPUESTO ODP30667 TT401 Y18 S269 P32...

Page 20: ...ations concernant les services et de pr cieux conseils Nous accordons de l importance votre vie priv e et nous ne communiquerons jamais vos informations personnelles d autres organisations Les informa...

Reviews: