background image


6

6.0 INSTALLATION 

OF 

MOUNTING COMPONENTS 

 
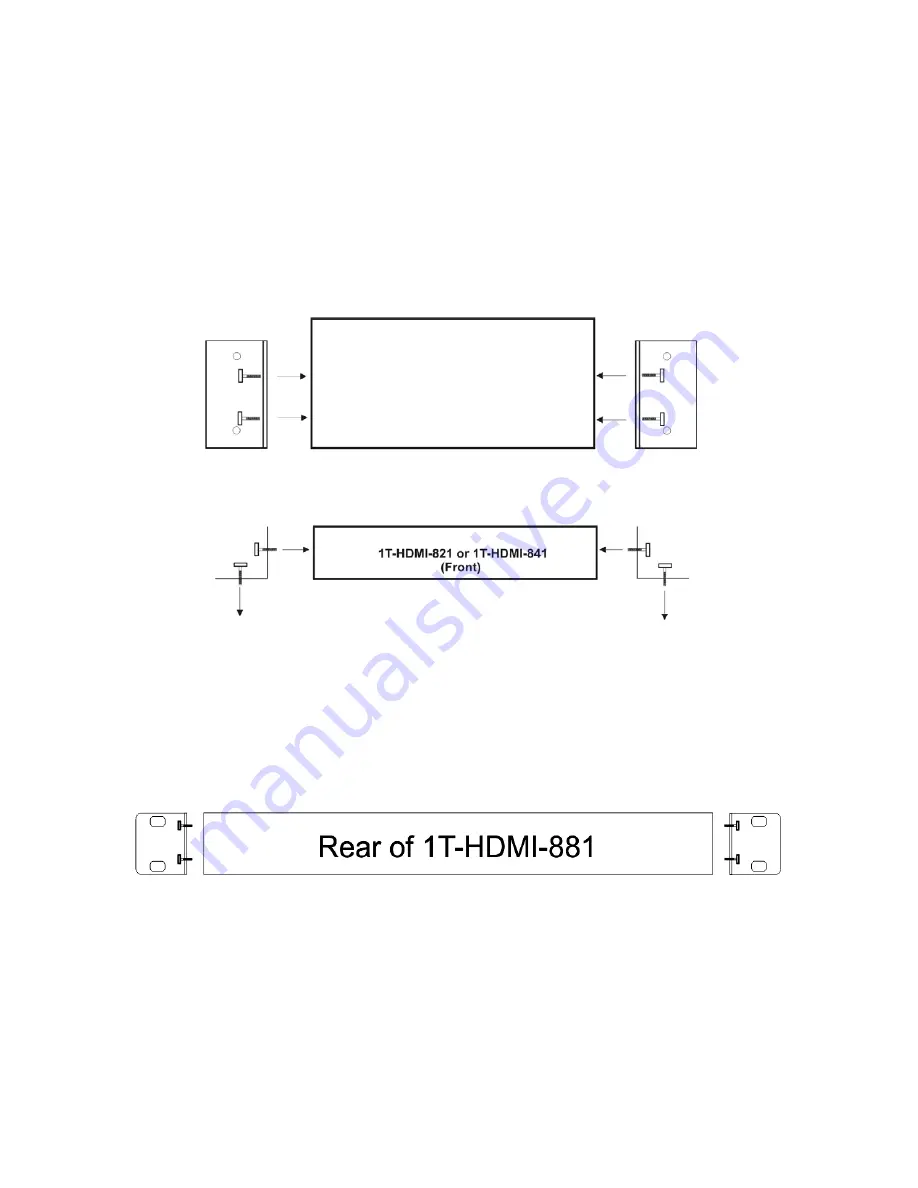
The 1T-HDMI-821 and 1T-HDMI-841 switchers can be mounted on any flat 
surface and the 1T-HDMI-881 switcher can be mounted in a standard 19” rack. 
 

Mounting the 1T-HDMI-821 or 1T-HDMI-841 Switchers 

 
Attach the two “L” shaped mounting brackets to the product using the furnished 
hardware and then attach the combined assembly to the desired location.  


Note that the holes on the brackets are offset to allow easier mounting to the flat 
surface after you’ve attached the brackets to the switcher. 
 

Mounting the 1T-HDMI-881 Switcher 

 
To mount the rack mounting brackets to the 1T-HDMI-881 switcher, merely 
attach the brackets to the 1T-HDMI-881 and then attach the combined assembly 
to the equipment rack using the furnished hardware. 


         Top View 

Summary of Contents for 1T-HDMI-821

Page 1: ...Instruction Manual 1T HDMI 821 1T HDMI 841 and 1T HDMI 881 HDMI Switchers...

Page 2: ......

Page 3: ...0 Checking Package Contents 4 4 0 Connecting The Hardware 4 5 0 Operating The Unit 5 6 0 Installation of Mounting Components 6 7 0 Troubleshooting 7 8 0 Limited Warranty 7 9 0 Regulatory Compliance 8...

Page 4: ...requirements and that it is installed correctly All rights reserved No parts of this manual may be reproduced or transmitted by any form or means electronic or mechanical including photocopying recor...

Page 5: ...perating Humidity 10 to 90 Non Condensing Storage Temperature 25 C to 95 C 13 to 203 F Storage Humidity 10 to 90 Non Condensing Certification HDMI Version 1 2 Silicon Image ATC Remote Control Serial I...

Page 6: ...rence when you call 4 0 CONNECTING THE HARDWARE The physical sizes of the three units vary according to number of inputs For reference purposes the units are depicted below in relative scale Please st...

Page 7: ...flexibility an Infrared remote control is also provided In the case of the remote there are separate buttons for the power and input sources Point the remote control at the unit and press the power bu...

Page 8: ...product using the furnished hardware and then attach the combined assembly to the desired location Note that the holes on the brackets are offset to allow easier mounting to the flat surface after you...

Page 9: ...V One via our support website http tvone crmdesk com Create a technical support request on the site and our support team will respond within a short period of time 8 0 LIMITED WARRANTY LIMITED WARRANT...

Page 10: ...responsible or liable for any damage arising from the use of such defective products whether such damages are direct indirect consequential or otherwise and whether such damages are incurred by the re...

Page 11: ...1 Commands Command Code Description 0x01 Port 1 On 0x02 Port 2 On 0x03 Port 3 On 0x04 Port 4 On 0x05 Power On Off 8x1 Commands Command Code Description 0x01 Port 1 On 0x02 Port 2 On 0x03 Port 3 On 0x0...

Page 12: ...n America 6991 NW 82 Avenue 8 Miami FL 33166 USA Tel 305 396 6275 Fax 305 418 9306 sales latinoamerica tvone com www tvonela com TV One Mercosur Honduras 5849 2nd Floor Office C C1414BNI Capital Feder...

Reviews: