Professional Stainless Steel Grill:
30”& 38” Models
USE AND CARE MANUAL
FOR OUTDOOR USE ONLY
MADE IN THE USA
Tuscany
TM
“Value at its Finest”
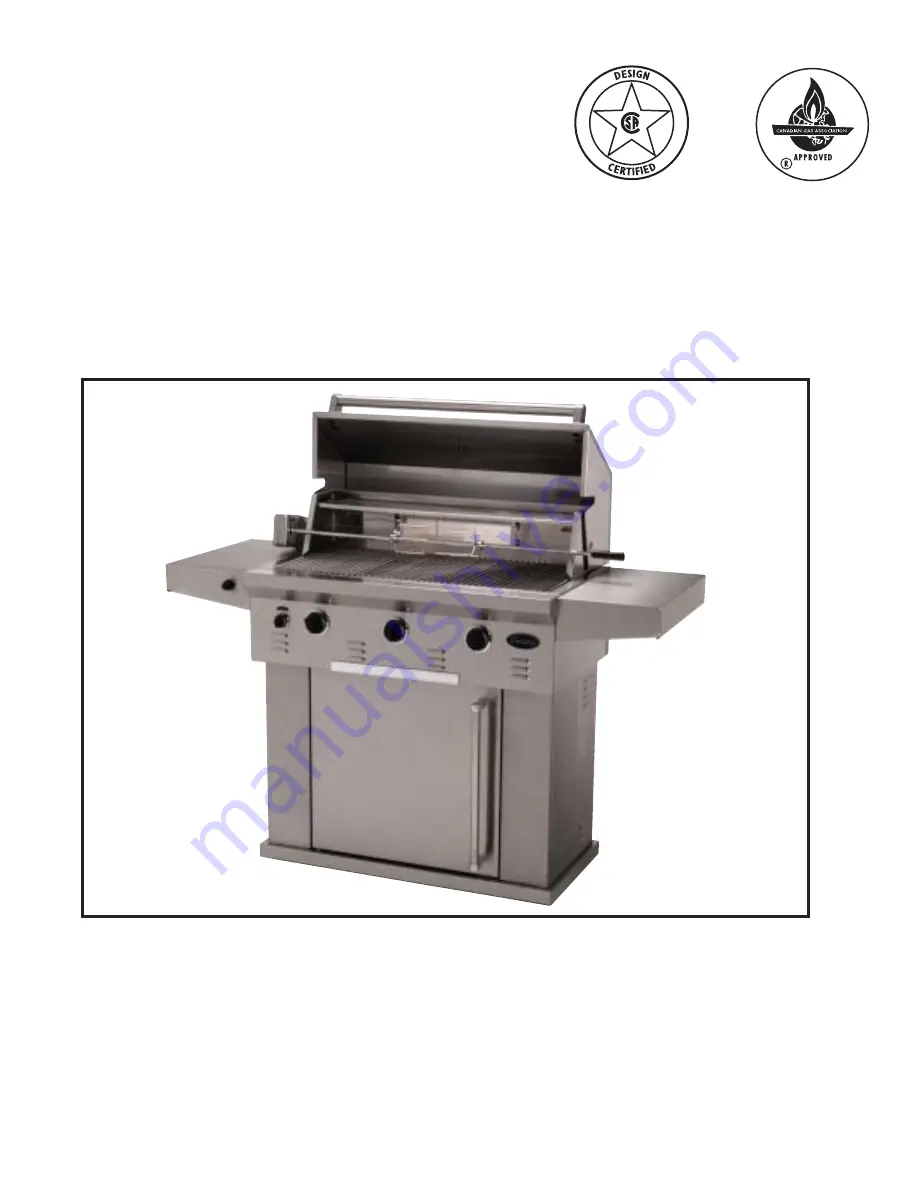
38” Grill (TGR38 shown with optional equipment)
4/2002
Page 1: ...Professional Stainless Steel Grill 30 38 Models USE AND CARE MANUAL FOR OUTDOOR USE ONLY MADE IN THE USA TuscanyTM Value at its Finest 38 Grill TGR38 shown with optional equipment 4 2002...
Page 2: ...ections before operating the appliance Tuscany Gas Grills have all the features consumers are asking for such as 304 stainless steel construction electronic ignitors convection cooking vents optional...
Page 3: ...LIST 4 INSTALLATION ASSEMBLY 5 8 BUILT IN INSTALLATION 9 11 GAS REQUIREMENTS 12 13 LEAK TESTING 14 USING THE GRILL 15 17 Lighting the Grill 16 Rotisserie Usage 17 18 CARE MAINTENANCE 19 TROUBLE SHOOTI...
Page 4: ...lights the burner you intend on using FOR YOUR SAFETY If you smell gas 1 Shut off gas to the appliance 2 Extinguish any open flames 3 Open lid 4 If odor continues immediately call your gas supplier TE...
Page 5: ...d back burner optional 9 Control knobs main burners 3 Drip grease tray 10 Control knob infrared back burner optional 4 Rotisserie motor assembly optional 11 Cart optional 5 Roll top grill hood 12 Elec...
Page 6: ...2 Hex head screws Grill Parts 1 Stainless steel grill head 1 Stainless steel side shelves 1 Electronic ignitor 1 3 Piece flavor grid on 38 models 1 1 Piece flavor grid on 30 models 3 Stainless steel c...
Page 7: ...ng Grill to cart without a door if a door is included skip to installation instructions on following page 1 With the grill on its back loosen all 4 bolts on the bottom side of the grill See Fig 3 2 Ha...
Page 8: ...e the door opening Make sure the 4 bolt heads fall through the large opening of the key hole slots in the top of the cart Slide the grill head backward so the bolts are resting in the small opening of...
Page 9: ...3 Push the threaded section of the ignitor into the U shaped cut out of the ignitor mounting bracket See Fig 11 4 Insert the threaded section of the ignitor through the hole in either shelf and secure...
Page 10: ...Fig 15 3 Attach the ignitor wire s coming out of the left side of the grill to the ignitor terminal s See Fig 16 Note It does not matter which wire goes to which terminal Interior parts installation 3...
Page 11: ...e To ensure a perfect fit we strongly recommend that you have all components on hand prior to final construction Clearance to Non Combustible Construction For your safety a minimum of 3 clearance from...
Page 12: ...clearance of 12 from the back must be maintained between the grill and any combustible construction such as wood siding of a residence 3 minimum for non combustible construction 3 5 3 5 Grill Maximum...
Page 13: ...rdware store LEFT HAND installation Reverse the above drawing so the gas cutout is located on the right hand side of the side burner cutout Additional items you will need to purchase at your local har...
Page 14: ...PSIG 3 5 kPa This Grill must be isolated from the gas supply piping system by closing its individual manual shut off valve during any pressure testing of the gas supply piping system at test pressure...
Page 15: ...L P tank or cylinder with a damaged valve The L P cylinder must be provided with a shut off valve terminating in an L P gas supply cylinder outlet spec ified as applicable for connection No 510 in th...
Page 16: ...the fuel supply assembly If no soap bubbles appear the grill is ok to use If bubbles form at the connections a leak is detected If a leak is detected immediately turn off the gas supply tighten any l...
Page 17: ...ll above and below the cooking surface to adjacent vertical combustible construction Clearance to non combustible construction A minimum of 3 clearance from the back of the grill to non combustible co...
Page 18: ...not light in 4 seconds turn the knob to OFF and wait 5 minutes before try ing again Repeat above steps to light remaining burners See Fig 21 Match Lighting If by chance the electronic ignitor does no...
Page 19: ...the Rotisserie Burner With the rotisserie motor in place and plugged into an electrical outlet it is now ready to operate After installing rotis rod handle slide one of the meat forks onto the rod pro...
Page 20: ...tes before trying again Once lit turn the control knob to the desired setting See Fig 23 If the ignitor does not function the burner can be lit by holding a lit match to the burner while the control k...
Page 21: ...f the grill is allowed to cool down cleaning the grates will be easier if removed from the grill and cleaned with a mild detergent Stainless Steel The grill is made from a non rusting stainless steel...
Page 22: ...one of the Grill control knobs is on high for at least 4 seconds while pushing ignitor button Check tank fuel level Check for loose wire connections Remove the cooking grates and flavor grids Push ign...
Page 23: ...drip tray Check the burner inlet for obstructions Grill may be in a windy area Move to a less windy area if possible Loosen the four bolts that attach grill head to cart Slide grill head either to th...
Page 24: ...warranty registration card is not a condition for warranty coverage SERVICE AND LIMITED WARRANTY If the Tuscany Grill does not operate properly first thoroughly carry out the instructions provided wi...