


WARNING
CAUTION
CAUTION
CAUTION
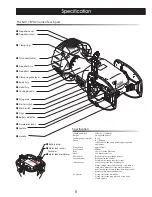
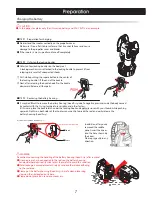
●
Altering the battery connector plug in any way is very dangerous and should not
be done. Any alterations will cause unexpected trouble.
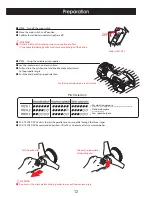
●
The battery is quite heavy, so be careful not get your fingers pinched or to
drop it onto your feet.
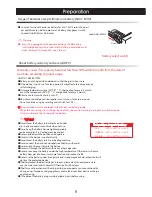
●
Hold and squeeze the release levers on both sides of the battery connector
plug and pull upwards.
●
Hold the grip of the battery firmly and lift it away from the body.
Place in on a clean and dry flat stable surface.
●
You must use the correct exclusive charger suitable for the type of battery being used.
Please refer to the handling manual that is attached to each product about the battery.
●
The connector is polarized, so when connecting, insert in a direction so it will smoothly enter the connector
receptor.
CAUTION
●
Please do not set the battery into the scooter for at least 30 minutes after completing the charge.
Please do not use if the battery become high temperature.
●
The red is changed into green as the charge progresses.
●
A green lamp shows when the battery connector is not
connected (open circuit) but the power is on.
The color of LED2 will indicate when charging is completed.
LED1:
Power ON: Red
LED2:
Charging : Red
Remove the connector
Finished : Green
Charging : Red light
Finished : Green light
The battery charger automatically changes into trickle
charge mode after charging is complete however please
avoid leaving the charger connected after the charge
lamp becomes green.
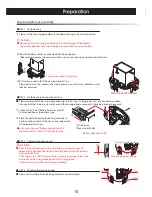
①
At first, turn the power off and remove the
AC plug from the domestic outlet.
②
Next, remove the plug of charger.
■
STEP4
Releasing the battery connector plug.
■
STEP5
Removal of the battery.
■
STEP6
Connecting the exclusive charger to begin recharging.
■
STEP7
Disconnect the charger when charging is completed.
■
STEP8
Charge completion.
Charging time of the charger
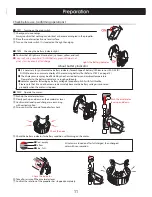
①
First, connect the AC (alternating current) plug of the charger to a domestic outlet.
②
Next, connect the socket from the battery to
the plug on the charger.
The charging will automatically start upon
connection after the power is turned on
at the domestic outlet.
12
DC29.2V
AC100~240V
FUSE
LED2 LED1
110V
Inlet voltage selector
220V
110V
↑
↓
●
Set the inlet voltage selector to AC voltage of your region.
90~132V: Set to110V position / 200~264V: Set to 220V position
8


