background image

Copyright © 2022 ves-artex.com| All Rights Reserved  

V01-December 2020     

55” BELT DRIVE 

ECV 

STORM FAN 

| Installation Manual


pg. 9


2.

Attach the back chains to the eye bolts in the 
front corners of the fan


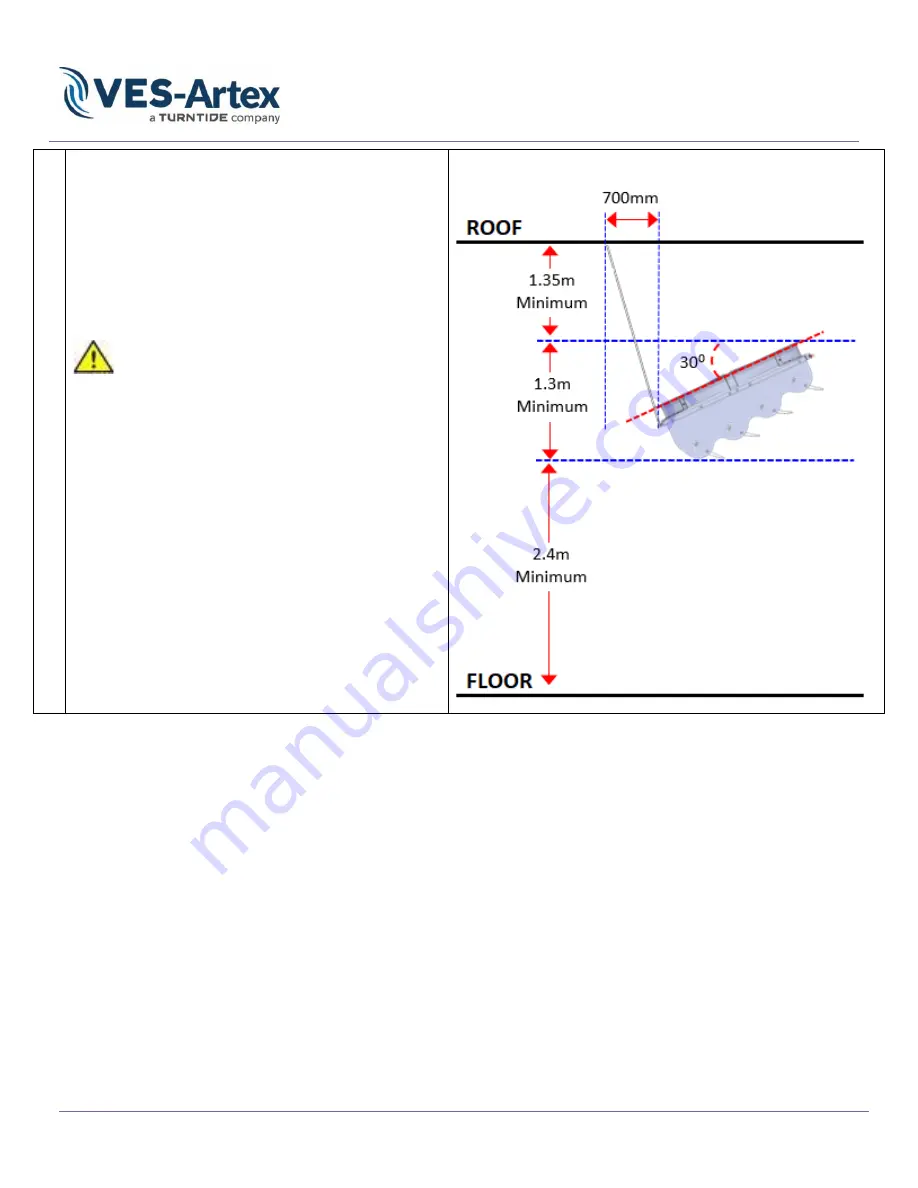
NOTE: 

The minimum


height from the ground is 

2.4m. 
If there is equipment that will pass 

under the fan, adjust the height of the 
fan so that the fan is higher than the 
equipment


  before securing the fans to the roof, 

ensure the purlin/rafter is strong 

enough to support the weight of the fan, 

each fan weights approximately 170KG. 


Rear Chains


Summary of Contents for VES-Artex Storm

Page 1: ...55 Belt Drive ECV Storm Fan Installation Manual ves artex com 1 888 622 2999 SAVE THIS MANUAL FOR FUTURE REFERENCE PIG 024 55_ECV_Storm 01 ...

Page 2: ... material in this document before proceeding If you have any questions or concerns with the information that is presented please reach out to your VES Artex Sales Representative or our main office at the information below When following these instructions please note that you must also follow and adhere to all local and national safety codes electrical codes and building codes Those codes must be ...

Page 3: ... 1 The ECV Storm Fan comes in 5 separate pieces NOTE When assembling the fan this process is easiest with two people one on the outside holding the screw head with a screwdriver and the inside person tightening the nut with a socket wrench or electric driver Take care not to over tighten the bolts which will damage the fiberglass Refer to Appendix One 2 Attach 8mm 3 8 chain to each of the eye bolt...

Page 4: ...g line up the 5 pre drilled holes Number Description 1 Screw M6 x 25 2 Washer 3 Nut 5 Install the louver assemblies onto the side plates Starting at the back of the fan hold the first louver in place with the pointed end of the louver facing down toward the ground Place each bolt through the bottom hole of the bracket and into the middle of the louver Only hand tighten Place second bolt into curve...

Page 5: ...louvers to the correct position angles below taken when fan is hung at 30 degrees from horizontal see Hanging Procedure step 1 Louver to will be at 35 from horizontal Louvers to will be at 40 from horizontal NOTE the angle of deflection is measured across the two bolt heads Louver Position for Louver to Louver Position for Louver to ...

Page 6: ...d location of the corners of the fan This will give you an approximate 2 4m 8 square between the chains NOTE This will vary some based on the spacing of the purlins or rafter 2 Measure to determine best locations for the chains and mark the rafters or purlins NOTE Chain must be mounted hung wider than the fan to avoid swaying motion minimum width 3m wider as hanging length increases Front to back ...

Page 7: ...2 Put an eye bolt in the purlin drill and secure eye bolts at each marked point Use a quick connect link to attach the chain to the eye hook Method 1 Method 2 4 Determine the chain drop lengths required to hang from the ceiling to the fan at the required height NOTE Fan is to be hung at a 30 degree angle so the chain length will be longer at the back by approx 0 75 m 1 0 m 2 6 3 3 compared to the ...

Page 8: ...corners of the fan Lift the fan s up to the required location using a scissor lift NOTE The minimum height from the ground is 2 4m If there is equipment that will pass under the fan adjust the height of the fan so that the fan is higher than the equipment before securing the fans to the roof ensure the purlin rafter is strong enough to support the weight of the fan each fan weights approximately 1...

Page 9: ...n the front corners of the fan NOTE The minimum height from the ground is 2 4m If there is equipment that will pass under the fan adjust the height of the fan so that the fan is higher than the equipment before securing the fans to the roof ensure the purlin rafter is strong enough to support the weight of the fan each fan weights approximately 170KG Rear Chains ...

Page 10: ... lift until the chains are taking the weight of the fan check the fan is hung correctly Check that 1 The fan is level 0o side to side 2 The fan is sitting on a 30 degree angle from horizontal the height difference between the front and the back of the fan should be around 850mm Adjust the chains to correct any differences Fan is 30 degrees ...

Page 11: ... Using a hand held air speed meter measure the air speed 1 2 m above the ground at 6m and 9m from the fan Minimum Target Air Speed should be Distance from Fan Minimum Air Speed 6 0 m 2 5 m s 9 0 m 2 5 m s Adjust the louvers accordingly 2 Once the louvers are set in correct position tighten the bolts NOTE Do Not use power tools to tighten the bolts 6m 9m 1 2m 0m ...

Page 12: ...mber 2020 55 BELT DRIVE ECV STORM FAN Installation Manual pg 12 Appendix 1 Parts List Per Fan Description Diagram QTY 55 ECV Storm fan assembly ships with motor and blade attached 1 Louver 4 Side plates 2 left right Hardware kit 1 Box Chain 8mm Obtain Localy ...

Page 13: ...m All Rights Reserved V01 December 2020 55 BELT DRIVE ECV STORM FAN Installation Manual pg 13 Appendix 2 Tools and Equipment List Wrench and socket set Spanner s wrench Tape measure 8M Measuring Tape Screwdriver set Spirit Level ...

Page 14: ...al pg 14 Fork lift Cherry Picker Scissor Lift or other device for lifting the fans into place Chains for lifting the fans must be able to hold a total of 400 kgs Contact Please contact VES Artex with any questions regarding your ECV Storm Fan installation Phone 1 888 622 2999 info ves artex com www ves artex com ...

Reviews: