background image


SOLENOID CONNECTION 


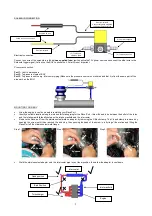
Electrical connection 

 
Connect one wire of the solenoid to a fused (

use supplied fuse

) ignition activated 12V power source and connect the other wire to the 

Solenoid trigger signal (Yellow) on the BOV controller unit. Polarity is not important. 
 

Pressure connection 

 
Port 1:

 Vent to atmosphere.  

Port 2:

 To pressure nipple of BOV.  

Port 3:

 To pressure source e.g. Intercooler piping (Make sure the pressure source is not shared and that it is from the same part of the 

pipe work as the BOV) 


MOUNTING YOUR BOV 


Allow the engine to cool down before installing your Race Port 


Identify a suitable location along the intercooler/intake piping for the Race Port 

– this will need to be between the outlet of the turbo 

and the intake manifold ideally between the intake manifold and the intercooler 


Remove the Race port from the stainless steel weld on adapter by removing the V-Band clamp. The V-band clamp is removed by 
opening the screw until it has reached the end stop, then pushing the head of the screw in a “syringe” like motion and lifting the 
Race Port off the stainless steel weld flange. 

 
Step 1:                                                               Step 2:                                                                Step 3:


Weld the stainless steel adapter onto the intercooler pipe in your ideal position, then allow the adapter to cool down 


Wire from solenoid 

(1) Vent to atmosphere 

Supplied 5A fuse 

Wire from solenoid: 

Connect to Ignition activated 

12V Power source via fuse 


(3) To pressure source 

(2) To pressure 

nipple on BOV 

Bolt head 

Squeeze 

Lift off 

Pull down 

Inlet manifold 

Turbocharger 

Intercooler 

Engine 

Good position 

Bad Position 

Yellow wire from control unit 

Summary of Contents for BOV Controller Kit

Page 1: ...ing all pressure lines 1 8 way wiring loom Connects BOV Controller to devices and power FUNCTIONALITY The BOV controller works by detecting a negative voltage change in throttle position It then energises the solenoid to vent all of the air out of the BOV cap causing a pressure differential between the piston of the BOV and the cap which will vent pressure from the intake system There are 2 parame...

Page 2: ...to be between the outlet of the turbo and the intake manifold ideally between the intake manifold and the intercooler Remove the Race port from the stainless steel weld on adapter by removing the V Band clamp The V band clamp is removed by opening the screw until it has reached the end stop then pushing the head of the screw in a syringe like motion and lifting the Race Port off the stainless stee...

Page 3: ...vity setting determines how the BOV controller reacts to throttle movement The controller will only activate on negative changes in throttle The higher the sensitivity setting the lower the negative change in throttle movement needs to be before the solenoid will activate the BOV e g a change from 4V to 3 5V will not activate the valve but from 4V to 3V will activate the valve OPTIONAL IF SWITCHED...

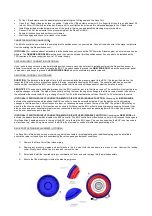
Page 4: ...reaches the diaphragm line up the notches in the cap Figure 1 with the cut outs Figure 2 in the lower diaphragm housing Carefully push the cap down till the cap is home on the lower diaphragm housing Reinstall the locking collar Make sure that the cap is clamped down while tightening the collar ...

Page 5: ...ying of the Services again or the payment of the cost of having the Services supplied again 1 2 You will only be entitled to the benefit of the warranty set out in this pledge if You have not wholly or partially caused or contributed to the defect to the Goods by the misuse of the Goods or the failure to use the Goods in accordance with any specifications or instructions applicable to the Goods 1 ...

Reviews: