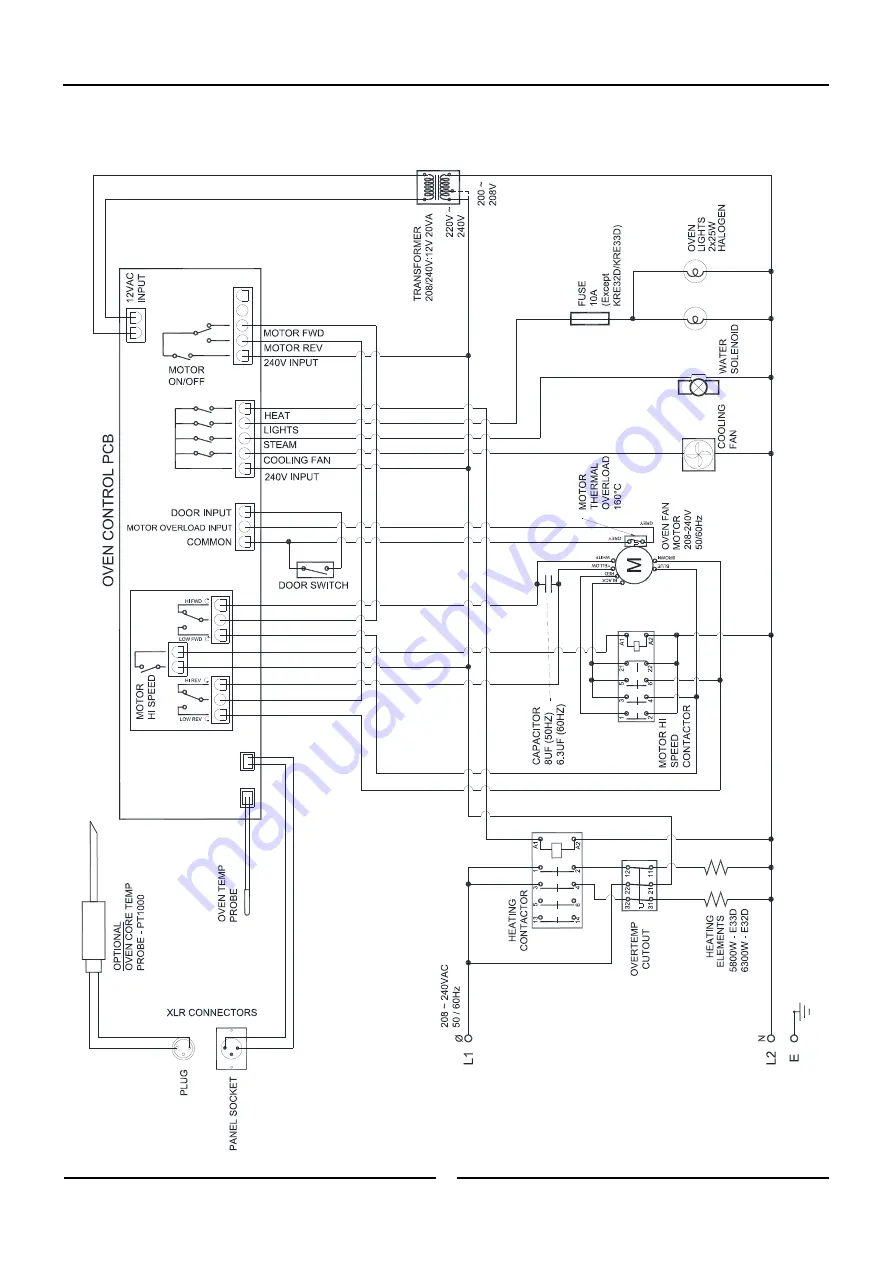
Electrical Schematics
21
Electrical Schematic E33D5 Turbofan Oven
Page 1: ...237468 1 Installation and Operation Manual E33D5 2 Speed Fan Moisture Mode Multi Stage Cooking Optional Core Temp Probe 30DSERIES...
Page 2: ...s tel 1800 337 963 Customer Service tel 1800 335 315 fax 1800 350 281 CANADA Serve Canada Web www servecanada com E Mail info servecanada com Sales tel 800 551 8795 Toll Free Service tel 800 263 1455...
Page 3: ...Specifications Positioning and Levelling of Oven Initial Start Up Commissioning Operation 6 Operation Guide Cooking in Manual Mode Cooking in Manual Mode using Core Temp Probe Cooking in Program Mode...
Page 4: ...URBOFAN dealer on any matter concern ing this oven please have the information provided opposite readily available Caution Warning Model Number Serial Number Dealer Service Provider Date Installed Dat...
Page 5: ...60Hz 6 0kW Oven Tray Details Tray Capacity 5 Shelf 13 x 18 Bun Pan 12 x 20 Steam Pan 5 Shelf 1 1 GN Pan Tray Spacing 31 3 85mm 85mm 31 3 Water Connection Max Water Pressure 80psi 550kPa 80psi 550kPa C...
Page 6: ...re easily reachable for loading and unloading Clearances To ensure correct ventilation for the motor and controls the following minimum installation clearances are to be adhered to Top 200mm 8 Rear 50...
Page 7: ...nnector on the oven Max Inlet Pressure 80psi 550kPa 5 Turn On the water supply and check for leaks Recommended Water Specifications In order to prevent corrosion or scaling in the oven and water syste...
Page 8: ...n CP and set core probe temperature On Off Light Key and LED A dual function key Press On Off Light key once to turn the oven On When oven is turned On press On Off Light key to switch oven light On O...
Page 9: ...ature setting and display Cooking completion is then determined by the core temp probe reaching the set core probe temperature To enable Core Probe Cooking Mode plug in the Core Probe The Timer Displa...
Page 10: ...illuminate when fan low speed is selected 5 STARTING TIMER Press Timer Start Stop key to start timer operation LED will illuminate to indicate the timer is running Pressing Timer Start Stop key or ope...
Page 11: ...6 START CORE TEMP MODE COOKING Press Timer Start Stop key to start Core Temp Mode cooking Timer Start Stop LED is On during Core Temp Mode cooking Lower Display will alternately flash between and Core...
Page 12: ...into the food product press the Timer Start Stop key to resume the program 4 START PROGRAM Press Timer Start Stop key to start cooking program Pressing Timer Start Stop key when timer is operating wi...
Page 13: ...direction for 3 seconds will enter Temp Edit Mode where Temp knob can be used to temporarily adjust temperature for the current stage Controller will update the Temperature and exit Temp Edit Mode af...
Page 14: ...age of the program While alarm is sounding additional cooking time can be added to the stage that has just finished Rotate and hold Timer knob for 3 seconds to enter Timer Edit Mode and add time to th...
Page 15: ...below and overleaf All active stages and the first inactive stage are visible and can be accessed by rotating the Temp knob to scroll through the stages When editing a program for the first time only...
Page 16: ...re value Refer to the Cooking in Manual Mode with Core Probe Section for instructions on cooking with the Core Probe fitted Turn and hold timer knob until lower display shows CP Controller will step t...
Page 17: ...play shows Lower Display flashing with current alarm setting Rotate Timer knob to select desired alarm state which will be shown on the Lower Display ON Alarm sounds at completion of the cooking stage...
Page 18: ...ct value required Press Fan Lo key to confirm value Lower Display will stop flashing 4 EXITING THE OPERATOR SETTING MODE Press On Off Light key to return to Stand By Mode Operator Settings Setting Num...
Page 19: ...d on deposits or discoloration may require a good quality stainless steel cleaner Always apply cleaner when the oven is cold and rub in the direction of the grain Side Racks Removal Right Rack Fan Baf...
Page 20: ...k a Locate the top rear of the rack onto the locating peg at the top rear LH side of the oven b Locate the top front of the rack over the locating peg at the top front LH side of the oven RH Lower Mou...
Page 21: ...rgent c Dry the oven thoroughly with a soft dry cloth d Clean the oven regularly with a good quality oven cleaner Push Seal carefully into locating channel Door Glass Cleaning Ensure that the oven doo...
Page 22: ...oor seal Refer to Cleaning Section Oven light not illuminating Blown bulb one bulb not working Blown fuse both bulbs not working Call for service Call for service Uneven cooking Too high a temperature...
Page 23: ...Electrical Schematics 21 Electrical Schematic E33D5 Turbofan Oven...
Page 24: ...821 Overtemp Thermostat 355 C 670 F 231738 Contactor Heating 231742 Contactor Motor Speed 236109 Oven Element 5800W 230 240V 236110 Oven Element 5800W 208 220V 236264 Element Gasket included in Oven E...
Page 25: ......