


2 5
English
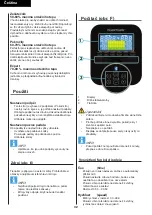
Programs
Quick start
-
Press START/ STOP key to start your workout
without any pre-set setting.
-
Use Dial UP/ DOWN to adjust resistant level during
workout.
End your workout
-
Press START/ STOP in workout mode to stop/
pause your workout.
To resume your workout press START/ STOP button
in pause mode.
-
Press and hold RESET key for over 2 seconds to
reset console. ( Active training data will be lost )
Manual mode
-
Use Dial UP/ DOWN key to select workout
program, choose MANUAL mode and press mode
key to enter next setting entry for manual mode
program.
-
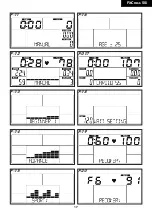
Use Dial UP/ DOWN key to pre-set training time (
fig. - F-07), and press M to confirm the setting.
-
After confirm you can set also:
distance ( fig. - F-08), Calories ( fig. - 09), and Pulse.
( fig. - 10)
NOTE
• When setting more than one goal, the training
will end at first achieved goal.
• Leave a goal blank and it will not be seen as a
pre-set limit.
-
Press START/ STOP key to start workout
-
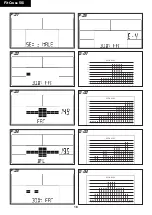
Use Dial UP/ DOWN key to adjust resistance level.
Load level is shown in LEVEL window ( fig. - F-11)
Beginner mode (fig. G1~G4)
-
Use Dial UP/ DOWN key to select workout
program, choose BEGINNER mode and press mode
key to enter next setting entry for BEGINNER mode
program.
-
Use Dial UP/ DOWN key to select BEGINNER
program 1~4 ( fig. - 12) and press MODE to
confirm.
-
Use Dial UP/ DOWN key to set time, press MODE
to confirm.
-
Press START/ STOP key to start workout
-
Use Dial UP/ DOWN key to adjust resistance level.
Load level is shown in LEVEL window ( fig. - 11)
Advance mode (fig. G5~G8)
-
Use Dial UP/ DOWN key to select workout
program, choose ADVANCE mode and press mode
key to enter next setting entry for ADVANCE mode
program.
-
Use Dial UP/ DOWN key to select ADVANCE
program 1~4 ( fig. - 13) and press MODE to
confirm.
-
Use Dial UP/ DOWN key to set time, press MODE
to confirm.
-
Press START/ STOP key to start workout
-
Use Dial UP/ DOWN key to adjust resistance level.
Load level is shown in LEVEL window ( fig. - 11)
Sporty mode (fig. G9~G12)
-
Use Dial UP/ DOWN key to select workout
program, choose SPORTY mode and press mode
key to enter next setting entry for SPORTY mode
program.
-
Use Dial UP/ DOWN key to select SPORTY program
1~4 ( fig. - 14) and press MODE to confirm.
-
Use Dial UP/ DOWN key to set time, press MODE
to confirm.
-
Press START/ STOP key to start workout
-
Use Dial UP/ DOWN key to adjust resistance level.
Load level is shown in LEVEL window ( fig. - 11)
Cardio mode.
-
Use Dial UP/ DOWN key to select workout
program, choose CARDIO mode and press mode
key to enter next setting entry for CARDIO mode
program.
-
Use Dial UP/ DOWN key to set age ( fig. - 15)
-
Use Dial UP/ DOWN key to select 55% ( fig. - 16),
75%, 90% or TAG (Target H.R. _ Default 100)
-
Use Dial UP/ DOWN key to set time, press MODE
to confirm.
-
Press START/ STOP key to start workout
-
Use RESET, to go back to main menu.
Watt Mode.
-
Use Dial UP/ DOWN key to select workout
program, choose WATT and press MODE / ENTER
key to enter next setting entry for WATT mode
program.
-
Use Dial UP/ DOWN to set WATT target. (default:
120Watt, Fig. F-18)
-
Use Dial UP/ DOWN key to set TIME.
-
Press START/ STOP key to start workout.
Use Dial UP/ DOW) to adjust target Watt level.
-
Press START/STOP key to pause workout.
-
Use RESET to go back to main menu.
Recovery
-
The RECOVERY key will only be valid if pulse is
detected.
-
TIME will show „0:60“ (seconds) and counts down
to 0.
-
Computer will show F1 to F6 after the countdown
to test heart rate recovery status. User can find the
heart rate recovery level based on the chart below.
-
Press RECOVERY key again to return to the
beginning.
Summary of Contents for FitCross 50i
Page 2: ......
Page 3: ...3 FitCross 50i A...
Page 4: ...4 FitCross 50i B...
Page 15: ...1 5 FitCross 50i E...
Page 16: ...1 6 FitCross 50i F 01 F 06 F 02 F 07 F 03 F 08 F 04 F 09 F 05 F 10...
Page 17: ...1 7 FitCross 50i F 11 F 16 F 12 F 017 F 13 F 18 F 14 F 19 F 15 F 20...
Page 39: ...3 9 FitCross 50i...