background image

MANUAL 

|

 FRONT HUB MIG70 


                      www.tune.de

As of May 2015 


             Page 7 of 9

6

Reassembling the hub

Needed tools:
•  TT08.1 

article No. WZ0200

•  TT08.5 

article No. WZ0218

•  TT08.9 

article No. WZ0204

•  plastic hammer

•  grease 

1

   fig.10

fig.9

TT08.1

TT08.5

TT08.9

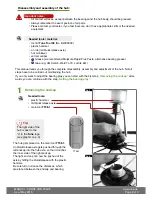
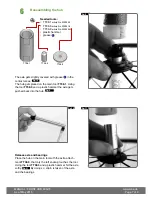
Release axle and bearings

Place the hub on the main tool with the extra attach-

ment TT08.9, that only the left endcap touches the tool. 

Using the tool TT08.5 and a plastic hammer hit the axle 

softly. 

fig.11

 By doing so, strain is taken of the axle 

and the bearings.

fig.11

The axle gets slightly covered with grease 

 in the 

contact areas. 

fig.10

The hub gets placed on the main tool TT08.1. Using 

the tool TT08.5 and a plastic hammer the axle gets 

pushed back into the hub. 

fig.9

Summary of Contents for MIG70

Page 1: ...ount none Build in with 100 mm Axle diameter 17 mm Colours black silver red gold blue green orange froggy green and white powder coated Bearings hub body 2 specific Tune grooved ball bearings 2 x 61803 Sealing dust cap washer and rubber lip seal Weight limit none Material Flange aluminium CNC machined Axle aluminium CNC machined Endcaps aluminium CNC machined Inner sleve aluminium CNC machined ...

Page 2: ...ts the tech nical condition as well as the durability of the hub What does the regular maintenance include The mounted hub should be cleaned Afterwards it should be undertaken a detailed visual and technical examination When disassembled the bearings should be examined The maintenance is described in detail below Lacing The hub is constructed for radial lacing or crossed lacing The 32 and 36 hole ...

Page 3: ...öhrchen für Mig70 VR Nabe Farbe hub body bushing for Mig70 front hub color VN01167 Farbcode color code Endkappe für King Princess Mig70 Dörte 17mm 10 0mm links rechts schwarz end cap for King Princess Mig70 Dörte 17mm 10 0mm left right black NZ0304sw Einreihiges Rillenkugellager 61803 2RS C3 single row ball bearing 61803 2RS C3 NZ1509 Einreihiges Rillenkugellager 61803 2RS C3 single row ball beari...

Page 4: ...ugh the complete disassembly assembly and adjustment of the hub Not all steps have to be carried out maintaining the hub If you only want to adjust the bearing play you can start with the first step Removing the endcap after wards you can continue with the step Setting the bearing play The hub gets placed on the main tool TT08 1 An Quickrelease axle gets pushed through the left endcap into the hub...

Page 5: ... can be pushed out using the to the Tool TT08 2 and a hammer fig 3 4 If the hub is not laced the flange including the pressed in bearings as well as the inner sleeve can be separated already fig 3 2 Removing the axle Needed tools plastic hammer TT08 2 article No WZ0202 TT08 1 article No WZ0200 fig 4 TT08 1 TT08 2 ...

Page 6: ...arings and always only strain the outer ring of the bearing 5 Installing a new bearing Needed tools TT08 1 No WZ0200 TT08 14 No WZ0209 plastic hammer glue 2 fig 7 fig 8 TT08 1 TT08 14 fig 6 fig 5 4 Removing the bearings Needed tools TT08 1 TT08 2 TT08 2 Place the hub on the main tool TT08 1 Now the bearings can be pushed out us ing the tool TT08 2 and a plastic hammer Always dispense the force all...

Page 7: ...rings Place the hub on the main tool with the extra attach ment TT08 9 that only the left endcap touches the tool Using the tool TT08 5 and a plastic hammer hit the axle softly fig 11 By doing so strain is taken of the axle and the bearings fig 11 The axle gets slightly covered with grease 1 in the contact areas fig 10 The hub gets placed on the main tool TT08 1 Using the tool TT08 5 and a plastic...

Page 8: ...and 0 2mm NZ1606 width The washers are placed between the outer freewheel bearing and the right endcap We adjust the bearing play during production for every hub in manual labour With wear or when new bearings are installed the bearing play has to be readjusted 7 Setting the bearing play fig 14 From the measured length e g 8 4 mm subtract the depth of the endcap 8 0 mm The difference is the axial ...

Page 9: ...crossings spoke tension etc Warranty claims have to be sent to the local Tune distributor and are subject to the assessment of Tune Based on this warranty the company Tune is not liable for compensation especially not for indirect damage caused by accidents collateral damage and consequential damage All anodized parts can bleach in sunlight Crash Replacement Tune offers a Crash Replacement in addi...

Reviews: