


3-2
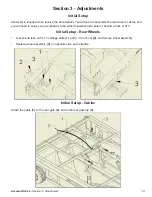
Section 3 - Adjustments -
Ac2/+4
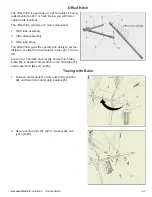
Optional Baler Hitch Attachment
NOTE:
This procedure is for balers that do not have a hitch.
1. Position bale chute 6” back and 6” down from the baler’s
chamber, as shown in
Fig.1
.
2. Drill two 1/2” holes through both sides of baler chamber and
baler hitch assembly,
.
3. Secure with 1/2”-13 bolts, and 1/2”-13 lock nuts.
Fig.1
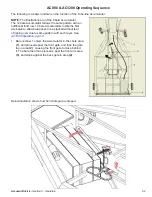
10 & 12 Bale Kit Installation
The Tube-line Accu has the ability to accumulate 10 or 12 bale packs depending on which kit you
have installed.
10 Bale Kit Installation
NOTE:
Installing a 10 bale kit will only work if you have an A, it will not work if you have an Accumul8.
NOTE:
Setup assumes no kit has been installed.
1. Insert the 10 bale swing arms
(1)
into the holes indicated
(2)
.
2. Retain the 10 bale swing arms
(1)
, with spring handle
(3)
and secure with 3/8-16 bolt
(4)
and 3/8-16 lock nut
(5)
.
Summary of Contents for Accumul8
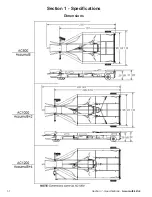
Page 5: ...1 1 Section 1 Specifications Accumul8 2 4 Section 1 Specifications Dimensions...
Page 26: ...Accumul8 2 4 Section 4 Transportation 4 6 6 Set bale slide 13 to it s raised position...
Page 40: ...Accumul8 2 4 Section 7 Parts Breakdowns Lists 7 1 Section 7 Parts Breakdowns Lists...
Page 41: ...7 2 Section 7 Parts Breakdowns Lists Accumul8 2 4 Bale Chute All Models...
Page 43: ...7 4 Section 7 Parts Breakdowns Lists Accumul8 2 4 Wheels Axles All Models...
Page 45: ...7 6 Section 7 Parts Breakdowns Lists Accumul8 2 4 Bale Gate All Models...
Page 47: ...7 8 Section 7 Parts Breakdowns Lists Accumul8 2 4 Front Bale Guides All Models...
Page 49: ...7 10 Section 7 Parts Breakdowns Lists Accumul8 2 4 Endgate All Models...
Page 53: ...7 14 Section 7 Parts Breakdowns Lists Accumul8 2 4 Swing Arms AC1000...
Page 58: ...Intentionally Left Blank...
Page 59: ...VII Torque Value Chart Imperial Accumul8 2 4 Torque Value Chart Imperial...
Page 60: ...Accumul8 2 4 Torque Value Chart Metric VIII Torque Value Chart Metric...
Page 63: ......


