background image

19 

Fluids & Lubricants 

 
1. Grease: Use an SAE multi-purpose 
grease with extreme pressure (EP) 
performance. Also acceptable is an SAE 
multi-purpose lithium base grease. 


2. Gearbox Oil: Use an SAE 80W90 gear 
oil for all operating conditions. 


3. Storing Lubricants: Your machine 
can operate at top efficiency only if clean 
lubricants are used. Use clean containers 
to handle all lubricants. Store them in an 
area protected from dust, moisture and 
other contaminants. 


Greasing your Machine 

 
1. Use only a hand-held grease gun for all 
greasing. 


2. Wipe grease fitting with a clean cloth 
before greasing, to avoid injecting dirt. 


3. Replace and repair broken fittings 
immediately. 


4. If fittings will not take grease, remove 
and clean thoroughly. Also clean lubricant 
passageway. Replace fitting if necessary. 


5. Inject 2-3 pumps on each grease zerk. 


Adjusting Apron Chain Tension 

 
1. Occasionally check the apron chain for 
any bent or damaged slats. It is important 
to straighten or replace any damaged slats 
immediately. 


2. The apron chain tension should be 
checked and adjusted on occasion. If apron 
chain has slack, tightening is required: 


• To tighten apron chain, loosen the four 
bolts on bearing and turn nut until proper 
tightness is achieved (both sides) then 
tighten 4 bolts on the bearing. 

Apron chain tension adjustment of spreader


When adjusting the apron chain tension use 
the following procedure. 
 
a) Start on one side and tighten the nut a few 
turns. 


b) Repeat on opposite side of machine to 
evenly tighten chain tension. 


c) Repeat this procedure 2-3 times 
until moderate chain tension is achieved. 

 
Caution: It is important to ensure nuts on 4 
bolts on bearing are tightened after adjusting 
apron chain. In the event of the nuts not being 
tightened, and the apron chain is reversed, 
equipment damage may occur. 

Summary of Contents for Nitro 450

Page 1: ...Tube Line Manure Spreader Nitro 450 Operator s Manual 31375 Rev 1 3 Nov 11 2014...

Page 2: ...tioned when ordering parts or requesting service For your convenience a space has been provided inside the front cover of this manual to record the serial number model number purchase date and dealer...

Page 3: ...irect or consequential damages of any kind under this contract or otherwise The company s liability shall be limited exclusively to replacing or repairing without charge at its factory or elsewhere at...

Page 4: ...Heaped Cu ft 453 Inside Width 62 Inside Depth 40 Inside Length 201 Height to Dump 77 Overall Length 27 Beater Diameter 34 Beater Speed 420 RPM Axle Type Single Tandem Hub Capacity 12000 lbs PTO Speed...

Page 5: ...on chain is operated from the tractor cab and controls the feed speed of material through the beaters The apron chain and rear lift gate are operated using the tractor s hydraulic power outputs The re...

Page 6: ...Caution Indicates a potentially hazardous situation that may result in injury Warning Indicates a potentially hazardous situation that could result is serious injury or death Danger Indicates a hazard...

Page 7: ...to safety Good safety practices not only protect you but also the people around you Most accidents can be prevented Do not risk injury or death by ignoring good safety practices 1 Study the features...

Page 8: ...on are dependent upon the awareness concern prudence and proper training of personnel involved in the operation transportation maintenance and storage of the machine THINK SAFETY WORK SAFELY Respirato...

Page 9: ...ent prevention are dependent upon the awareness concern prudence and proper training of personnel involved in the operation transportation maintenance and storage of this equipment 3 It has been said...

Page 10: ...afety signs the types of warning and the area or proper function related to that area that requires your safety awareness Examples only Actual decals may differ in text and graphic representation REME...

Page 11: ...se the above procedure NOTE Occasionally air may become trapped in the hydraulic circuit making it necessary to bleed the circuit Preparation Safety 1 Never use the Nitro Manure Spreader until you hav...

Page 12: ...er operating for 10 hours 1 Repeat the 2 hour service list 2 See Service in the Service Maintenance section To perform this operation cycle the hydraulic several times or especially on older tractors...

Page 13: ...Always check for bystanders before engaging the PTO Operation Safety 1 Please remember it is important that you read and heed the safety signs on the Nitro Manure Spreader Clean or replace all safety...

Page 14: ...n chain is operating properly before loading the spreader Pre operation Checklist It is important for both personal safety and maintaining the good mechanical condition of the machine that this pre op...

Page 15: ...r gate about 1 3 of the way down to prevent debris from being projected towards the front Unplugging The following is a recommended procedure that may help if the manure spreader becomes plugged or th...

Page 16: ...e spreader to completely unload 3 To clean the spreader raise the rear gate Warning Turn off all power during cleaning and inspection Do not use power to move any components or to discharge material w...

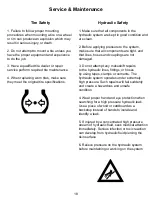
Page 17: ...ools are properly grounded Use adequate light for the job at hand 3 Never attempt to service hydraulic applications while pressurized or with engine running 4 Never work under equipment unless it is b...

Page 18: ...cardboard as a backstop instead of hands to isolate and identify a leak 5 If injured by a concentrated high pressure stream of hydraulic fluid seek medical attention immediately Serious infection or t...

Page 19: ...t 2 3 pumps on each grease zerk Adjusting Apron Chain Tension 1 Occasionally check the apron chain for any bent or damaged slats It is important to straighten or replace any damaged slats immediately...

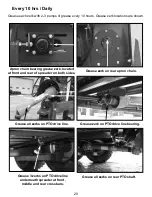
Page 20: ...Grease all zerks on rear PTO shaft Grease 3 zerks on PTO driveline underneath spreader at front middle and rear crossbars Grease zerk on PTO drive line bearing Grease zerk on rear apron chain Apron ch...

Page 21: ...s Daily Grease each zerk with 2 3 pumps of grease every 10 hours Grease zerk locations are shown Grease 2 zerks on rear beaters located at bottom of each beater Grease 2 zerks on rear beaters located...

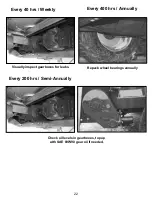
Page 22: ...ck oil levels in gearboxes top up with SAE 80W90 gear oil if needed Visually inspect gearboxes for leaks Repack wheel bearings annually Every 40 hrs Weekly Every 400 hrs Annually Every 200 hrs Semi An...

Page 23: ...23 Part Lists...

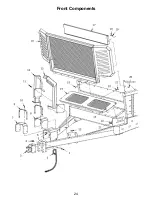
Page 24: ...24 Front Components...

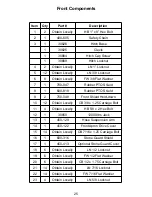
Page 25: ...d down 10 12 Obtain Locally CB 3 8 x 1 25 Carriage Bolt 11 4 Obtain Locally HB 5 8 x 2 Hex Bolt 12 1 30850 12000 lbs Jack 13 1 450 129 Hose Suspension Arm 14 1 450 122 Front Apron Drive Cover 15 14 Ob...

Page 26: ...26 Rear Components...

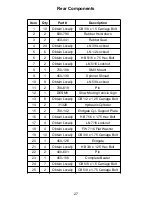
Page 27: ...LN 5 8 Locknut 11 2 700 619 Pin 12 1 DESMV Slow Moving Vehicle Sign 13 6 Obtain Locally CB 1 2 x 1 25 Carriage Bolt 14 2 31328 Hydraulic Cylinder 15 2 700 142 Endgate Cyl Support Plate 16 4 Obtain Loc...

Page 28: ...28 Beaters 34...

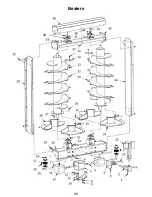
Page 29: ...ctor w Fether 17 2 31517 60 Coupling Chain 18 2 400 905 Sprocket w Set Screws 19 24 Obtain Locally CB 5 8 x 1 5 Carriage Bolt 20 1 450 115 Bottom Cross Beam 21 136 Obtain Locally HB 5 8 x 1 75 Hex Bol...

Page 30: ...30 Apron Drive 20...

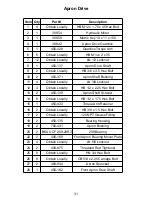
Page 31: ...N 3 8 Locknut 12 4 Obtain Locally HB 1 2 x 2 25 Hex Bolt 13 2 450 138 Apron Shaft Scraper 14 8 Obtain Locally HB 1 2 x 1 75 Hex Bolt 15 1 450 433 Torque Arm Retainer 16 2 Obtain Locally HB 3 8 x 1 5 H...

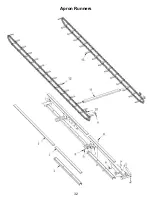
Page 32: ...32 Apron Runners...

Page 33: ...Obtain Locally LN 3 8 Locknut 5 38 Obtain Locally FW 3 8 Flat Washer 6 12 Obtain Locally HB 3 8 x 4 5 Hex Bolt 7 4 Obtain Locally HB 3 8 x 5 25 Hex Bolt 8 22 Obtain Locally HB 3 8 x 1 75 9 2 400 889...

Page 34: ...34 Side Floor Boards...

Page 35: ...450 356 Trimmed Floorboard 2 9 450 355 Floorboard 3 132 Obtain Locally FHSCS 3 8 x 2 Flathead Bolt 4 196 Obtain Locally LN 3 8 Locknut 5 196 Obtain Locally FW 3 8 Flat Washer 6 64 Obtain Locally FHSC...

Page 36: ...36 Single Axle...

Page 37: ...000lb Hub 5 2 HUB 16000 CCS 16000lb Hub Bearing Seal Kit 6 20 31529 3 4 Wheel Stud 7 20 Obtain Locally FW 75 Flat Washer 8 20 31530 3 4 Wheel Nut 9 2 450 118 450 119 Complete Tire Left Right 10 2 450...

Page 38: ...38 Tandem Axle...

Page 39: ...Tandem Tire 8 4 450 12001 3 x 15 1 4 Spindle 9 4 Obtain Locally 125 NPT Grease Zerk 10 4 HUB 12000 CCS 12000lbs Hub Bearing Seal Kit 11 4 HUB 12000 Complete 12000lbs Hub 12 4 Obtain Locally HB 1 2 x...

Page 40: ...40 Drive Line 11 12...

Page 41: ...Obtain Locally HB 1 2 x 2 Hex Bolt 5 1 30840 Over Running Slip Clutch PTO 6 1 400 994 Splined Drive Shaft 7 4 Obtain Locally LN 5 8 Locknut 8 4 Obtain Locally HB 5 8 x 4 5 Hex Bolt 9 6 Obtain Locally...

Page 42: ...42 Endgate Hydraulics...

Page 43: ...ly LN 3 8 Locknut 6 6 Obtain Locally FW 3 8 Flat Washer 7 6 LA HOSE CLAMP Hose Clamp 8 2 450 HH 322 Hose 3 8 FJX 6 8 9 1 450 HH 324 Hose 3 8 FJX 6 8 10 1 450 HH 325 Hose 3 8 FJX 6 8 11 4 HF 6801 8 8 H...

Page 44: ...44 Chain Drive Hydraulics...

Page 45: ...ly HB 1 4 x 2 75 Hex Bolt 9 1 HF 5604 8 8 Hydraulic Fitting 10 1 HF 5502 8 8 Hydraulic Fitting 11 1 HF 5404 8 8 Hydraulic Fitting 12 1 30855 3 4 Pressure Compensating Valve 13 2 HF 2404 8 8 Hydraulic...

Page 46: ...46 Grease Line Schematic...

Page 47: ...47 Grease Line Schematic Item Qty Part Description 1 2 GR21999 0439 Grease Bank Manifold 2 8 35617 HF 5404 2 4 Hydraulic Fitting 3 6 35618 HF 5502 2 2 Hydraulic Fitting...

Page 48: ...48 Intentionally Blank...

Page 49: ...49 Light Kit TLVLK 450 Available Options...

Page 50: ...50 Lights Right Left...

Page 51: ...1 4 x 5 Hex Bolt 7 1 Obtain Locally LN 7 16 Locknut 8 2 31521 4 Rubber Grommet 9 1 31520 Red Tail Light 10 1 31519 Amber Tail Light 11 1 Obtain Locally CB 7 16 x 1 5 Carriage Bolt 12 1 400 939 400 355...

Page 52: ...52 Light Kit Hydraulics...

Page 53: ...53 Light Kit Hydraulics Item Qty Part Description 1 2 450 HH 329 Hose 3 8 FJX 6 FJ90 6 8 2 4 HF 6801 6 6 Hydraulic Fitting 3 2 450 HH 328 Hose 3 8 FJX 6 FJ90 6 8 4 4 HF 6804 8 8 Hydraulic Fitting...

Page 54: ...54 Light Kit Electrical Breakdown...

Page 55: ...tem Qty Part Description 1 1 TL550 200 117 Female 7 Pin Plug 1 31798 Grommet 3 4 31790 Individual Light Harness 4 2 31788 Red Tail Light 5 2 31789 Amber Tail Light 6 1 450 463 Light Wiring Harness 1 3...

Page 56: ...56...

Page 57: ...57...

Page 58: ......

Reviews: