background image

8

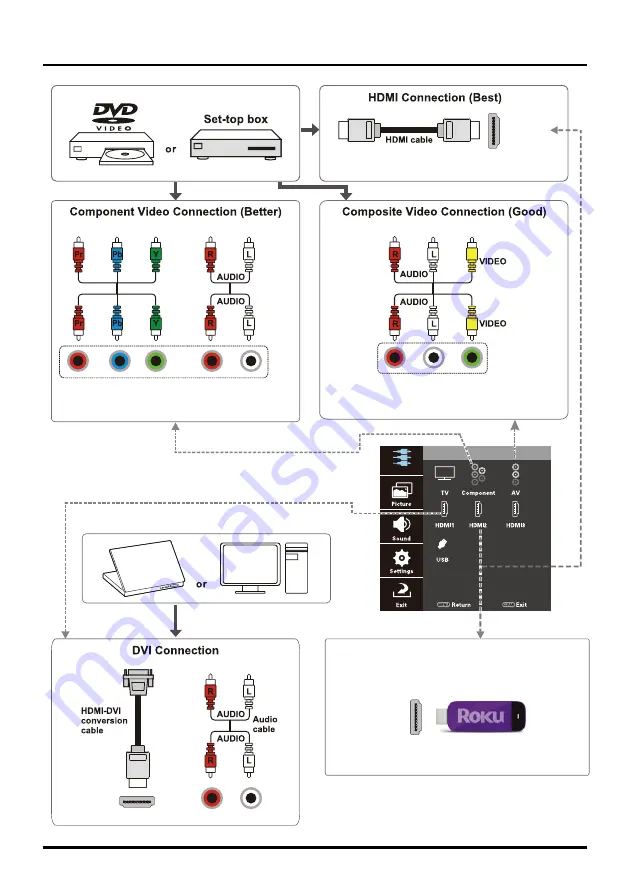
Connections and Setup

Same connection to HDMI 1/HDMI 3 IN

HDMI 2 IN

Only when plugging the Roku Streaming Stick 

into the MHL port, HDMI 2 is displayed as 

HDMI 2 (ROKU).

Roku Streaming Stick Sold Separately

COMPONENT IN (CMPT)

AUDIO/VIDEO IN (AV)

HDMI   

1 IN (DVI)

Menu operation for input source selection

or select the input source directly by pressing

INPUT button.

Input

Input

HDMI 2 IN

(MHL)

Summary of Contents for TCL 50FS5600

Page 1: ...nd 48 States or 1 877 800 1269 for AK HI and Puerto Rico User s Guide For use with models 50FS5600 Figures and illustrations in this User s Guide are provided for reference only and may differ from actual product appearance Product design and specifications may be changed without notice ...

Page 2: ... the disconnect device shall remain readily operable Therefore you should ensure that the TV is installed in a manner that allows you to disconnect the power cord when desired Product Registration Please register your TCL purchase on line at www tclusa com It will make it easier to contact you should it ever be necessary Registration is not required for warranty coverage Product Information Keep y...

Page 3: ... apparatus during lightning storms or when unused for long periods of time 14 Refer all servicing to qualified service personnel Servicing is required when the apparatus has been damaged in any way such as power supply cord or plug damaged liquid has been spilled or objects have fallen into the apparatus the apparatus has been exposed to rain or moisture does not operate normally or has been dropp...

Page 4: ... 14 Input Menu 14 Picture Menu 14 Picture Mode 14 Brightness 14 Contrast 14 Saturation 14 Sharpness 14 Tint 14 Color Mode 14 Back Light 14 Dynamic Backlight 14 Advanced Settings 14 Sound Menu 15 Equalizer 15 Speaker 15 SPDIF Type 15 Smart Volume 15 MTS 15 Audio Language 15 Settings Menu 15 Language 15 Channel 15 Closed Caption 16 Parental Control 17 Time Setting 18 Software Info 18 Location 18 Key...

Page 5: ...e it on the top shelf so the heated air won t harm the TV Avoid Audio Interference Position cables properly insert each cable firmly into the designated jack Route all cables down one side of the back of the TV instead of straight down the middle If your antenna uses 300 ohm twin lead cables do not coil the cables Keep twin lead cables away from audio video cables Avoid Direct Light Don t place th...

Page 6: ...arning Keep the screws and plastic parts away from grease and organic solvents to avoid damage Espe cially during the assembly process Mounting Your TV to the Wall If you are mounting your TV to the wall don t attach the base stand To mount your TV to the wall purchase a VESA wall mount Models of 50 Purchase a VESA 400 x 200 screws M6x15 The VESA number is the horizontal and vertical measurement o...

Page 7: ...are the same L R AUDIO and Y Video input jacks AUDIO VIDEO IN AV IN Lets you connect a component that has composite video jacks such as a VCR DVD player or set top box Green jack for VIDEO connection red and white jacks for R AUDIO and L AUDIO connection HDMI 3 IN Lets you connect a component such as a digital cable or satellite box with an HDMI output for the best picture quality ANT CABLE SAT IN...

Page 8: ... IN HDMI 2 IN MHL Lets you connect a component such as a digital cable or satellite box with an HDMI output for the best picture quality MHL stands for Mobile High definition Link and allows you to link a MHL capable mobile device to the television Choose Your Connections There are several ways to connect signal sources such as BD player DVD players and set top boxes to your TV Note No cables are ...

Page 9: ...he Roku Streaming Stick into the MHL port HDMI 2 is displayed as HDMI 2 ROKU Roku Streaming Stick Sold Separately COMPONENT IN CMPT AUDIO VIDEO IN AV HDMI 1 IN DVI Menu operation for input source selection or select the input source directly by pressing INPUT button Input Input HDMI 2 IN MHL ...

Page 10: ... starts automatically When connecting MHL compatible device to HDMI 2 MHL port on the TV switch TV source to HDMI 2 Note Do not connect the MHL compatible device to any ports other than HDMI 2 MHL port When using MHL Interoperability with MHL devices of other manufacturers is not guaranteed TCL does not provide any guarantee therefore against operational failure such as that described below when a...

Page 11: ...UTE Turns the volume on and off FAV Press the FAV button to browse the channels set in your favorite list Use to select one of the favorite channel to watch Press CLEAR to exit the menu MEDIA Goes to the USB menu POWER button Turns the TV on or standby GUIDE Toggles the Electronic Programme Guide between on and off Only available for digital channels CLEAR Removes any menu or display from the scre...

Page 12: ...your location and the program will list local analog and digital stations available using your antenna Switching On Follow the instructions on this page on how to switch on your TV set and use the remote control before going on to following pages describing how to use the channel scan procedure 1 Insert two AAA batteries in the remote control Precautions on using batteries Only use the battery typ...

Page 13: ...o continue to the next screen Note if you select Retail Mode a screen menu will display to ask you go back to the previous menu to select Home Mode by pressing to select Go Back and press OK to confirm or you can select Proceed to proceed to the next screen 2 Use to select the current local time zone Press OK to continue to the next screen 3 Select either Antenna or Cable Sat as the channel scan t...

Page 14: ...ration Sharpness Tint Color Mode Back Light Dynamic Backlight Advanced Vibrant 48 49 12 12 8 Cool 64 Off Picture Sound Settings Exit Return MENU CLEAR Exit Sound Equalizer Speaker SPDIF Type Smart Volume MTS Audio Language On Dolby Digltal Off Stereo English Picture Sound Settings Exit Return MENU CLEAR Exit Settings Language Channel Closed Caption Parental Control Time Setting Software Info Locat...

Page 15: ...rately into the MHL port HDMI 2 is displayed as HDMI 2 ROKU Picture Menu The menus for adjusting the picture are used to obtain the best picture settings according to your preference the type of program you are watching and the ambient lighting To access the Picture menu press MENU to display the menu screen Press to select Picture then press OK to display options Picture Mode Displays a list that...

Page 16: ... Digital Audio Output jack SPDIF OUT Available options are Dolby Digital PCM Smart Volume Option On Off This option reduces the annoying blasts in volume that often occur during commercial breaks and also amplifies softer sounds in program material eliminating the need for constant volume adjustment MTS This option controls the manner in which the sound comes through your speakers Options availabl...

Page 17: ... to close the menu DTV Signal Show the condition of DTV signal Good or Bad Normal Bad for no DTV signal or very weak DTV signal Closed Caption Many programs are encoded with closed captioning information which allows you to display the audio portion of a program as text on the TV screen Note Closed caption settings are not available for HDMI or CMPT inputs These settings must be set in the connect...

Page 18: ...Parental Control Change Password press OK to enter 2 Use the number buttons to enter the four digit number for your password 3 Re enter the same code to confirm the pass word Note The password must be entered before the TV will continue with Parental settings next time The super password is 2458 If you forget your password enter it to override any existing password System Lock You must remember to...

Page 19: ...between View and Block View All unrated programs are available Block All unrated programs are not available Keyboard Lock This option allows you to block disable or unblock enable the TV panel buttons The remote control still tunes to any channel If you are using this to keep children from changing channels be sure to remove access to any remote that is capable of operating the TV while you have t...

Page 20: ...ce with a USB port connect one end of the USB cable to the USB port and the other end to the USB jack on the side of the TV The USB feature on your TV allows you to play audio files format supported MP3 or display pictures format supported JPEG To utilize this feature follow these steps 1 Press MENU to display the menu screen 2 Use to select Input 3 Press OK to proceed enter 4 Press to select USB ...

Page 21: ...mes sent in 4 3 which does not fill your screen It depends on how the station or device connected to your TV is formatting the video If there are bars on the screen press the ZOOM button to try a different format that may eliminate the bars Some bars can t be removed because of the way the format is sent by the broadcaster The format changes as you press the ZOOM button and the format type is disp...

Page 22: ...r back of your TV three video cables or bundled component video cables red blue and green connect to the corresponding COMPONENT INPUT jacks on the back of your TV Check the antenna connections Make sure all of the cables are firmly connected to the jacks There is no sound but the picture is fine The sound might be muted Try pressing the volume up button to restore sound If using DVI or Y PB PR re...

Page 23: ...ssistance If you have black bars on each side of your picture the component you connected might have a switch or a menu option allowing you to change the picture quality output that will fix this Choose either 720p or 1080i The remote control doesn t work Something might be between the remote and the remote light sensor on the front of the TV Make sure there is a clear path The remote may not be a...

Page 24: ... slots in the cabinet to help assure adequate ventilation IMPORTANT Never use strong cleaning agents such as ammonia based cleaners or abrasive powder These types of cleaners will damage the TV The TV s screen may be cleaned with a soft lint free cloth as well Take care not to scratch or mar the screen If necessary you may use a cloth dampened with warm water While cleaning do not spray liquid dir...

Page 25: ...ice location will be at the sole discretion of TTE based upon the TTE Limited Warranty Statement At the sole discretion of TTE television screen sizes 32 and smaller will either be repaired at an Authorized TCL Service Center or directly exchanged for a new or refurbished remanufactured unit At the sole discretion of TTE television screen sizes 33 through 55 or larger will either be repaired at an...

Page 26: ...RODUCT OR ARISING OUT OF ANY BREACH OF ANY EXPRESS OR IMPLIED WARRANTY ON THIS PRODUCT THIS DISCLAIMER OF WARRANTIES AND LIMITED WARRANTY ARE GOVERNED BY THE LAWS OF THE STATE OF CALIFORNIA EXCEPT TO THE EXTENT PROHIBITED BY APPLICABLE LAW ANY IMPLIED WARRANTY OF MERCHANTABILITY OR FITNESS FOR A PARTICULAR PURPOSE ON THIS PRODUCT IS LIMITED TO THE APPLICABLE WARRANTY AND WARRANTY PERIOD SET FORTH ...

Page 27: ...press or implied including but not limited to warranties of merchantability of satisfactory quality fitness for a particular purpose of accuracy of quiet enjoyment and non infringement of third party rights TCL does not guarantee the accuracy validity timeliness legality or completeness of any content or service made available through this device and does not warrant that the device content or ser...

Page 28: ...following measures Reorient or relocate the receiving antenna Increase the separation between the equipment and receiver Connect the equipment into an outlet on a circuit different from that to which the receiver is connected Consult the dealer or an experienced radio TV technician for help This Class B digital apparatus complies with Canadian ICES 003 This device complies with part 15 of the FCC ...

Reviews: