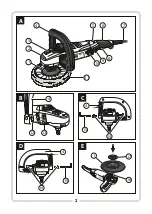
7
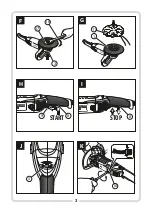
while removing the disk (fig.
F
).
which results in rough spots on buffed surfaces. In addition, it results
in overheating and damage to the motor.
ź
Release the spindle lock button.
NOTE!
While applying waxes and buffing compounds always follow the
ź
To remove the buffing disk, undo the clamping nut using the locking
manufacturer's instructions. Do not use any gel-like greasing agents for
wrench (with spindle locked).
buffing.
ź
Buffing compound or wax should match the material. Apply a small
amount of buffing compound onto the surface and buff with the
n
Installing and removing the buffer pad
(fig.
G
)
buffing pad.
ź
Install a buffer pad (
11
) onto the pre-installed buffing disk (
1
) and
NOTE:
Applying too much compound or wax can make buffing pad slide off
draw its strings. Tie the strings up well and hide the ends, including
the disk during operation.
the knot, under the pad fabric edge.
NOTE!
Make sure the strings are covered completely by the edge of fabric
buffer pad.
ź
To remove the buffer pad, untie the knot and remove it from the
buffing disk.
n
Test run
Once the buffing tool bit is installed and prior to switching the power tool
on make sure that the tool bit is properly mounted and whether it moves
NOTE!
Prior to any cleaning or maintenance always unplug the
tool
from
freely.
the mains socket.
The test start up should be performed away from other persons. Stand in
other plane that the tool bit rotation plane and switch the power tool
after setting it to maximum speed.
n
Before you start the power tool, always check if switch (
8
) operates and
returns to “Off” position once released.
To avoid any accidental start, the switch (
8
) is fitted with a locking lever
(
9
).
To start the power tool:
1
- press the locking lever (
9
) in the direction shown by the arrow (see:
fig.
H
),
2
- press the switch (
8
).
-
To stop the power tool, just release it switch.
For continuous operation, press the locking lever (
9
) in the direction
shown by the arrow, press the switch (
8
), and then press the locking
lever further on in the direction shown by the arrow.
To stop the power tool operating in locked position:
1
- press the switch until resistance is felt,
2
- release it (see: fig.
I
).
n
Replacement of carbon brushes
(fig.
K
)
NOTE:
Never put the tool aside when the switch is locked. When the tool is
The motor is provided with carbon brushes that are considered as fast
not used disconnect the power cord plug from the mains.
wearing parts. When they are worn or are in the near-to-worn limit that
n
Speed adjustment
(
f
ig.
J
)
is 6 mm, the motor may operate with serious disturbances. When poor
Depending on the material being buffed the power tool speed can be
condition of brushes is found out they must be replaced with new ones.
adjusted within the range from 600
rpm to 3300
rpm (when, the switch
Moreover, the brushes must be always kept clean so they can freely move
(
8
) is on) by turning the speed adjustment knob (
5
) to position from
1
to
in brush sockets.
6
. The maximum speed is obtained when the knob is in position
6
, while
The both brushes must be replaced at a time. Use always original and
the minimum speed after setting it to
1
.
identical carbon brushes.
n
Tips regarding the operation
ź
Always immobilize the item to be buffed, if it does not rest securely
under its own weight.
ź
Avoid excessive pressure to the buffing disk. Buffing should be
performed by using the buffer weight. Apply a very slight pressure
during operation. Excessive disk pressure can result in reducing speed,
WARNING!
Do never activate the spindle lock (
3
) when the tool is running.
It may lead to damage of the tool.
The tool does not require any special maintenance. Store it away from
children, keep clean and protect against humidity and dust. Storage
conditions should exclude any mechanical damage or harmful weather
factors.
n
Cleaning
To provide safe and efficient operation, the power tool casing and its
ventilating holes should be kept clean.
Clean the power tool immediately after each use.
Wipe with a clean, slightly damp cloth with a small amount of soap. Do
OPERATION:
not use any solvents; as it may result in damage to plastic parts of the
Switching the tool on and off
power tool. Protect the power tool against water penetration.
It is recommended to clean ventilating holes with compressed air on a
regular basis. It will protect bearings against damage, remove dust that
blocks cooling air to enter the motor.
Wash the buffer pads by hand and allow to dry in the open air. Use soft
soap for washing the pad.
check whether the power cord (
7
) is correctly plugged in and the
electric power outlet is energized;
- check condition of carbon brushes and replace them if necessary.
- if the defect persists, the tool fails to work despite of voltage presence
and carbon brushes are in good condition, hand the tool over for repair
to an authorized workshop to the address specified
in the warranty
card.
WARNING! Prior to commencement of the brush
replacements unplug the power cord from and electric
outlet.
To replace the brushes first unscrew the plugs (
10
) of brush sockets with a
small screwdriver and then pull the brushes out. Insert new brushes and
screw tightly the socket plugs.
STORAGE AND MAINTENANCE:
TROUBLESHOOTING:
The electric tool fails to switch on or works with breaks:
Summary of Contents for TMA1300K
Page 2: ...2 A 1300W 1 2 3 4 5 7 8 9 10 11 B 12 13 C D 14 14 15 4 15 4 E 17 1 16 13 00 W 6 4...
Page 14: ...RCD TMA1300K 14...
Page 15: ...15 a a...
Page 16: ...16...
Page 19: ...19 n 10 5 7 n K 6 34 03 228 PROFIX...
Page 36: ......


