background image

Trust Ami Mouse Optical

7


GB 

5. Setting the mouse properties

NOTE:

This chapter only applies for Windows 95, 98, NT4 or 2000.

The basic mouse functions are optimally set for the user. If you wish to change the mouse settings, refer to
the relevant chapter.

Double click on the icon in the taskbar (figure 12) to open the 'Mouse Properties' window. Figure 13 will be
displayed on your monitor.

Close the program if you wish to play a game using the mouse but do not wish to use the special mouse
properties. To do this, right click on the icon and select 'Close Trust Ami Mouse Optical'.

Figure 12: The taskbar icon in Windows 95 / 98 / NT / 2000

NOTE:

The order of the tabs (figure 13 and further) can differ. The functions, however, remain the same.

5.1 'Buttons' 

tab

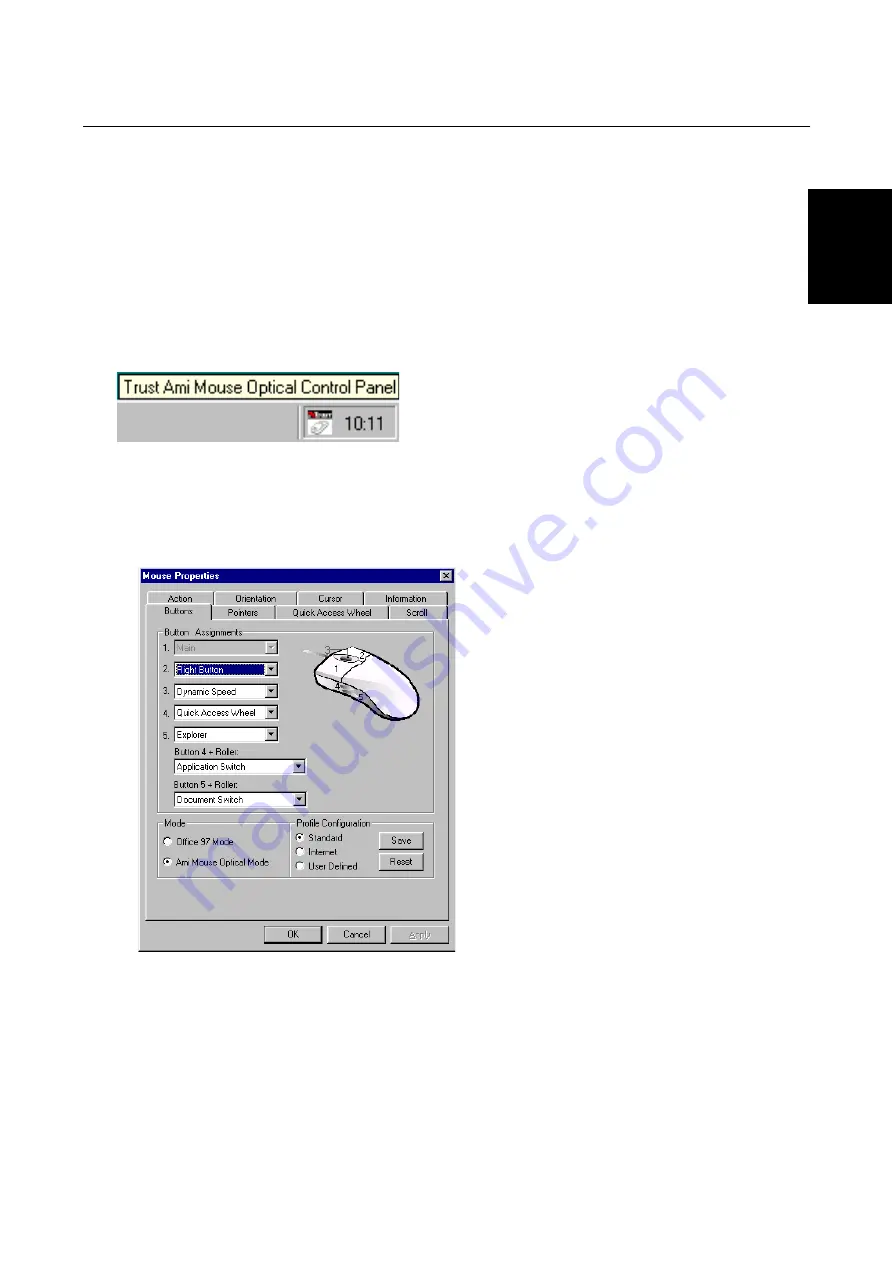
Click the 'Buttons' tab (figure 13) to assign a function to the mouse buttons.

Figure 13: Mouse Properties - Buttons

5.1.1 'Button 

assignment'

Click the down arrow to select a function from the list. Repeat this for each mouse button.

The complete list of functions is given in Appendix A.

5.1.2 'Mode'

Office 97 Mode:


Supports zoom, scrolling and Auto-scrolling in Microsoft Office 97. This option
is the same as the Microsoft IntelliMouse.

Summary of Contents for AMI

Page 1: ...Trust Ami Mouse Optical GB TRUST AMI MOUSE OPTICAL Instruction manual Version 1 1...

Page 2: ...any purpose other than the purchaser s own personal use without prior written permission from the manufacturer Disclaimer statement The manufacturer specifically disclaims all warranties either expre...

Page 3: ...use software Windows 2000 5 5 Setting the mouse properties 7 5 1 Buttons tab 7 5 1 1 Button assignment 7 5 1 2 Mode 7 5 1 3 Profile configuration 8 5 2 Pointers tab 8 5 3 Quick Access Wheel tab 8 5 3...

Page 4: ...es not work on your computer s serial port The examples assume that the letter D has been assigned to your CD ROM drive If your system uses a different letter for your CD ROM drive for example E you s...

Page 5: ...f figure 1 4 Installation Close all programs before installing the driver 4 1 Trust Software Installer Follow the points given below to start the Trust Installer 1 Turn on the computer and start Windo...

Page 6: ...r 4 2 to install the software for the mouse 4 2 Installing the mouse software Windows 95 98 NT4 1 Start the Trust Installer see chapter 4 1 2 Select the option Install Trust Ami Mouse Optical Software...

Page 7: ...t A number of files will be copied to your hard drive Figure 7 will then appear Figure 7 Restarting the computer 8 Choose to restart your computer and then click on Finish The driver has now been succ...

Page 8: ...ure 9 Choosing a location for the driver 4 Click on Next Figure 10 will appear Figure 10 Selecting a program folder 5 Click on Next A number of files will be copied to your hard drive Figure 11 will t...

Page 9: ...se properties To do this right click on the icon and select Close Trust Ami Mouse Optical Figure 12 The taskbar icon in Windows 95 98 NT 2000 NOTE The order of the tabs figure 13 and further can diffe...

Page 10: ...he profile Reset If you do not wish to save the changes that you have made click on Reset to return all the profiles to the factory settings 5 2 Pointers tab You can alter the mouse pointer icons usin...

Page 11: ...n Use the Quick Access Files tab if you wish to add an application or function to the Quick Access Wheel Chapter 5 3 1 gives more information about Quick Access Selection Click on Apply to activate th...

Page 12: ...n Set the order by moving an item up down Click on OK to return to the Quick Access Wheel 5 4 Scroll tab Click on the Scroll tab figure 17 to set the mouse wheel properties Figure 17 Mouse Properties...

Page 13: ...use moves across the monitor screen Double Click Speed Set the speed for double clicking Double click on the Trust icon to test the speed Button swap Set the mouse for left handed or right handed use...

Page 14: ...ttings NOTE A message will be displayed on the screen if you have not moved the mouse in a straight line Click on Retry to carry out the calibration again 5 7 Cursor tab Extra mouse pointer properties...

Page 15: ...of dust Clean the mouse lens using a clean lint free cloth 7 Removing the driver It is only necessary to remove the driver if you no longer wish to use the mouse Follow the procedure given below 1 Sta...

Page 16: ...installed Install the software correctly see chapter 5 The scrolling function does not work The application is not 100 compatible with Windows Use an application that is compatible The mouse pointer...

Page 17: ...00 17 00 French Office Internet www trust com E mail support_fr trust com Fax 33 0 1 48174918 Phone 33 0 1 48174931 Inhabitants of Germany should contact From 9 00 17 00 German Office Internet www tru...

Page 18: ...se DragLock Turns the mouse off for selecting and dragging Explorer Starts Windows Explorer Maximize Maximizes active window Close Application Closes active application Minimize Minimizes active windo...

Page 19: ...ween different applications ALT TAB Horizontal Scroll Scrolls horizontally Vertical Scroll Scrolls vertically Document Switch Switches between different open documents in e g Microsoft Word Back Forwa...

Page 20: ...Print Print Quick Access Files 1 WordPad WordPad FreeCell 2 NotePad NotePad Solitaire 3 Paint Imaging Minesweeper 4 Imaging NetMeeting Hearts 5 Calculator Microsoft Chat CD Player 6 Address Book Addre...

Reviews: