background image

Trust Ami Mouse Wireless 200

14

8.6 'Orientation' 

tab

Select the 'Orientation' tab to calibrate the mouse (see figure 19).

Figure 19: Mouse Properties - Orientation

Follow the instructions below to set the mouse to the desired position in your hand or to move the mouse in a
more natural position.

1.  Click on ‘Set Orientation’.

2.  Move the mouse in a straight line in the direction of the finish line until the racing car reaches the finish

line.

3.  Click on 'Apply' to keep these settings.

Click on 'Cancel' to delete the new settings.

Note:

A message will be displayed on the screen if you have not moved the mouse in a straight line.
Click on 'Retry' to carry out the calibration again.

Summary of Contents for Ami Mouse Wireless 200

Page 1: ...Trust Ami Mouse Wireless 200 GB TRUST AMI MOUSE WIRELESS 200 Instruction Manual Version 1 0...

Page 2: ...d retrieval systems for any purpose other than the purchaser s own personal use without prior written permission from the manufacturer Disclaimer statement The manufacturer specifically disclaims all...

Page 3: ...stalling the mouse software 7 8 Setting the mouse properties 8 8 1 Buttons tab 8 8 1 1 Button assignment 9 8 1 2 Mode 9 8 1 3 Profile configuration 9 8 2 Pointers tab 10 8 3 Quick Access Wheel tab 10...

Page 4: ...s the English term e g File used in the figure referred to Additional information will be shown as follows Note The Ami Mouse Wireless 200 does not work correctly when the batteries are low The exampl...

Page 5: ...device is clearly becoming worse 4 Position the device so that the cables cannot be damaged 5 If the device must be cleaned use a damp cloth Do not use a liquid cleaner or a spray 6 Make sure that th...

Page 6: ...Remove the battery flap from the top of the mouse by sliding it off of the mouse The battery compartment will be visible figure 2 Figure 2 Battery compartment 3 Insert the two AAA batteries provided i...

Page 7: ...igure 3 4 Set this to the same channel as you have just set the mouse to position 1 or 2 5 Connecting the mouse Note The drivers for your old mouse must be removed before installing the software for t...

Page 8: ...ams before installing the driver 7 1 Trust Software Installer Follow the points given below to start the Trust Installer 1 Turn on the computer and start Windows If you are using Windows NT or 2000 lo...

Page 9: ...ouse software 1 Start the Trust Software Installer see chapter 7 1 2 Select the option Install Ami Mouse Wireless 200 Software see figure 7 Figure 8 will appear Figure 8 Installation 3 Select the lang...

Page 10: ...e optimally set for the user If you wish to change the mouse settings refer to the relevant chapter Double click on the icon in the taskbar figure 12 to open the Mouse Properties window Figure 13 will...

Page 11: ...roll functions and auto panning 8 1 3 Profile configuration Using profile configuration you can use change and save three preference settings for Button assignment Quick Access Wheel and Quick Access...

Page 12: ...r for each item by clicking on Browse You can save the scheme by clicking on the Save As button See Windows Help for more information 8 3 Quick Access Wheel tab Quick Access Wheel is an application th...

Page 13: ...el This option opens a window that can include a maximum of 10 applications or functions Click on the Quick Access Selection button to change these applications or functions Chapter 8 3 1 gives more i...

Page 14: ...t the order by moving an item up down Click on OK to return to the Quick Access Wheel 8 4 Scroll tab Click on the Scroll tab figure 17 to set the mouse wheel properties Figure 17 Mouse Properties Scro...

Page 15: ...18 Mouse Properties Action Mouse Speed Set the speed that the mouse moves across the monitor Double Click Speed Set the speed for double clicking Double click on the Trust icon to test the speed Butto...

Page 16: ...ur hand or to move the mouse in a more natural position 1 Click on Set Orientation 2 Move the mouse in a straight line in the direction of the finish line until the racing car reaches the finish line...

Page 17: ...d By selecting this option the mouse automatically jumps to the active button Trails This option makes it easier to find the mouse pointer This function only works on an LCD monitor Loop When this opt...

Page 18: ...s new drivers etc 9 Maintenance The ball of the mouse will become dirty through use and cause the mouse to function poorly It is therefore necessary to regularly clean the ball 1 Turn off the computer...

Page 19: ...no longer wish to use the mouse Follow the procedure given below 1 Start the computer 2 Close the mouse program in your taskbar a Right click on the icon figure 12 b Select Close Trust Ami Mouse Wirel...

Page 20: ...your previous mouse before installing this software Read the instruction manual for your previous mouse to do this The software has not been installed Install the mouse software see chapter 7 The mou...

Page 21: ...ons Number of buttons 5 Wheels 1 wheel standard for vertical scrolling in combination suitable for horizontal scrolling Resolution 400 dpi Connection Suitable for connecting to the PS 2 port Wireless...

Page 22: ...com Fax 33 0 1 48174918 Tel 33 0 1 48174931 Inhabitants of Germany should contact From 9 00 17 00 German Office Internet www trust com E mail support de trust com Fax 02821 58873 Tel 0800 00TRUST 0800...

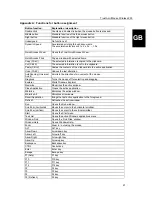
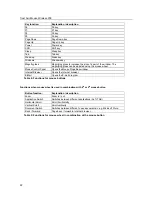
Page 23: ...e direction of movement of the mouse DragLock Turns the mouse off for selecting and dragging Explorer Starts Windows Explorer Maximize Maximizes the active window Close Application Closes the active a...

Page 24: ...e Mouse Properties window Internet Browser Opens the Internet browser E Mail Opens the E mail program Table 4 Functions for mouse buttons Functions when mouse wheel is used in combination with 4th or...

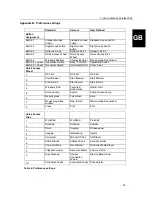
Page 25: ...ck Access Wheel 1 QAF list QAF list QAF list 2 Start Browser Start Browser Start Browser 3 Start E mail Start E mail Start E mail 4 Windows Find Favorites Bookmarks New E mail 5 Screen dump Search Act...

Reviews: