background image

3

ENGLISH

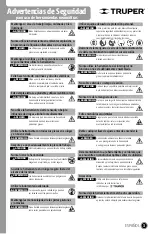
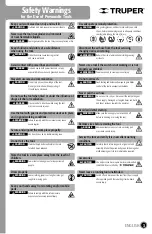
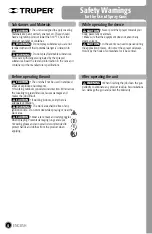
Safety Warnings

for the Use of Pneumatic Tools

Keep your work area clean, tidy and well lit.

Cluttered and dark areas may cause accidents.

Never use the tool in explosive environments

or near flammable liquids.

Sparks generated by the tool may cause explosion or fire.

Keep children and visitors at a safe distance

when using the tool.

Distractions may cause loosing control
and cause accidents.

Avoid contact with power lines and circuits.

Find and avoid both power lines and circuits,
especially hidden wires and grounded devices.

Stay alert, use care and common sense.

Do not rely on your knowledge of the tool.
Do not get distracted while operating it.
It could cause accidents.

Do not use the tool when tired or under the influence of 

drugs, alcohol or medication.

One second of distraction while using the tool
may cause severe injuries.

Use the tool with guards and protective devices in place 

and in good working conditions.

Failure to comply with these measures may cause
severe injuries.

Secure and support the work piece properly.

Use bench vices and a stable working area.

Do not force the tool.

It will do the job better and safer at the rate
for which it was intended.

Store the tool in a safe place away from the reach of 

children.

Power tools are dangerous for inexperienced
people.

Dress properly.

Loose clothing, jewelry or long hair may get
caught in moving parts.

Keep your hands away from rotating and/or mobile 

parts.

Failure to comply with this safety measure
exposes you to severe personal injury. 

Use adequate personal protection.

Using safety glasses, anti-dust mask, safety non-skid 
shoes, helmet and earplugs used in adequate conditions 
considerably reduce the risk of injury.

Disconnect the air hose from the tool servicing, 

changing devices or storing.

Reduce the risk of unintentional starting causing 
accidents.

Never use a tool if the switch is not working or is not 

properly assembled.

You are exposed to severe personal injury.

Do not overreach.

Good footing and balance allow you to gain better
control of the tool in unexpected situations.

Never pull the air hose.

Do not use it to carry or disconnect the tool pulling out 
the air supply. Damaged or tangled hoses can burst
and shoot residues towards the operator.

Avoid accidental start up.

Make sure the air supply tool is switched off
before connecting or moving the tool.

Remove vices before starting the tool.

Additional tools or vices set into a moving part
may cause severe injury.

Service the tool and verify it is in excellent working 

conditions.

Carefully check all moving parts, alignment and 
assembly. Make this periodically. Look for damaged or 
malfunctioning parts to immediately be repaired.  

Accessories.

Use only accessories or spare parts recommended in
this MANUAL or certified by                              .

Never leave a running tool unattended.

Switch off and disconnect the tool from the air supply 
after operating and before putting it aside. Avoid
severe injury.

CAUTION

CAUTION

CAUTION

CAUTION

CAUTION

CAUTION

CAUTION

CAUTION

CAUTION

WARNING

WARNING

WARNING

WARNING

WARNING

WARNING

WARNING

WARNING

WARNING

DANGER

DANGER

DANGER

DANGER

Summary of Contents for 11098

Page 1: ...eto antes de usar la herramienta ATENCI N Instructivo de 30 PSI 45 PSI Presi n de trabajo 206 8 kPa 310 2 kPa Modelo C digo PIPI 400 Este Instructivo es para 11098 PIPI 400 ESPA OL ENGLISH Pistola de...

Page 2: ...2 3 4 5 6 7 8 9 Para poder sacar el m ximo provecho de la herramienta alargar su vida til hacer v lida la garant a en caso de ser necesario y evitar riesgos o lesiones graves es fundamental leer este...

Page 3: ...ras o aplastamiento Utilice equipo adecuado de protecci n personal Utilice protecci n para los ojos Mascarilla antipolvo zapatos de seguridad antideslizantes casco y protecci n para los o dos en condi...

Page 4: ...rabajo Si va a trabajar en interiores verifique que haya ventilaci n adecuada El rea de trabajo debe de estar libre de cualquier fuente de ignici n No fume durante el trabajo de rociado ni cerca del r...

Page 5: ...Entrada de aire Conexi n macho 1 4 NPT Boquilla Tornillo de ajuste de volumen de fluido Resorte Aguja Tornillo de ajuste de amplitud de roc o Tobera Anillo retenedor Sello de la aguja Gatillo Cepillo...

Page 6: ...de que chorree Adelgazamiento del material Llenado del vaso Para obtener un buen trabajo es importante que prepare la superficie a rociar y adelgace la pintura o material para que obtenga la viscosid...

Page 7: ...acia abajo No roc e en ngulo de lo contrario la pintura podr a correrse por la superficie D pasadas suaves y uniformes Cuando roc e reas grandes utilice un patr n cruzado E Desplace la pistola a una v...

Page 8: ...funcionamiento e invalidar la garant a Vac e el fluido sobrante del vaso en un contenedor adecuado Sin retirar el vaso presione el gatillo para que retirar todo el fluido del interior del sistema Vie...

Page 9: ...o da adas Sello de la aguja flojo o da ado Boquillas mal apretadas o da adas Filtro sucio u obstruido Vaso mal apretado o empaque del vaso da ado Limpie las boquillas Reemplace las boquillas Apriete...

Page 10: ...obra Excepto cuando el producto haya sido usado en condiciones distintas a las recomendadas o propias de su naturaleza o destino o cuando haya sufrido un deterioro esencial irreparable y grave por cau...

Page 11: ...anual Model Code PIPI 400 Applies for 11098 PIPI 400 ENGLISH ESPA OL Air Pressure 30 PSI 45 PSI Mini Gravity Feed Touch up Spray Gun Read the user s manual thoroughly before operating this tool CAUTIO...

Page 12: ...Technical Data Pneumatic Requirements PIPI 400 11098 4 3 oz 30 PSI 45 PSI 1 4 NPT Mini Gravity Feed Touch up Spray Gun Code Description Jar Capacity Air Pressure Connection Diameter 3 CFM Air Consump...

Page 13: ...ply with this safety measure exposes you to severe personal injury Use adequate personal protection Using safety glasses anti dust mask safety non skid shoes helmet and earplugs used in adequate condi...

Page 14: ...job difficult If working indoors verify there is adequate ventilation The work area shall be free of any ignition source Do not smoke while spraying or near the work area Wear a face mask and safety g...

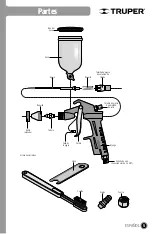
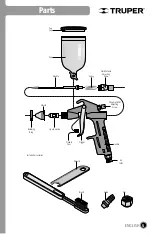
Page 15: ...Parts Cup Cup Cap Handle Air Inlet Nozzle Fluid Volume Adjusting Screw Spring Needle Stream of Mist Adjusting Screw Liquid nozzle Retaining Ring Needle Seal Trigger Brush Wrench Spike Nut Included ac...

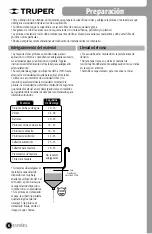
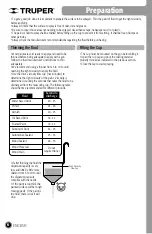
Page 16: ...it will drip Thinning the fluid The cup must be mounted on the gun before filling it Open the cup cap and pour the coating material properly thinned as indicated in the previous section Close the cap...

Page 17: ...s produce thin layers and slow movements produce thick layers Apply one layer at a time If you need another layer see the drying recommendations from the material manufacturer before applying a second...

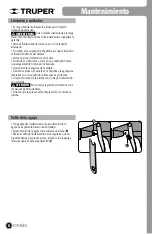
Page 18: ...nctioning and will void the warranty Empty the remaining fluid from the cup into a designated container Not removing the cup press the trigger to remove all the fluid from inside the system Poor a lit...

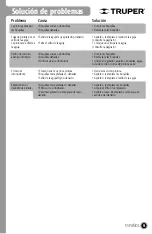
Page 19: ...are damaged Filter is dirty or obstructed The jar is not tightened correctly or the jar washer is damaged Clean the nozzles Replace the nozzles Tighten or replace the needle seal see page 8 Set a new...

Page 20: ...Notes 10 ENGLISH...
Reviews: