


A
B
D
1
2
3
C
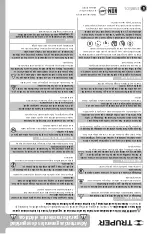
Parts
Auxiliary
handle
Continuous
use button
Wrench for
mounting / adjusting
auxiliary handle
Trigger
switch
Carbon
brushes (x2) cap
Polishing
pad
Handle
Handle
Speed
control
Auxiliary handle
screws (x2)
Continuous
use button
Speed
control
Ergonomic
front handle
Polisher pad
with
hook and loop
attachment
Ergonomic
front handle
Power cord
6
Assembly
• Align the auxiliary handle (
A
) to the polisher head
and align it with the screw holes (
B
).
• Move the handle to the desired angle.
• Screw the auxiliary handle securely to the polisher
head with the screws and wrench provided.
Auxiliary handle assembly
• Polishing pads (
C
) or any other polishing accessory is
mounted directly to the disc with hook and loop system
(
D
).
• To install the pad, first remove any dirt or foreign material. Place the
pad on the hook and loop fastening disc so that the edges are aligned.
• The polisher includes three interchangeable pads:
1
. Wine: for removing scratches.
2
. Yellow: for removing fine lines.
3
. Orange: for final finishing.
• To remove the pad, simply pull it by the edge.
Make sure the pad and pad are aligned and
properly installed. Otherwise, the pad will cause excessive vibration
which may cause loss of control or the pad may be ejected from the
tool.
Polishing pads
ENGLISH
CAUTION


