background image

* All specifications are based on the latest product information available at the time of printing. We reserve the right to make changes at

any time without notice.

Engine Type  . . . . . . . . . . . . . . . . . . . . . . . . . . . . . . . . . . . . . . . . . . . . . . . . . . . . . . . . . . . . . . . . . . . . . . . . . . . . . . . . . Air-Cooled, 4-Cycle
Displacement  . . . . . . . . . . . . . . . . . . . . . . . . . . . . . . . . . . . . . . . . . . . . . . . . . . . . . . . . . . . . . . . . . . . . . . . . . . . . . . . . 1.6 cu. in. (26.2 cc)
Idle Speed RPM  . . . . . . . . . . . . . . . . . . . . . . . . . . . . . . . . . . . . . . . . . . . . . . . . . . . . . . . . . . . . . . . . . . . . . . . . . . . . . . . . 3,000-3,600 rpm
Operating RPM  . . . . . . . . . . . . . . . . . . . . . . . . . . . . . . . . . . . . . . . . . . . . . . . . . . . . . . . . . . . . . . . . . . . . . . . . . . . . . . . . 7,200-8,800 rpm
Clutch Type . . . . . . . . . . . . . . . . . . . . . . . . . . . . . . . . . . . . . . . . . . . . . . . . . . . . . . . . . . . . . . . . . . . . . . . . . . . . . . . . . . . . . . . . . Centrifugal
Ignition Type . . . . . . . . . . . . . . . . . . . . . . . . . . . . . . . . . . . . . . . . . . . . . . . . . . . . . . . . . . . . . . . . . . . . . . . . . . . . . . . . . . . . . . . . . Electronic
On/Off Stop Control  . . . . . . . . . . . . . . . . . . . . . . . . . . . . . . . . . . . . . . . . . . . . . . . . . . . . . . . . . . . . . . . . . . . . . . . . Positive On/Off Switch
Valve clearance (intake and exhaust)   . . . . . . . . . . . . . . . . . . . . . . . . . . . . . . . . . . . . . . . . . . . . . . . .  0.003–0.006 in. (0.076–0.0152 mm)
Spark Plug Gap  . . . . . . . . . . . . . . . . . . . . . . . . . . . . . . . . . . . . . . . . . . . . . . . . . . . . . . . . . . . . . . . . . . . . . . . . . . . . 0.025 inch (0.635 mm)
Lubrication  . . . . . . . . . . . . . . . . . . . . . . . . . . . . . . . . . . . . . . . . . . . . . . . . . . . . . . . . . . . . . . . . . . . . . . . . . . . . . . . . . . . . . . . . . SAE 30 Oil
Crankcase Oil Capacity . . . . . . . . . . . . . . . . . . . . . . . . . . . . . . . . . . . . . . . . . . . . . . . . . . . . . . . . . . . . . . . . . . . . . . . . . . . . 3.04 oz (90 ml)
Fuel  . . . . . . . . . . . . . . . . . . . . . . . . . . . . . . . . . . . . . . . . . . . . . . . . . . . . . . . . . . . . . . . . . . . . . . . . . . . . . . . . . . . . . . . . . . . . . . . Unleaded
Carburetor  . . . . . . . . . . . . . . . . . . . . . . . . . . . . . . . . . . . . . . . . . . . . . . . . . . . . . . . . . . . . . . . . . . . . . . . . . . . . . . . Diaphragm, All-Position
Starter  . . . . . . . . . . . . . . . . . . . . . . . . . . . . . . . . . . . . . . . . . . . . . . . . . . . . . . . . . . . . . . . . . . . . . . . . . . . . . . . . . . . . . . . . . . . Auto Rewind
Muffler  . . . . . . . . . . . . . . . . . . . . . . . . . . . . . . . . . . . . . . . . . . . . . . . . . . . . . . . . . . . . . . . . . . . . . . . . . . . . . . . . . . . . . . Baffled with Guard
Throttle  . . . . . . . . . . . . . . . . . . . . . . . . . . . . . . . . . . . . . . . . . . . . . . . . . . . . . . . . . . . . . . . . . . . . . . . . . . . . . . . . . . . . . . . . . Spring Return
Fuel Tank Capacity  . . . . . . . . . . . . . . . . . . . . . . . . . . . . . . . . . . . . . . . . . . . . . . . . . . . . . . . . . . . . . . . . . . . . . . . . . . . . . . . . 18 oz (532 ml)

Cultivating Path Width (Maximum)  . . . . . . . . . . . . . . . . . . . . . . . . . . . . . . . . . . . . . . . . . . . . . . . . . . . . . . . . . . . . . . . 9 inches (22.86 cm)
Cultivating Depth (Maximum)  . . . . . . . . . . . . . . . . . . . . . . . . . . . . . . . . . . . . . . . . . . . . . . . . . . . . . . . . . . . . . . . . . . . 6 inches (15.24 cm)
Approximate Weight (no fuel)   . . . . . . . . . . . . . . . . . . . . . . . . . . . . . . . . . . . . . . . . . . . . . . . . . . . . . . . . . . . . . . . . . . . . . . .  25 lb. (11.5 kg)

SPECIFICATIONS

CULTIVATOR*

ENGINE*

CALIFORNIA / EPA EMISSION CONTROL WARRANTY STATEMENT 

Your Warranty Rights and Obligations

The California Air Resources Board, the Environmental Protection Agency, and Troy-Bilt LLC (Troy-Bilt) are pleased to explain the
emission control system warranty on your 2008 and later small off-road engine. In California and the 49 states, new small off-road
engines must be designed, built and equipped to meet the state’s stringent anti-smog standards. Troy-Bilt must warrant the emission
control system on your small off-road engine for the periods of time listed below provided there has been no abuse, neglect or
improper maintenance of your small off-road engine.

Your emission control system may include parts such as the carburetor or fuel-injection system, the ignition system, and catalytic
converter.  Also included may be hoses, belts, connectors and other emission-related assemblies.

Where a warrantable condition exists, Troy-Bilt will repair your small off-road engine at no cost to you including diagnosis, parts and
labor.

The 2008 and later small off-road engines are warranted for two years. If any emission-related part  on your engine is defective, the part
will be repaired or replaced by Troy-Bilt.

Owners Warranty Responsibilities

As the small off-road engine owner, you are responsible for the performance of the required maintenance listed in your operator’s
manual. Troy-Bilt recommends that you retain all receipts covering maintenance on your small off-road engine, but Troy-Bilt cannot
deny warranty solely for the lack of receipts or for your failure to ensure the performance of all scheduled maintenance.
• As the small off-road engine owner, you should however be aware that Troy-Bilt may deny you warranty coverage if your small off-

road engine or a part has failed due to abuse, neglect, improper maintenance or unapproved modifications.

• You are responsible for presenting your small off-road engine to a Troy-Bilt Authorized Service Center as soon as a problem exists.

The warranty repairs should be completed in a reasonable amount of time, not to exceed 30 days.

If you have any questions regarding your warranty rights and responsibilities, you should call 

1-800-828-5500

.

Manufacturer’s Warranty Coverage

• The warranty period begins on the date the engine or equipment is delivered to the retail purchaser.
• The manufacturer warrants to the initial owner and each subsequent purchaser, that the engine is free from defects in material and

workmanship which cause the failure of a warranted part for a period of two years.

• Repair or replacement of warranted part will be performed at no charge to the owner at an Authorized Troy-Bilt Service Center. For

the nearest location please contact Troy-Bilt at: 

1-800-828-5500

.

• Any warranted part which is not scheduled for replacement, as required maintenance or which is scheduled for only for regular

inspection to the effect of “Repair or Replace as Necessary” is warranted for the warranty period. Any warranted part which is
scheduled for replacement as required maintenance will be warranted for the period of time up to the first scheduled replacement
point for that part.

• The owner will not be charged for diagnostic labor which leads to the determination that a warranted part is defective, if the

diagnostic work is performed at an Authorized Troy-Bilt Service Center.

• The manufacturer is liable for damages to other engine components caused by the failure of a warranted part still under warranty.
• Failures caused by abuse, neglect or improper maintenance are not covered under warranty.
• The use of add-on or modified parts can be grounds for disallowing a warranty claim. The manufacturer is not liable to cover failures

14

Summary of Contents for TB144

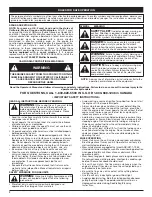
Page 1: ...r website at www troybilt com or www troybilt ca DO NOT RETURN THE UNIT TO THE RETAILER PROOF OF PURCHASE WILL BE REQUIRED FOR WARRANTY SERVICE THIS PRODUCT IS COVERED BY ONE OR MORE U S PATENTS OTHER PATENTS PENDING Service on this unit both within and after the warranty period should be performed only by an authorized and approved service dealer Copy the serial number here Copy the model and par...

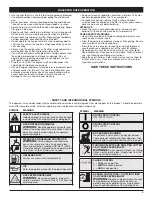
Page 2: ...n contact with anything before starting the unit Use the unit only in daylight or good artificial light Avoid accidental starting Be in the starting position whenever pulling the starter rope The operator and unit must be in a stable position while starting See Starting Stopping Instructions IMPORTANT SAFETY INSTRUCTIONS RULES FOR SAFE OPERATION Read the Operator s Manual and follow all warnings a...

Page 3: ...st OTHER SAFETY WARNINGS Never store a fueled unit inside a building where fumes may reach an open flame or spark Allow the engine to cool before storing or transporting Be sure to secure the unit while transporting Store the unit in a dry area locked up or up high to prevent unauthorized use or damage out of the reach of children Never douse or squirt the unit with water or any other liquid Keep ...

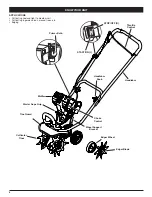
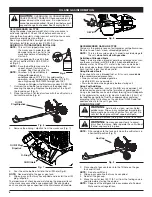
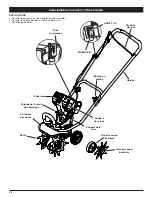
Page 4: ...pport Bracket Handlebar Knob Tine Guard Cultivator Tines Choke Control Muffler STOP OFF O START ON I Throttle Control Handlebar APPLICATIONS Cultivating sod and light to medium soil Cultivating in garden areas around trees etc Edging Edger Wheel Edger Blade ...

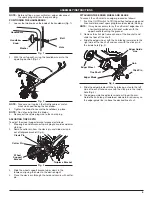
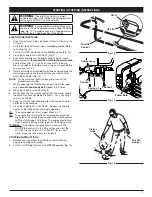
Page 5: ...BLY INSTRUCTIONS Handlebar Knob Handlebars Washer Hole Bolt Fig 1 Fig 2 Clevis Pin Cotter Pin Wheel Support Bracket Tailpiece Bracket Fig 3 ATTACHING THE EDGER WHEEL AND BLADE To convert the cultivator to an edger proceed as follows 1 Push the On Off switch to Off O position to stop engine and tines and disconnect spark plug to avoid accidental starting NOTE It may be necessary to lay the cultivat...

Page 6: ...the gas or gas tank 5 Wipe up any oil that may have spilled and reinstall the oil fill plug dipstick The importance of checking and maintaining the proper oil level in the crankcase cannot be overemphasized Check oil before each use and change as specified in the Maintenance Schedule Fig 7 Oil Fill Plug Dipstick Oil Fill Hole O Ring Fig 8 Oil Fill WARNING Remove gas cap slowly to avoid injury from...

Page 7: ... seconds 11 Place the choke lever in Position 3 Release the throttle control to the idle position and begin operation IF The engine does not start repeat Steps 4 11 IF The engine fails to start after a few attempts place the choke lever in Position 3 and squeeze the throttle control Pull the starter rope 3 to 8 times The engine should start If not continue pulling starter rope until the engine sta...

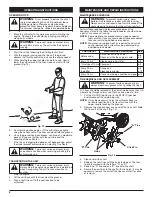
Page 8: ...ith unit running Always service and repair a cool unit Disconnect the spark plug wire to ensure that the unit cannot start WARNING To prevent serious personal injury always wear heavy gloves when handling the tines TRANSPORTING THE UNIT 1 Stop the engine 2 Tilt the unit back until the tines clear the ground 3 Push or pull the unit to the next location to be cultivated OPERATING TIPS 1 Move the cul...

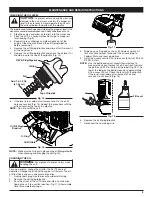
Page 9: ...the proper oil level in the crankcase Never operate the unit with the oil level below the bottom of the dipstick CHANGING THE OIL For a new engine change the oil after the first 10 hours of operation Change the oil while the engine is still warm The oil will flow freely and carry away more impurities 1 Unplug spark plug wire to prevent accidental starting 2 Remove the oil fill plug dipstick 3 Pour...

Page 10: ...needed to reduce idle speed Checking the fuel cleaning the air filter and adjusting the idle speed should solve most engine problems If not and all of the following are true the engine will not idle the engine hesitates or stalls on acceleration there is a loss of engine power Have the carburetor adjusted by a qualified service dealer Fig 21 1 2 3 Idle Adjustment Screw Fig 22 Check Fuel Old fuel i...

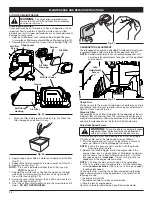
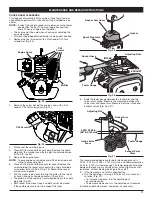
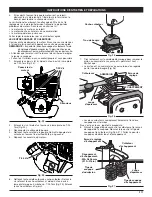
Page 11: ...ng it counterclockwise with a 5 8 socket 5 Remove the engine cover NOTE To ease engine cover removal pull the starter rope out a little to give some slack 6 Clean dirt from around the rocker arm cover Remove the screw holding the rocker arm cover with a large flat blade screwdriver or Torx T 25 bit Fig 25 Remove the rocker arm cover and gasket 7 Pull the starter rope slowly to bring the piston to ...

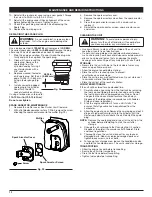
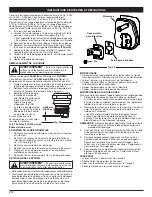
Page 12: ...nit out of the reach of children LONG TERM STORAGE If the unit will be stored for an extended time 1 Carefully drain all gasoline from the fuel tank by removing the fuel cap and tipping the motor housing over to allow the fuel to drain into an approved gas container Do not use gas that has been stored for more than 60 days Dispose of the old gasoline in accordance with Federal State and Local regu...

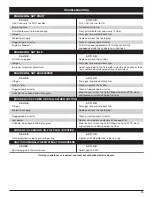
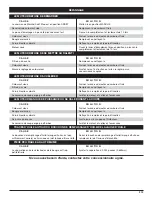
Page 13: ...I O N Old gas Drain gas tank and add fresh fuel Fouled spark plug Replace or clean the spark plug Plugged spark arrestor Clean or replace spark arrestor Low power Rocker arm clearance adjustment see page 18 Cultivator tines bound with dirt or grass Stop the unit switch the On Off Stop Control to STOP clean and remove any debris binding the tines C A U S E A C T I O N Old gas Drain gas tank and add...

Page 14: ...of the required maintenance listed in your operator s manual Troy Bilt recommends that you retain all receipts covering maintenance on your small off road engine but Troy Bilt cannot deny warranty solely for the lack of receipts or for your failure to ensure the performance of all scheduled maintenance As the small off road engine owner you should however be aware that Troy Bilt may deny you warra...

Page 15: ...e Emissions Warranty Coverage The fuel tank must be warranted to the ultimate purchaser and any subsequent owner that the evaporative emission control system when installed was 1 Designed built and equipped so as to conform with all applicable regulations and 2 Free from defects in materials and workmanship that causes the failure of a warranted part for a period of two years c The warranty on eva...

Page 16: ... LLC Troy Bilt with respect with new merchandise purchased and used in the United States its possessions and territories Troy Bilt warrants this product against defects in material and workmanship for a period of two 2 years commencing on the date of original purchase and will at its option repair or replace free of charge any part found to be defective in material or workmanship This limited warr...

Page 17: ...se Nous nous réservons le droit d y apporter des modifications à tout moment sans préavis Copyright 2008 MTD SOUTHWEST INC Tous droits réservés Obtenez la liste des concessionnaires agréés appelez le 1 800 828 5500 aux États Unis ou le 1 800 668 1238 au Canada Pour de plus amples informations à propos de votre appareil visitez www troybilt com ou www troybilt ca NE RETOURNEZ PAS L APPAREIL AU DÉTA...

Page 18: ...SI Z87 1 1989 lesquelles doivent être indiquées sur les lunettes mêmes Portez des bouchons d oreille et des casques antibruit lors de l utilisation de cet appareil Portez un masque CONSIGNES DE SÉCURITÉ IMPORTANTES CONSIGNES DE SÉCURITÉ Lisez le s manuel s de l utilisateur et suivez tous les avertissements et consignes de sécurité Vous pourriez à défaut entraîner des blessures graves pour vous ou ...

Page 19: ...SATION Nettoyez les dents à l aide d un produit d entretien d intérieur afin de retirer les dépôts Graissez les dents à l huile pour l empêcher de rouiller AUTRES MISES EN GARDE DE SECURITE N entreposez jamais un appareil à essence à l intérieur d un bâtiment où les vapeurs peuvent entrer en contact avec toute source de flammes ou d étincelles Laissez refroidir le moteur avant de le ranger ou de l...

Page 20: ... dents Dents Support de la roue Silencieux ARRÊT O MARCHE I Manette des gaz Guidon APPLICATIONS Travailler le gazon et les sols meubles ou semi meubles Travailler les plates bandes autour des arbres etc Découpage de bord FAMILIARISEZ VOUS AVEC VOTRE APPAREIL Roue du coupe bordures Lame du coupe bordures ...

Page 21: ...lle Trou inférieur Trou supérieur Boulon Boulon à clavette Support de la roue Support de la partie arrière Fig 3 Axe à épaulement Fig 2 ATTACHER LE COUPE BORDURES ET LA LAME Pour transformer le cultivateur en coupe bordures procédez de la façon suivante 1 Appuyez sur l interrupteur On Off pour le mettre en position Off O pour arrêter le moteur et les dents et débranchez la bougie pour éviter tout ...

Page 22: ... le réservoir et faites marcher le moteur jusqu à ce qu il soit à sec avant d entreposer l appareil Utilisation d additifs de carburant L utilisation d additifs de carburant tel que le stabilisant d essence STA BIL ou un produit équivalent permet d empêcher la corrosion et de minimiser la formation de résidus de gomme L usage d additifs peut empêcher le carburant de former des dépôts nocifs dans l...

Page 23: ...irez dessus brusquement 5 fois de suite 8 Mettez le levier d étrangleur en Position 2 9 Tout en appuyant sur la manette des gaz tirez sur la corde 1 à 4 fois jusqu à ce que le moteur démarre 10 Laissez le tourner pendant 30 à 60 secondes 11 Mettez le levier en Position 3 Mettez la manette des gaz en position de ralenti et commencez le travail SI Le moteur ne démarre pas retournez à l étape 5 SI Le...

Page 24: ...eure avec les deux mains le cultivateur jusqu à ce que les dents touchent le sol Fig 13 TRANSPORT DE L APPAREIL 1 Arrêtez le moteur 2 Inclinez l appareil vers l arrière jusqu à ce que les dents décollent du sol 3 Poussez ou tirez l appareil pour aller au lieu de travail suivant MODE D EMPLOI F8 AVERTISSEMENT Portez des vêtements appropriés pour diminuer les risques de blessures durant l utilisatio...

Page 25: ...e bouchon de remplissage jauge d huile au moment de la vérification et du changement d huile Fig 17 CHANGEMENT D HUILE Si le moteur est neuf changez l huile après les 10 premières heures d utilisation Mieux vaut changer l huile lorsque le moteur est encore chaud Cela lui permet de s écouler librement et AVERTISSEMENT Portez toujours des gants pour éviter tout risque de blessures lorsque vous manip...

Page 26: ...as tourner lorsque le moteur est au ralenti Fig 21 3 Lavez le filtre dans un mélange d eau et de détergent Fig 20 Rincez le filtre abondamment et laissez le sécher 4 Appliquez une quantité suffisante d huile moteur propre SAE 30 pour enduire légèrement le filtre Fig 21 5 Pressez le filtre pour répartir et drainer l excédent d huile Fig 21 6 Replacez le filtre et l écran Fig 19 NOTE Si vous faites ...

Page 27: ...sion et d échappement 3 Si les dents tournent lorsque le moteur est au ralenti dévissez la vis de ralenti de 1 8 de tour à la fois selon le besoin pour réduire la vitesse de ralenti La vérification de carburant le nettoyage du filtre à air et le réglage de la vis de ralenti devraient résoudre la plupart des problèmes de moteur Dans le cas contraire et si le moteur ne se met pas au ralenti le moteu...

Page 28: ...pliez celui ci L appareil est alors prêt pour l entreposage TRANSPORT Laissez le moteur refroidir avant le transport Attachez bien l appareil lors du transport Videz tout le carburant du réservoir avant le transport Serrez le bouchon du réservoir avant le transport ENTRETIEN DU PARE ÉNTINCELLES 1 Retirez le couvercle du silencieux Voir Jeu entre soupape et culbuteur 2 Retirez la vis retenant le co...

Page 29: ...e étincelles colmaté Nettoyez ou remplacez le pare étincelles Moteur noyé Placez le levier d étranglement bleu en position 3 pressez la complètement et lentement de 10 fois C A U S E S O L U T I O N Carburant vieux Drainez le réservoir ajoutez du carburant frais Bougie encrassée Remplacez ou nettoyez la Pare étincelles colmaté Nettoyez ou remplacez le pare étincelles De basse puissance Ajuste jeu ...

Page 30: ...aire au regard de la garantie En tant que propriétaire du petit moteur hors route vous êtes responsable de la maintenance telle qu indiquée dans votre manuel du propriétaire Troy Bilt vous conseille de conserver toutes les factures relatives à l entretien de votre petit moteur hors route mais Troy Bilt ne peut refuser une garantie au seul motif de l absence de factures ou de votre manquement à eff...

Page 31: ... livré à l acheteur final b Couverture générale de garantie des émissions par évaporation Le réservoir de carburant doit comporter la garantie pour l acheteur final et tout propriétaire ultérieur que le système de contrôle d émissions d évaporation lorsqu il a été installé était 1 Conçu construit et équipé afin de se conformer à toutes les réglementations en vigueur et 2 Exempt de défauts quant au...

Page 32: ... La garantie limitée énoncée ci après est accordée par Troy Bilt LLC Troy Bilt et concerne les marchandises neuves achetées et utilisées aux États Unis ainsi que dans leurs possessions et territoires Troy Bilt garantit ce produit contre tout vice de matière ou de façon pendant une période de deux 2 ans à compter de la date d achat initiale et elle se réserve le choix de réparer ou de remplacer à t...

Page 33: ...R PARA SOLICITAR SERVICIO POR LA GARANTIA DEBERA PRESENTAR PRUEBA DE SU COMPRA ESTE PRODUCTO ESTA CUBIERTO POR UNA O MAS PATENTES DE EE UU OTRAS PATENTES EN TRAMITE El servicio de esta unidad ya sea durante o después del período cubierto por la garantía debe ser realizado solamente por un proveedor de servicios autorizado y aprobado Antes de que empiece a ensamblar su nuevo equipo por favor ubique...

Page 34: ...si la operación produce mucho polvo Use pantalones largos fuertes botas guantes y camisa de mangas largas No use ropa holgada joyas pantalones cortos sandalias ni esté descalzo Asegúrese el cabello por Lea el manual del operador y siga todas las advertencias e instrucciones de seguridad De no hacerlo el operador y o los espectadores pueden sufrir graves lesiones SI TIENE PREGUNTAS LLAME AL 1 800 8...

Page 35: ...Limpie las púas con un limpiador casero para eliminar la acumulación de resina Aceite las púas con aceite de máquina para evitar la corrosión OTROS AVISOS DE SEGURIDAD Nunca almacene una unidad con combustible dentro de un edificio en el cual los vapores puedan llegar a una llama expuesta o una chispa Deje que el motor se enfríe antes de almacenarlo o transportarlo Asegúrese de fijar bien la unida...

Page 36: ...s del manubrio Protección de las púas Púas Control del obturador Silenciador OFF APAGADO O ON ENCENDIDO I Control del regulador Manubrio CONOZCA SU UNIDAD APLICACIONES Cultivar tierra herbosa y tierra negra ligera a mediana Cultivar áreas de jardines alrededor de árboles etc Recortar los bordes ...

Page 37: ...ura deseada 4 Ubique la chaveta de la horquilla a través del orificio y asegúrelo con una chaveta de retén INSTRUCCIONES DE ENSAMBLE Perilla del manubrio Manubrio Arandela Perno Orificio Fig 1 Fig 2 CONEXIÓN DE LA RUEDA Y DE LA CUCHILLA DE LA BORDEADORA Para convertir la cultivadora en una bordeadora siga los siguientes pasos 1 Presione el interruptor encendido apagado O para detener el motor y lo...

Page 38: ...argue el gasolina en un área exterior limpia y bien ventilada Limpie de inmediato todo gasolina que se haya derramado Evite crear una fuente de encendido con la gasolina derramado No arranque el motor hasta que se hayan evaporado los gases de la gasolina ADVERTENCIA Saque la tapa del gasolina lentamente para evitar lesionarse con el rociado de la gasolina No opere nunca la unidad sin la tapa de la...

Page 39: ... regulador tire de la cuerda de arranque de 1 a 4 veces hasta que el motor arranque Déjelo funcionar de 30 a 60 segundos 10 Coloque la palanca del obturador en Posición 3 Suelte el control del regulador a la posición de mínima y comience la operación SI El motor no arranca regrese al pasos 4 11 SI El motor no arranca después de varios intentos coloque la palanca del obturador en la Posición 3 y op...

Page 40: ...ierra 3 Empuje o lleve la unidad hasta el próximo lugar que deba cultivar Fig 13 CONSEJOS PARA LA OPERACIÓN 1 Mueva el cultivador al área de trabajo antes de arrancar el motor Puede transportar el cultivador empujándolo sobre las ruedas o llevándolo del tubo central de la manija 2 Arranque la unidad siguiendo las instrucciones de arranque 3 Con el motor en marcha y las púas sin tocar el suelo opri...

Page 41: ...que que el anillo en O esté en su lugar en el tapón de relleno de aceite varilla de medición cuando mida y cambie el aceite Fig 16 CAMBIO DEL ACEITE En un motor nuevo cambie el aceite después de las 10 primeras horas de operación Cambie el aceite mientras el motor aún está caliente El aceite fluirá con libertad y llevará más impurezas 1 Desenchufe el manguito de la bujía de encendido para eliminar...

Page 42: ...a unidad sin el filtro de aire su garantía será ANULADA 7 Vuelva a instalar la cubierta del filtro de aire Coloque los ganchos del lado derecho de la cubierta del filtro de aire dentro de las ranuras del lado derecho del bastidor del filtro de aire AJUSTE DEL CARBURADOR La velocidad mínima del motor puede ser ajustada Puede tener acceso al tornillo de ajuste de mínima a través de un orificio en la...

Page 43: ...a de encendido 7 Tire lentamente de la cuerda de arranque para traer el pistón hacia la parte superior de su recorrido conocido como punto muerto superior Verifique que El pistón se encuentre en la parte superior de su recorrido mientras mira dentro del orificio de la bujía de encendido Fig 26 Ambos brazos oscilantes se mueven con libertad y ambas válvulas están cerradas De no ser así repita este ...

Page 44: ... transportar la unidad CAMBIO DE LA BUJÍA DE ENCENDIDO Use una bujía de encendido 753 05784 o Champion ref RDZ4H La separación correcta es de 0 635 mm 0 025 pulgadas Retire la bujía luego de cada 25 horas de operación e inspeccione su estado 1 Apague el motor y espere que se enfríe Tome el alambre de la bujía con firmeza y sáquelo de la bujía de encendido 2 Limpie alrededor de la bujía de encendid...

Page 45: ...a palanca azul del obturador en la Posición 3 oprima la bombilla de cebado total de 10 veces C A U S A A C C I Ó N El gasolina es viejo Drene el tanque de gasolina Agregue gasolina nueva La bujía de encendido está arruinada Cambie o limpie la bujía de encendido Parachispas obstruido Limpie o cambie el parachispas Energia baja Huelgo del brazo oscilante El accesorio de corte está atascado de hierba...

Page 46: ...efectuosa Troy Bilt la reparará o la reemplazará Responsabilidades del Propietario según la Garantía Como propietario del motor off road pequeño usted es responsable de realizar el mantenimiento requerido que se indica en su manual del operador Troy Bilt recomienda que usted conserve todos los recibos que cubren el mantenimiento de su motor off road pequeño pero Troy Bilt no puede denegar la garan...

Page 47: ... fecha en que se entrega el motor o el equipo a un comprador final b Cobertura General de la Garantía de Emisiones Evaporativas El tanque de combustible debe estar garantizado al comprador final y a cualquier propietario posterior en cuanto a que cuando se instaló el sistema de control de emisiones evaporativas estaba 1 Diseñado construido y equipado de forma tal que cumplía con todas la regulacio...

Page 48: ...a continuación es dada por Troy Bilt LLC Troy Bilt con respecto a mercancía nueva que sea comprada y usada en los Estados Unidos sus posesiones y territorios Troy Bilt garantiza este producto contra defectos en el material y la mano de obra durante un período de dos 2 años a partir de la fecha de compra original y a su entera opción arreglará o substituirá sin costo alguno cualquier pieza cuyo mat...

Reviews: