


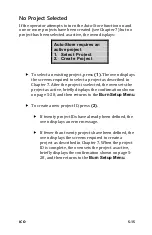


5-18
hh:mm AM
Arrows toggle AM/PM
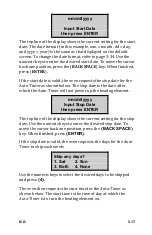
Input Start Time
then press ENTER
The top line of the display shows the current setting for the start
time. The time format (in this example, the
AM/PM
format) is
the same as that displayed on the default screen. To change the
time format, refer to page 5-34. Use the numeric keys to enter
the desired start time and the arrow keys to toggle between
AM
and
PM
. To move the cursor back one position, press the
(
BACK SPACE
)
key. When finished, press
(
ENTER
)
.
NOTE
The start time should be set at least 60 – 90 minutes
before the first sample is to be burned. To ensure
consistent, repeatable results.
If the start time is valid, the oven requests the
stop time
for the
Auto-Timer
as shown below. The stop time is the time of day
when the
Auto-Timer
is to turn the heating element off.
hh:mm PM
Arrows toggle AM/PM
Input Stop Time
then press ENTER
The top line of the display shows the current setting for the stop
time. Use the numeric keys to enter the stop time and the arrow
keys to toggle between
AM
and
PM
. To move the cursor back
one position, press the
(
BACK SPACE
)
key. When finished,
press
(
ENTER
)
.
If the stop time is valid, the oven displays the
Auto-Timer
Enabled
screen, showing the start date and time, the stop date
and time, and the days to be skipped (if any). If no days are to be
skipped, the bottom line of the display is blank.
Summary of Contents for ICO 4740
Page 2: ......
Page 13: ...ICO xi Figure 21 Disengage Paper Spindle A 10 Figure 22 Insert New Paper Roll A 11...
Page 14: ......
Page 22: ...1 8 Figure 1 Parts and Accessories...
Page 138: ......
Page 152: ......
Page 161: ...ICO C 1 Appendix C SPECIFICATIONS This appendix contains specifications for the ICO...
Page 166: ......
Page 170: ......