background image

10200-15

10. CONDITIONING GUIDELINES

How you begin your exercise program depends on your physical condition. If you have been inactive for several years, or 
are severely overweight, you must start slowly and increase your time on the equipment; a few minutes per workout.

Initially, you may be able to exercise only for a few minutes in your target zone, however, your aerobic fitness will improve 
over the next six to eight weeks. Don’t be discouraged if it takes longer. It’s important to work at your own pace. 
Ultimately, you’ll be able to exercise continuously for 30 minutes. The better your aerobic fitness, the harder you will have 
to work to stay in your target zone. Please remember these essentials :

• Have your doctor review your training and diet programs to advise you of a workout routine you should adopt.
• Begin your training program slowly with realistic goals that have been set by you and your doctor.
• Monitor your pulse frequently. Establish your target heart rate based on your age and condition.
• Set up your equipment on a flat, even surface at least 3 feet from walls and furniture.

EXERCISE INTENSITY

To maximize the benefits of exercising, it is important to exercise with the 
proper intensity. The proper intensity level can be found by using your heart 
rate as a guide. For effective aerobic exercise, your heart rate should be 
maintained at a level between 65% and 85% of your maximum heart rate 
as you exercise. This is known as your target zone. You can find your target 
zone in the table below. 

During the first few months of your exercise program, keep your heart rate near the low end of your target zone as you 
exercise. After a few months, your heart rate can be increased gradually until it is near the middle of your target zone as 
you exercise.

To measure your heart rate, stop exercising but continue moving your legs or walking around and place two fingers on 
your wrist. Take a six-second heartbeat count and multiply the results by 10 to find your heart rate. For example, if your 
six-second heartbeat count is 14, your heart rate is 140 beats per minute. (A six-seconds count is used because your 
heart rate will drop rapidly when you stop exercising.) 
Adjust the intensity of your exercise until your 
heart rate is at the proper level. 

For more information visit www.trojanhealth.co.za

Summary of Contents for WALKER 110

Page 1: ...SPACE MY TIME CAUTION READ ALL PRECAUTIONS AND INSTRUCTIONS IN THIS MANUAL BEFORE USING THIS EQUIPMENT KEEP THIS MANUAL FOR FUTURE REFERENCE WALKER 110 TREADMILL TREADMILL CARE INSTRUCTION AND ASSEMB...

Page 2: ...OLDING TRANSPORT 8 6 MAINTENANCE 9 7 GROUNDING INSTRUCTIONS 10 8 COMPUTER FUNCTIONS 11 9 FITNESSTIPS TECHNIQUES 14 10 CONDITIONING GUIDELINES 15 11 WARM UP AND COOL DOWN 16 12 FREQUENTLY ASKED QUESTIO...

Page 3: ...ded that the equipment be located in an access controlled area Control is the responsibility of the owner Keep children away from all equipment Parents or others supervising adults must provide close...

Page 4: ...lease contact our service department on 0861 876 526 0861Trojan to arrange a repair OPERATING WARNINGS It is the purchaser s responsibility to instruct all users as to the proper operating procedures...

Page 5: ...ullest Yes it is a proven fact that a regular exercise program can improve your physical and mental health Too often our busy lifestyles limit our time and opportunity to exercise TheTROJAN WALKER 110...

Page 6: ...Bolt M8 x p1 25 x 52 2 57 Allen Bolt M8 x p1 25 x 45 2 12 POP Pin Rod 1 10 POP Pin Head 1 11 Spring 1 75 Allen Key Screwdriver 5mm 70mm x 70mm 1 74 Safety Key Clip 1 102 Silicon 1 65 Arc Washer 20 x...

Page 7: ...2 then pull them out of the hole of the Upper Computer Connect the Control Wires of the Upright to the Control wires in the Handrail Insert the Handrails into the Uprights and secure with two Allen Bo...

Page 8: ...nd then re insert the Pop Pin into the frame Note Lowering of the running deck can cause injury if caution is not taken when lowering the deck Please keep small children away from the treadmill when l...

Page 9: ...feel the top surface of the treadboard If the surface is slick to the touch then no further lubrication is required If the surface is dry to the touch apply one packet of lubricant or half of the bott...

Page 10: ...dinances DANGER improper connection of the equipment grounding conductor can result in a risk of electric shock Check with a qualified electrician or serviceman if you are in doubt as to whether the p...

Page 11: ...e range 40 240 beats min Refer to table on page 15 for different age and heart rate values II OPERATION MODE 1 Under START READY status press to start the treadmill at the speed of 1 0 km hr Press or...

Page 12: ...eed during workout 2 4 After entering P2 program you can set the target DISTANCE Distance range is 1 99 9km km The preset value is 5 km After setting press or to start immediately The treadmill will r...

Page 13: ...NS cont PROGRAM 4 PROGRAM 5 LEVEL 1 LEVEL 1 LEVEL 1 LEVEL 2 LEVEL 2 LEVEL 2 LEVEL 3 LEVEL 3 LEVEL 3 PROGRAM 6 MINUTES KM H MINUTES KM H MINUTES KM H MINUTES MINUTES MINUTES MINUTES MINUTES MINUTES KM...

Page 14: ...process Weight training helps tone build and strengthen muscle If you are working above your target zone you may want to do a less amount of reps MUSCLE CHART TREADMILL The exercise routine that is pe...

Page 15: ...t least 3 feet from walls and furniture EXERCISE INTENSITY To maximize the benefits of exercising it is important to exercise with the proper intensity The proper intensity level can be found by using...

Page 16: ...low your back and shoulders to relax as you reach down toward your toes as far as pos sible Hold for 15 counts then relax Repeat 3 times Stretches Hamstrings back of knees and back 2 Hamstring Stretch...

Page 17: ...e consol cannot read the hand pulse signal The hand pulse sensors will not operate correctly if your skin is extremely dry Moisten your hands and try again Avoid moving your hands while exercising and...

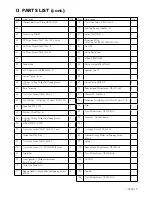
Page 18: ...Sink Hex Screw M8xP1 25x30 2 23 Frame Assembly 1 24 Rubber Pad PECP1434 6 25 Front Roller 1 No Description Qty 26 Socket Philips Screw M6xP1 0x25 1 27 Rear Roller 1 28 Rear End Cap Left 1 29 Rear End...

Page 19: ...afety Key 1 75 Hex Spanner Philips Screwdriver 5mm 70mmx70mm 1 76 Wire Clip Knob UC 1 1 77 Round Head Drilling Philips SelfTapping Screw 4x16 2 No Description Qty 78 Truss Hex Screw M8xP1 25x15 4 79 E...

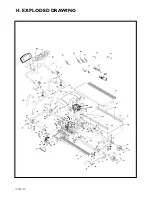
Page 20: ...10200 20 14 EXPLODED DRAWING...

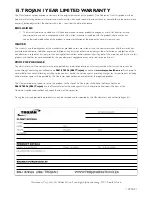
Page 21: ...any injury loss or damage direct indirect or consequential arising out of the use of or inability to use this product and whether or not occasioned by the manufacturer s negligence or any act or omis...

Page 22: ...as it complies with the terms and conditions of the warranty refer to warranties section in this manual Any items that need to be repaired that are NOT covered in the warranty will be for the consume...

Reviews: