background image

7

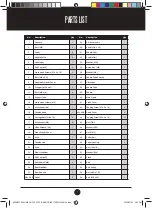
PARTS LIST

No.

Description

Qty

1

Console

1

2

Bolt (M8)

4

3

Foam 

2

4

Handle Pulse

2

5

Handlebar

1

6

End Cap (ø22)

2

7

Cross Head Screws (ST4.2 x 19)

2

8

Bolt (M8 x 60)

1

9

Handlebar Plastic Cover

1

10

Stopper (ø12.6 x ø3)

2

11

Bolt (M8 x 16)

4

12

Support Tube

1

13

Cross Head Screws (M5)

1

14

Arc Washer (D6)

1

15

Tension Knob

1

16

Carriage Bolt (M8 x 70)

4

17

Arc Washer (D8)

8

18

Allen Wrench (S6)

1

19

Front Plastic Cover

1

20

Wire

1

21

Tension Line

1

22

Wire

1

23

Front Stabiliser

1

24

End Cap (ø60)

2

25

Domed Nut (M8)

4

26

Rear Stabiliser

1

27

Rear End Cap

2

28L, 28R Pedal

2

No.

Description

Qty

29

D Plastic Insert

1

30

Knob (M16 x 1.5)

1

31

Saddle Post

1

32

Knob (M10)

1

33

Washer (D10)

1

34

Nylon Nut (M8)

3

35

Washer (D8)

1

36

Saddle Tube End cap

2

37

U Bracket

1

38

Saddle Tube 

1

39

Saddle 

1

40

Main Frame

1

41

Crank Cover

2

42

Tapping Screw (ST4.2 x 16)

4

43L, 43R Chain Cover

2

44

Tapping Screw (ST4.2 x 19)

11

45

Nut (7/8“)

1

46

Washer (D23)

1

47

Nut(7/8“ L)

1

48

Collar Ball

2

49

Collar Housing

2

50

Nut (15/16“ R)

1

51

Washer (D24)

1

52

Crank

1

53

Belt

1

54

Belt Pulley

1

55

Nut (M10 x 1.0)

1

56

Bolt (M8 x 25)

1

#20M03T008 OMEGA 390 STATIONARY BIKE USER MANUAL.indd   7

2020/03/25   3:59 PM

Summary of Contents for OMEGA 390

Page 1: ...com trojanhealth www trojanhealth co za www instagram com trojanhealth CAUTION READ ALL PRECAUTIONS AND INSTRUCTIONS IN THIS MANUAL BEFORE USING THIS EQUIPMENT KEEP THIS MANUAL FOR FUTURE REFERENCE 20...

Page 2: ...______________________________ 11 Console Functions ____________________________________________ 15 Fitness Tips Techniques _____________________________________ 18 Conditioning Guidelines ___________...

Page 3: ...r pain and strain begin each workout by stretching and warming up and end each session by cooling down and stretching INSTALLATION Trojan recommends that all equipment Be secured to or set up on a sol...

Page 4: ...e or repair the equipment yourself Please contact our service department on 0861 TROJAN 0861 876526 to arrange a repair Customers residing outside South Africa can contact us on 27 10 206 4405 OPERATI...

Page 5: ...enient and simple method to begin your assault on getting your body in shape and achieving a healthier lifestyle Before reading further please review the drawing below and familiarise yourself with th...

Page 6: ...rs and Allen keys will be provided for assembly 8 Bolt M8 x 60 1 PC 18 Allen Wrench S6 1 PC 9 Handlebar Plastic Cover 1 PC 25 Domed Nut M8 4 PCS 33 Washer D10 1 PC 41 Crank Cover 2 PCS 11 Bolt M8 x 16...

Page 7: ...ap 60 2 25 Domed Nut M8 4 26 Rear Stabiliser 1 27 Rear End Cap 2 28L 28R Pedal 2 No Description Qty 29 D Plastic Insert 1 30 Knob M16 x 1 5 1 31 Saddle Post 1 32 Knob M10 1 33 Washer D10 1 34 Nylon Nu...

Page 8: ...x 10 2 66 Water Bottle Cage 1 67 Bearing 2 68 Axle 1 69 Magnet 4 70 Location Grid 1 71 Hexagon Bolt M6 x 15 2 72 Spring Washer D6 2 73 Washer D6 x 12 x 1 2 74 Snap Spring D12 2 75 Magnetic Board Axle...

Page 9: ...9 EXPLODEDDRAWING 20M03T008 OMEGA 390 STATIONARY BIKE USER MANUAL indd 9 2020 03 25 3 59 PM...

Page 10: ...10 EXPLODEDDRAWING 20M03T008 OMEGA 390 STATIONARY BIKE USER MANUAL indd 10 2020 03 25 3 59 PM...

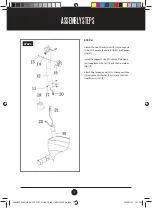
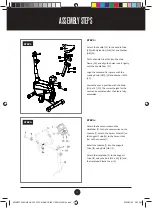
Page 11: ...ng on the opposite page STEP 1 Attach the Front Stabiliser 23 and Rear Stabiliser 26 to the Main Frame 40 with Carriage Bolt M8 x 70 16 Domed Nut M8 25 and Arc Washer D8 17 Attach the pedal to the cra...

Page 12: ...d Tension Line 21 Install the Support Tube 12 into the Main Frame 40 using Bolt M8 x 16 11 and the Arc washer D8 17 Attach the Tension Knob 15 to the Support Tube 12 using the Arc Washer D6 14 and the...

Page 13: ...M16 x 1 5 30 The correct height for the seat can be adjusted after the bike is fully assembled STEP 3 STEP 4 Attach the 5a sensor wires on the Handlebar 5 to the 1b sensor wires on the Console 1 Attac...

Page 14: ...14 ASSEMBLYSTEPS STEP 5 Attach the Water Bottle Cage 66 to the Support Tube 12 with Cross Head Bolt M5 x 10 65 STEP 5 20M03T008 OMEGA 390 STATIONARY BIKE USER MANUAL indd 14 2020 03 25 3 59 PM...

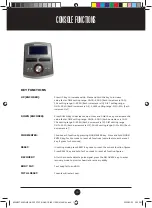
Page 15: ...ing range 0 00 99 50 Each decrement is 0 5 PULSE setting range 0 30 230 Each decrement is 1 MODE ENTER Choose each function by pressing MODE ENTER key Press and hold MODE ENTER key for 2 seconds to re...

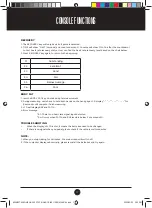
Page 16: ...any key is pressed or when it senses an input from the speed sensor The system turns off automatically when the speed has no signal input or when no key has been pressed for approximately 4 minutes OP...

Page 17: ...play for 8 seconds until computer finish measuring 3 LCD will display BMI and FAT 4 Error message E 1 There is no heart rate signal input detected E 4 Occurs when FAT and BMI result is below 5 or exce...

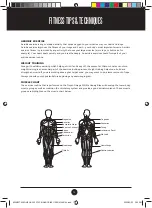
Page 18: ...ht training is an essential part of the exercise routine process Weight training helps tone build and strengthen muscle If you are working above your target zone you may want to do a lesser amount of...

Page 19: ...ising it is important to exercise with the proper intensity The proper intensity level can be found by using your heart rate as a guide For effective aerobic exercise your heart rate should be maintai...

Page 20: ...reach down toward your toes as far as possible Hold for 15 counts and then relax Repeat 3 times Stretches Hamstrings back of knees and back 2 HAMSTRING STRETCH Sit with one leg extended Bring the sole...

Page 21: ...et excessive moisture on the Console display panel as this might cause an electrical hazard or electronics to fail NOTE Keep the Console out of direct sunlight to prevent screen damage Please inspect...

Page 22: ...damage direct indirect or consequential arising out of the use of or inability to use this product and whether or not occasioned by the Manufacturer s negligence or any act or omission on its part PRO...

Page 23: ...e as long as it complies with the terms and conditions of the warranty refer to warranties section in this manual Any items that need to be repaired that are NOT covered in the warranty will be for th...

Reviews: