26
27
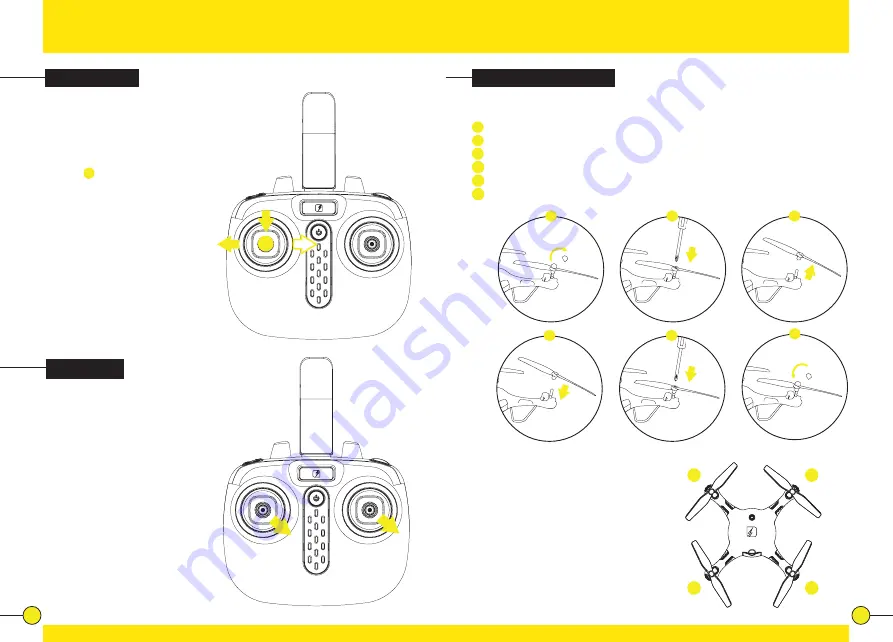
Replacing Rotor Blades
To replace a rotor blade, follow the steps below:
1
Gently remove the protector cap from the rotor top.
2
Use the Screwdriver to remove the screw.
3
Gently remove the rotor blade.
4
Press the new rotor blade onto the motor axis.
5
Fix the rotor blade by tightening the screw with the screw driver.
6
Put the protector cap back in place and press it gently.
Each rotor blade is marked with a “B”
followed by a number at the underside. Be
sure to note the marking and the tilt angle of
the rotor blades.
Front left: marking “1” or “3”
Front right: marking “2” or “4”
Rear left: marking “2” or “4”
Rear right: marking “1” or “3”
The “B” preceding the number can be ignored.
Calibration
The drone needs to be calibrated if
it flies unstable.
Place the drone on a flat and level
surface. Now push both the left and
right joystick, at the same time, to
the lower right corners and hold for
2 to 3 seconds. The LED lights on
the drone will start blinking rapidly,
indicating the drone is calibrating.
After 2 to 3 seconds the LED lights
will return back to normal, indicating
the calibration was succesful.
Rotation Trim
When hovering, if the drone rotates
to the left or right without you
moving the Throttle/Rotate stick,
proceed as follows:
Press down and hold the left
joystick.
1
While keeping the left
joystick pressed, move it to the left/
right to compensate for the rotation
deviation. Keep the left joystick
pressed down and keep trimming
until the drone flies stable.
4
5
6
2
1
3
1/3
2/4
2/4
1/3
1


