background image

3

4

Mounting and C onnec ting

,

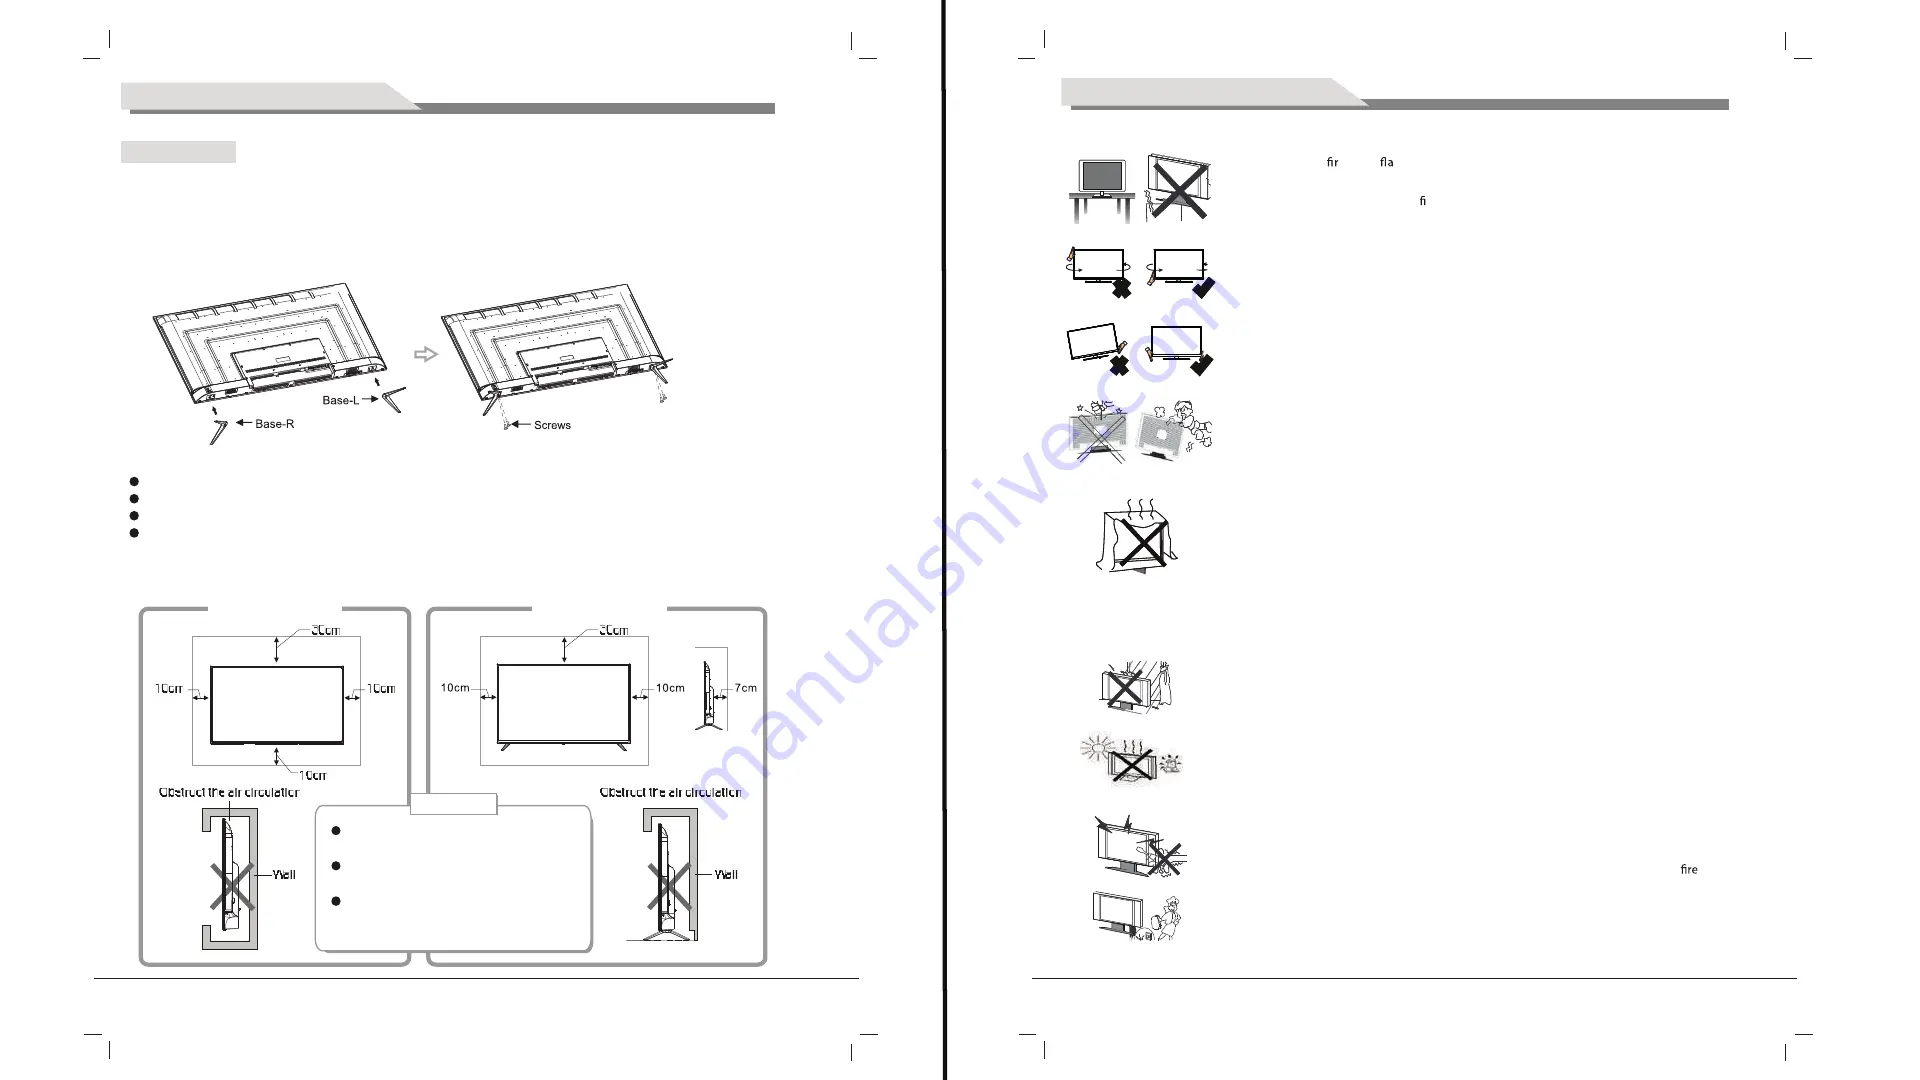
Please keep this space at least around

the TV as shown in the figure.

Do not cover the air vents or insert any

object into the enclosure.

Do not put the device in limited space,

e.g. bookcase or embedded closet,
unless the TV set is properly ventilated.

Mount on the wall

Mount on the bas e

Ventilation

1. The TV set;

2. User Manual;

3: Remote control;

4: Magic

Mounting the T V s et

Insert the base into the support hole in the rear enclosure in the arrow direction shown in the picture, aligning
the screw hole in the rear enclosure and the screw hole in the base, and then tighten the screw.

P ac king lis t

Mouse

The TV set should be mounted near the AC power socket for easy plugging and unplugging.
For your safety, please select appropriate wall mount bracket or base.
To avoid hurt, it is required to place the TV set on stable plane, or fix on firm wall.
Ask qualified personnel to mount the TV set on the wall. Improper mounting may result in instable TV set.

S afety warning and notic e

Do not use the 

with others  xations than those provided or suggested by the 

manufacturer. 

Do not place any material on the


Do not block or cover the ventilation openings on the monitor 


Power cord and cables must be properly routed and protected to prevent people from stepping 
on them and causing the 

to fall. 

Keep the 

dry and away from humidity. 

Keep the 

 away from heat sources .

Unplug the

before cleaning it. Do not use solvents or liquids to clean the

Only clean the 

with a soft and dry cloth.

In case of troubleshooting, does not use spare parts other than those suggested by the 
manufacturer. Using inadequate spare parts can lead  to electric shocks short-circuits 

 or 

other incidents.   

Unplug the TV during lighting storms or when unused for long periods of time. 

Place the  TV on  a  m  and  t  surface

 Ensur e the TV  is positioned close  to the wall to avoid it falling when  pushed. 

When you  turning the TV set,do  not hold  the top side of  the TV  set ,you  should 
hold the bottom side .

When you  lifting the TV set,do  not use  one hand  to handle  it,you should  lift the 
TV set  by two hands.

TV set

TV set

Do not put the c ontainer filled with water on the T V s et, to avoid elec tric s hoc k

or fire c aus ed by water drop of s plas hing.

TV set

TV set

TV set

The slots on the case is designed to release heat so as to assure that all inside

components will not reach an extra high temperature and can work normally for

a long time. Please do not cover the holes while place it.

TV set

TV set

TV set

Summary of Contents for 5520HDU9P0

Page 1: ...d Video Voice Search 16 2GB WI FI USB 2 0 DVB T T2 DVB S2 mini AV HDMI 2 0 Headphone Search Digital Audio Ethernet 140cm 55 55140cm HIGH DYNAMIC RANGE ULTRA HD 4K HDR DLED DIRECT LED SMART TV 11 47 Tr...

Page 2: ...1 1 7 8 USB 1 1 3 4 4 5 5 6 8 10 11 12 13 14 15 16 17 7 18 USB CI HDMI AV DVB S2 DVB T T2 RJ 45 4k LED LED DLED DLED Warning 2...

Page 3: ...4 3 4 3 2 1 10 10 10 10 10 30 30 7...

Page 4: ...1 5 6 3 4 2 7 10 9 13 8 12 11 DVB S2 COAX ETHERNET HDMI1 HDMI2 HDMI3 USB USB Ypbpr CI AV mini 2 7 9 10 8 USB 11 USB AV mini Ypbpr mini 3 12 13 7 1 2 3 4 5 6 7 8 9 0 PLAY PAUSE STOP MENU HOME SOURCE EX...

Page 5: ...8 1 5 AAA 7 SOURCE OK MENU ENTER 1 2 3 INFO MENU EXIT NICAM...

Page 6: ...10 9 1 MENU ENTER ENTER ENTER MENU EXIT ENTER P MODE Aspect Ratio ENTER MENU ENTER Color Temperature ENTER DNR 2 ENTER ENTER ENTER MENU EXIT MENU...

Page 7: ...12 11 S MODE ENTER Balance ENTER MENU Surround MENU suround ENTER AVL MENU AVL ENTER Digital Audio output SPDIF Output ENTER SPDIF RAW PCM OFF ENTER MENU 3 OSD 4...

Page 8: ...14 13 PIN 5 ENTER ENTER MENU EXIT ENTER MENU ENTER 6 CEC CEC HDMI CEC ARC...

Page 9: ...16 15 7 MENU ENTER ENTER MENU EXIT DTV ENTER ENTER ENTER ENTER ENTER...

Page 10: ...18 17 ENTER ENTER ENTER...

Page 11: ...20 19 ENTER Multi Audio Multi Audio DTV ENTER 8...

Page 12: ...22 21 1 ENTER Tv Store APPS...

Page 13: ...24 23 2 TV ENTER TV 3 Source ENTER MEDIA ENTER EXIT...

Page 14: ...26 25 INFO ENTER EXIT...

Page 15: ...28 27 ENTER EXIT ENTER ENTER EXIT INFO ENTER EXIT...

Page 16: ...30 29 4 SETTING ENTER WI FI...

Page 17: ...32 31...

Page 18: ...34 33...

Page 19: ...35 1 36 USB 2 Rj 45 8 55 76 1247 1247 785 726 255 15 9 0 0 5520HDU9P0 8 3 AV mini Ypbr mini 6 MINI AV_IN MINI COMPONENT_IN RAM ROM 2 0 GB 16 GB PAL SECAM BG DK I...

Page 20: ...Video Voice Search 16 2GB WI FI USB 2 0 DVB T T2 DVB S2 mini AV HDMI 2 0 Headphone Search Digital Audio Ethernet 140cm 55 55140cm Home Video Triview smart TV source popular 11 47AM Music Sport Apps My...

Page 21: ...edge of the screen s left right and center parts because of t transmition of the light on the screen Similar impact on the screen will occur when playing DVD or connecting games control Products dest...

Page 22: ...korcovertheventilationopeningsonthemonitor Power cord and cables must be properly routed and protected to prevent people from stepping on them and causing the to fall Keep the dry and away from humidi...

Page 23: ...EC TASK AUDIO SNAP APPS P MODE S MODE Wi Fi P SIZE STANDBY MUTE DVB S2 CH LIST BROWSER MOUSE SETTINGS FILE INFO FAV 1 2 3 4 5 6 7 8 9 10 11 12 13 14 15 16 17 18 19 20 21 22 23 24 25 26 27 28 29 30 31...

Page 24: ...ote control won t be used or battery voltage is too low please take out the battery to avoid corrosion due to battery liquid leakage Do not mix different types of batteries or used and new batteries D...

Page 25: ...ser mode TIPS You can press P MODE button on the remoter control again and again to change the picture mode directly 5 1 2 Aspect Ratio Press button to select Aspect Ratio then press ENTER button to e...

Page 26: ...utton to select surround then press ENTER button to enter and press button to adju Then press MENU button to return back the previous menu directly 5 2 4 AVL Press button to select AVL then press ENTE...

Page 27: ...sub menu 3 After nishing your adjustment press MENU button to save and return back to the previous menu or press EXIT button to exit the entire menu 5 5 1 Menu Language 5 5 1 Menu Language Menu Langu...

Page 28: ...IT button to exit the entire menu 5 7 1 Program Guide 1 In the DTV source you can art channel information function by pressing Program Guide button on the remote control The prompt window will appear...

Page 29: ...play the channel selected The menu will appear as follows 5 7 6 Record menu Press button to select Record menu and then press ENTER button to play the channel selected The menu will appear as follows...

Page 30: ...o Press button to select Multi Audio and then press ENTER button to play the channel selected The menu will appear as follows 5 7 9 DTV Setting Press button to select DTV Setting and then press ENTER...

Page 31: ...em is the standard Press button to select APPS in the Source Menu and then press ENTER or to enter you can button to select Tv Store to download apps what you want As the figure shows Home Home you ca...

Page 32: ...on MEDIA menu Plug in USB device or memory card then press SOURCE button to set the Source to Media Press button to select MEDIA in the Source Menu and then press ENTER or to enter You can also enter...

Page 33: ...on to ratite the picture Notes Other menu and description are the same as that for Movie menu 6 3 2 Music The picture is for a reference only the actual item is the standard Press button to select Mus...

Page 34: ...TER button to select the sub folder Press ENTER button or button to play Press button or EXIT button to stop playing Press the button to return back to previous page You can see the information of the...

Page 35: ...only the actual item is the standard Press button to select Setting in the Source Menu and then press ENTER or to enter 6 4 1 Network Setting Press button to select the Network that you can open the...

Page 36: ...to select the time that you can change As the figure shows Press button to select wallpapers that you can know these pictures As the figure shows Press button to select application that you can know...

Page 37: ...34 33 Home Home Press button to select reset that you can reset the system As the figure shows Press button to select the About TV that you can find the information about TV As the figure shows...

Page 38: ...55 Android Version 9 0 0 5520HDU9P0 76 1247 726 x x 1247 785 255 x x Picture and Sound input AV mini High quality audio and video input Ypbpr 3 MINI AV_IN MINI COMPONENT_IN REQUIREMENT OF WIRE HARNES...

Reviews: