


6
f. Be aware of paint finishes or treatments that may have been applied
to the material that is being sanded. Many treatments can create dust
that is toxic, or otherwise harmful.
If working on a building constructed
prior to 1960, there is an increased chance of encountering lead-based
paints
g. The dust produced when sanding lead-based paints is particularly
hazardous to children, pregnant women, and people with high blood
pressure.
DO NOT allow these people near to the work area, even if
wearing appropriate personal protective equipment
h. Whenever possible, use a vacuum dust extraction system to control
dust and waste
i. Be especially careful when using a machine for both wood and metal
sanding. Sparks from metal can easily ignite wood dust.
ALWAYS clean
your machine thoroughly to reduce the risk of fire
j. Empty the dust bag or container (where applicable) frequently during
use, before taking breaks and after completion of sanding.
Dust may
be an explosion hazard. DO NOT throw sanding dust into an open fire.
Spontaneous combustion may occur when oil or water particles come into
contact with dust particles. Dispose of waste materials carefully and in
accordance with local laws and regulations.
k. Work surfaces and sandpaper can become very hot during use. If
there is evidence of burning (smoke or ash), from the work surface,
stop and allow the material to cool.
DO NOT touch work surface or
sandpaper until they have had time to cool
l. DO NOT touch the moving sandpaper
m. ALWAYS switch off before you put the sander down
n. DO NOT use for wet sanding.
Liquids entering the motor housing can
cause severe electric shocks
o. ALWAYS unplug the sander from the mains power supply before
changing or replacing sandpaper
p. Even when this tool is used as prescribed it is not possible to
eliminate all residual risk factors.
If you are in any doubt as to safe use
of this tool, do not use it
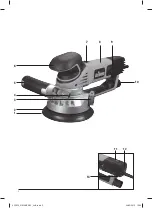
Product Familiarisation
1. Sanding Disc
2. Hook and Loop Backing Pad
3. Mode Selector Switch
4. Auxiliary Handle Adjustment Lever
5. Auxiliary Handle
6. Front Grip
7. On/Off Sliding Switch
8. Main Handle
9. Carbon Brush Access Covers
10. Dust Extraction Port
11. Power Indicator
12. Speed Control Dial
13. Dust Extraction Port Screw
Accessories (not shown):
•
6 x Hook and loop sanding discs (2 x 60 grit, 2 x 120 grit, 2 x 240 grit)
•
1 Pair spare carbon brushes
Intended Use
• Rotating dual-mode sanding/polishing machine, designed for sanding
and polishing of wood, plastics, metals, composite materials,
paint/varnish, fillers and similar materials, using compatible accessories
like sanding discs and polishing sponges/bonnets.
WARNING
: This machine may only be used for dry sanding applications; it is
unsuitable for wet sanding.
Unpacking Your Tool
• Carefully unpack and inspect your tool. Fully familiarise yourself with all its
features and functions
• Ensure that all parts of the tool are present and in good condition. If any
parts are missing or damaged, have such parts replaced before attempting
to use this tool
Before Use
Fittingthe backing pad
WARNING
: Always disconnect from the power supply before removing or
attaching the backing pad.
Note
: This sander is supplied with its regular Hook and Loop Backing Pad
(2) factory pre-installed. It may, however, become necessary to remove and
replace the backing pad, in order to fit replacements, perform maintenance or
to thoroughly clean the device.
1. Switch the device into fixed orbit mode (see ‘Selecting sanding mode’)
2. Remove the Sanding Disc (1) (if fitted), by peeling it off the Hook and Loop
Backing Pad (2)
3. Use a suitable hex key (not supplied) to loosen the bolt in the centre of the
Hook and Loop Backing Pad, by turning it anticlockwise
4. Remove the bolt, spring washer and washer
5. Pull the Hook and Loop Backing Pad off the gear housing
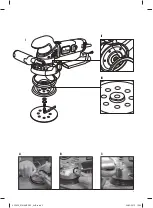
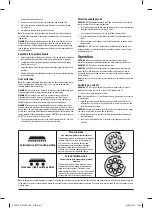
6. For cleaning purposes, also remove the rubber collar (Fig. I)
7. Assemble in reverse order
Please note that:
• the rubber collar has a flattened notch, which is a form-fit with the
flattened part of the gear housing (Fig. II),
• the Hook and Loop Backing Pad is a form-fit to the two flattened sides of
the internal mounting spindle (Fig. III)
Selecting the right grade of sanding disc
• Sanding discs are available in a variety of different grades: coarse (60 grit),
medium (120 grit) and fine (240 grit)
• Use a coarse grit to sand down rough finishes, medium grit to smooth the
work, and fine grit to finish off
• Always use good quality sanding discs to maximise the quality of the
finished task
• It is advisable to do a trial run on a scrap piece of material to determine
the optimum grade of sanding disc for a particular job. If there are still
marks on your work after sanding, try either going back to a coarser grade
and sanding the marks out before recommencing with the original choice
of grit, or try using a new sanding disc to eliminate the unwanted marks
before going on to a finer grit and finishing the job
Fitting a sanding disc
WARNING
: Always ensure that the tool is switched off and the plug is removed
from the power supply, before fitting or removing sanding discs.
Note
: DO NOT continue to use worn, torn or heavily clogged sanding discs.
Ensure foreign objects, such as nails and screws, are removed from the
workpiece before starting to sand.
WARNING
: DO NOT use a sanding disc on wood that has previously been used
on metal. This may cause scouring on the wooden surface.
• In order for the dust extraction system to function, this Triton sander must
only be used with punched sanding discs with holes that match the holes
in the Hook and Loop Backing Pad (2):
1. Remove the old Sanding Disc (1) (if fitted), by peeling it away from the
532839_Z1MANPRO1_AUS.indd 6
24/02/2015 16:04


