


9
• Excessively worn brushes may cause loss of power, intermittent failure, or
visible sparking
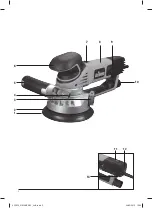
• To replace the brushes, remove the Carbon Brush Access Covers (9)
from both sides of the machine. Remove the worn brushes and replaced
with new. Replace covers. Alternatively, have the machine serviced at an
authorised Triton service centre
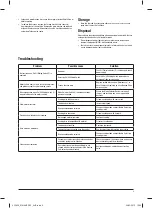
Problem
Possible cause
Solution
No function when On/Off Sliding Switch (7) is
operated
No power
Check if Power Indicator (11) is illuminated; check
power supply
Defective On/Off Sliding Switch
Have the On/Off Sliding Switch replaced by an
authorised Triton service centre
Motor suffers from cut-outs, loss of performance
and produces sparks and/or burning smells
Carbon brushes worn
Replace carbon brushes (see ‘Maintenance’), or
have the brushes replaced by an authorised Triton
service centre
No sanding action when On/Off Sliding Switch (7)
is operated, despite the motor running
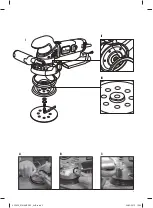
Mode Selector Switch (3) in between settings;
gears not engaged
Ensure the Mode Selector Switch is turned all
the way, and locked in one of the two possible
positions
Slow material removal
Sanding disc too fine or worn
Fit new sanding disc with coarser grit
Tool speed set too low
Increase tool speed
Wrong sanding mode selected
Change sanding mode as described in ‘Selecting
sanding mode’
Scratches on workpiece after sanding
Sanding disc too coarse
Fit new sanding disc with finer grit
Not enough material removed
Continue sanding
Burn marks on workpiece
Sanding disc incompatible with material
Fit correct sanding disc
Tool speed set too high
Decrease tool speed
Too much pressure exerted on to the sander
Use less pressure whilst moving the machine
Wrong sanding mode selected
Change sanding mode as described in ‘Selecting
sanding mode’
Excessive dust emission
Vacuum dust extraction system not connected, or
extraction system not switched on
Check connection of the vacuum hose, and ensure
dust extraction system is switched on
Dust extraction not working; sanding disc not
aligned with dust extraction holes in the Backing
Pad; extraction holes blocked
Realign sanding disc; unblock dust extraction
holes
Troubleshooting
Storage
• Store this tool and its accessories after use in its case, in a dry, secure
place out of the reach of children
Disposal
Always adhere to national regulations when disposing of power tools that are
no longer functional and are not viable for repair.
• Do not dispose of power tools, batteries or other waste electrical and
electronic equipment (WEEE), with household waste
• Contact your local waste disposal authority for information on the correct
way to dispose of power tools and batteries
532839_Z1MANPRO1_AUS.indd 9
24/02/2015 16:04


