background image

4

4. Setup

Caution! Read All Instructions and Warnings Before Installation!   

Warning: Charging stations can be extremely heavy. Do not attempt to unpack or mount the charging station without 

assistance. Use extreme caution when handling the charging station and be sure to follow all handling and installation 

instructions. Do not attempt to install equipment without first stabilizing the charging station.

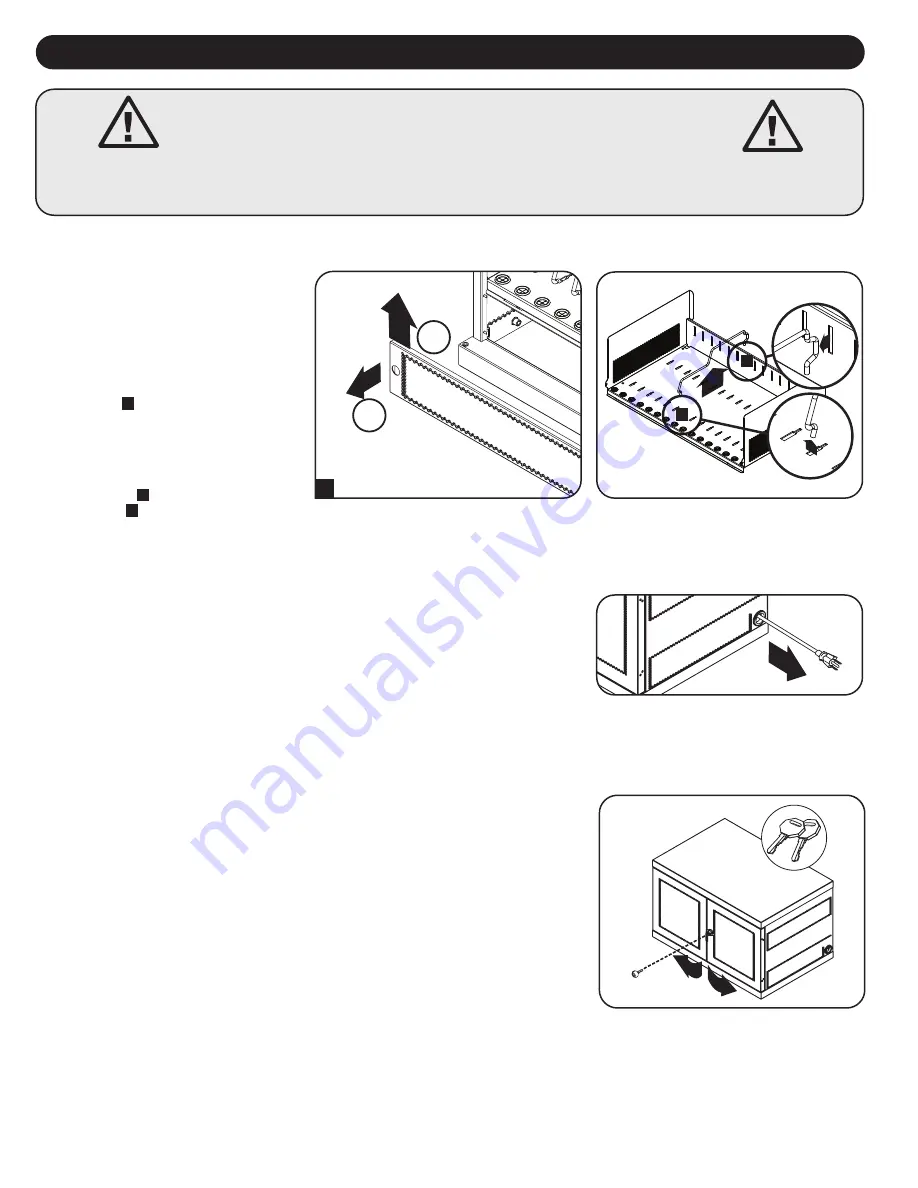
4.1 Adjusting Storage Shelf Dividers

4.2 Powering the USB Charger/Hub Unit

Your charging station comes with a storage 

shelf containing adjustable dividers that can 

accommodate up to 16 personal electronic 
devices.
Remove any personal electronic devices stored 

on the shelf tray. Then remove the blanking 

panel by inserting your fingers into its left and 

right holes, and lifting the blanking panel up 

and pulling out 

A

. To remove the shelf tray 

from the cabinet, push the shelf tray forward to 
disengage from the mounting hook, then pull 

the tray up and out. Once the shelf is removed, 
remove or rearrange a spring-wire divider by 

first pulling it gently forward to disengage it 

from the rear end 

B

, then pull it up from the 

front of the tray 

C

. Repeat as necessary for 

additional shelf dividers.

Once the blanking panel has been removed as shown in 

Section 4.1

, find the USB Charger/Hub 

unit’s input plug and cable located in the charging station’s bottom compartment. Push the input 

plug through one of the power cord access holes located on either side of the charging station 
cabinet (using the power cord access hole on the same side as the power cord manager is 

recommended). Plug the power cord into the nearest 3-prong, grounded wall outlet.

Note:

 The power cord can optionally be routed through the charging station’s rear panel. To do so, first remove 

the rubber grommet from either 

power cord access hole 

and attach it to the 

cable lock routing hole

 on the 

back of the unit (see 

3. Feature Identification

 for routing locations).

4.3 Door Locks

The split doors contain a lock that is accessible with the included keys.

B

C

1

2

A

Summary of Contents for CS16USBWHG

Page 1: ...esktop Floor Placement 6 8 Ultraviolet Light Operation 6 9 Specifications 7 10 Storage Service and Cleaning 8 11 Optional Casters and Handle 8 12 Warranty and Product Registration 8 Espa ol 9 Fran ais...

Page 2: ...dust and direct sunlight Leave adequate space around the charging station for proper ventilation Do not block cover or insert objects into the charging station s external ventilation openings The char...

Page 3: ...ide 5 5 15P HG Hospital Grade Input Plug with 10 ft Cord 6 Padlock Hasp Lock Not Included 7 Rear Panel with Keyhole Wall Mount Slots See Section 6 for More Information 8 UV Lamp 9 Start Button and LED...

Page 4: ...mounting hook then pull the tray up and out Once the shelf is removed remove or rearrange a spring wire divider by first pulling it gently forward to disengage it from the rear end B then pull it up...

Page 5: ...ices and reattach the blanking panel removed in Section 4 1 to the unit Tripp Lite offers individual and 10 pack cables for Apple devices using USB to 30 Pin or USB to Lightning cables as well as indi...

Page 6: ...d nearby Never attempt to lift or install the charging station without adequate help See Section 9 Specifications for more information on the charging station s rated load capacity Note The mounting b...

Page 7: ...eset for the next sanitizing cycle Note Both charging station doors must be closed before the start button is pressed The UV lights will not turn on if either door is open This helps ensure non protec...

Page 8: ...igital device pursuant to part 15 of the FCC Rules These limits are designed to provide reasonable protection against harmful interference in a residential installation This equipment generates uses a...

Page 9: ...nsamble 12 4 1 Ajuste de los Divisores de 12 Estante de Almacenamiento 4 2 Alimentaci n de la Unidad de 12 Cargador Hub USB 4 3 Cerraduras de las Puertas 12 5 Cargador Hub USB de 16 Puertos 13 5 1 Car...

Page 10: ...para que reciba una ventilaci n apropiada No bloquee cubra ni coloque objetos en las aberturas externas de ventilaci n de la estaci n de carga La estaci n de carga es muy pesada Tenga cuidado al mani...

Page 11: ...a NEMA 5 15P HG de Grado Hospital con Cable de 3 05 m 10 pies 6 Portacandados Candado No Incluido 7 Panel Posterior con Ranuras con Perforaciones para Instalaci n en Pared Para Obtener M s Informaci n...

Page 12: ...vuelva a acomodar un divisor de cables de resorte jal ndolo primero hacia adelante para desengancharlo del extremo posterior B entonces jale hacia arriba del frente de la charola C Rep talo si es nece...

Page 13: ...uerto de carga USB B Repita para todos los dispositivos y reinstale el panel obturador removido en la Secci n 4 1 a la unidad Tripp Lite ofrece cables individuales y en paquetes de 10 para dispositivo...

Page 14: ...a intente levantar o instalar la estaci n de carga sin la ayuda adecuada Ver Secci n 9 Especificaciones para obtener m s informaci n sobre la capacidad de carga especificada de la estaci n de carga No...

Page 15: ...iclo de sanitizado Nota Ambas puertas de la estaci n de carga deben cerrarse antes de oprimir el bot n de arranque Las luces UV no se encender n si cualquiera de las puertas est abierta Esto ayuda a g...

Page 16: ...Lite Uni n Europea Seg n la Directiva de Residuos de Aparatos El ctricos y Electr nicos WEEE por sus siglas en ingl s Waste Electrical and Electronic Equipment y regulaciones aplicables cuando los cl...

Page 17: ...diviseurs de 20 l tag re de rangement 4 2 Mise sous tension du chargeur 20 USB concentrateur 4 3 Verrous de porte 20 5 Chargeur concentrateur USB 21 16 ports 5 1 Caract ristiques du chargeur 21 USB c...

Page 18: ...ouvertures de ventilation externes de la station de chargement La station de chargement est extr mement lourde Faire preuve de vigilance lors de la manutention de la station de chargement Ne pas tent...

Page 19: ...e approuv e pour les h pitaux 5 15P HG avec 3 m 10 pi de cordon 6 Moraillon cadenas loquet non inclus 7 Panneau arri re avec fentes pour montage mural en trou de serrure consulter la Section 6 pour de...

Page 20: ...l armoire Une fois l tag re retir e retirer ou r arranger un s parateur ressort en le tirant d abord d licatement vers l avant pour le d gager de l extr mit arri re B puis le retirer de l avant du pla...

Page 21: ...areils et remettre en place sur l appareil le panneau de suppression ayant t retir de l appareil dans la Section 4 1 Tripp Lite offre des c bles individuels et des c bles en paquet de 10 pour des disp...

Page 22: ...ut autre bo tier et ou quipement qui sera install proximit Ne jamais tenter de soulever ou d installer la station de chargement sans aide ad quate Consulter la Section 9 Caract ristiques techniques po...

Page 23: ...deux portes de la station de chargement doivent tre ferm es avant d enfoncer le bouton de d marrage Les lumi res UV ne s allumeront pas si l une des portes est ouverte Cela permet d assurer que les ye...

Page 24: ...et les recycleurs Union europ enne En vertu de la directive et des r glements d application relatifs aux d chets d quipements lectriques et lectroniques DEEE lorsque des clients ach tent de l quipemen...

Reviews: