background image

47

6. Toolbar Interface

The meanings of the toolbar icons are explained in the following table:
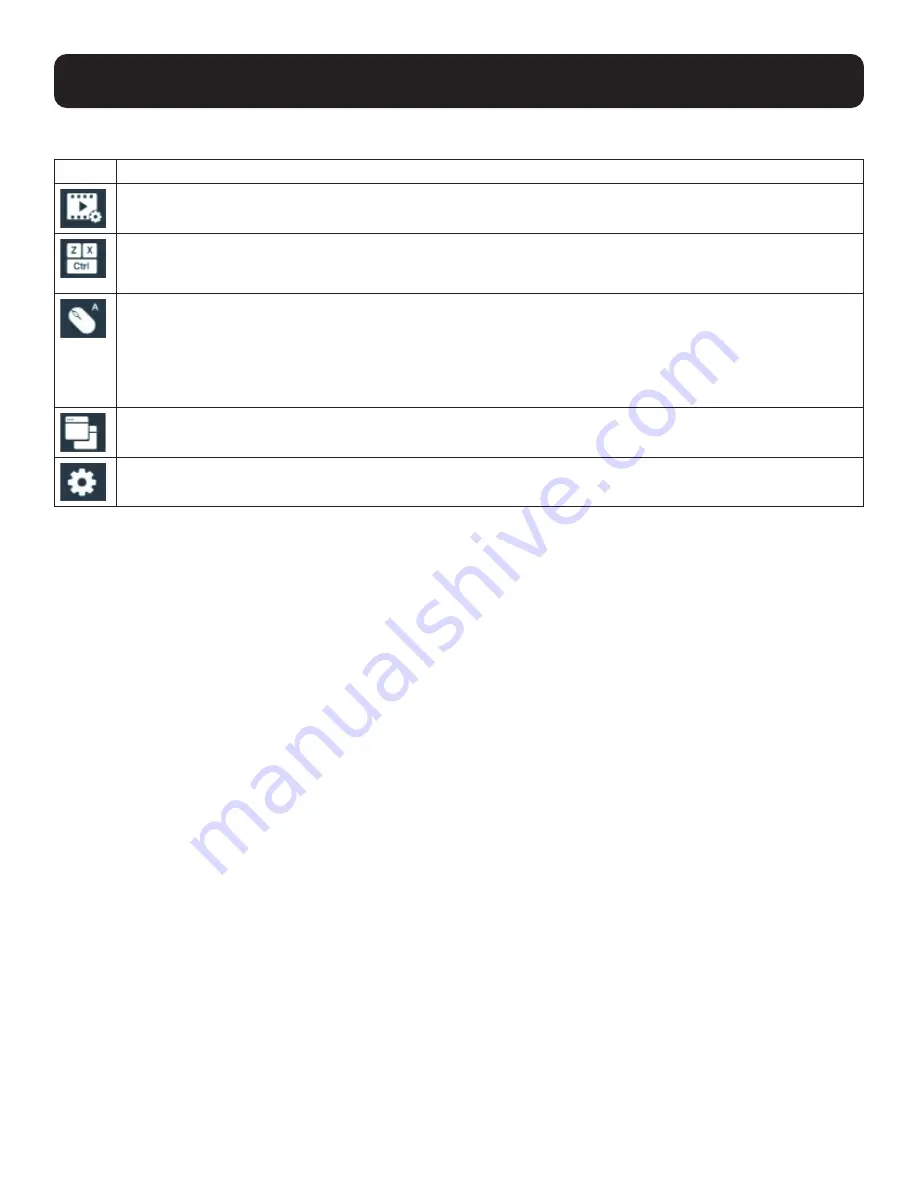
Option Description

Video icon

Brings up the video settings. See section 

6.2 Video Settings

 for more details.

Macros icon

Provides access to three functions found in the Macros dialog box: Hotkeys, User Macros and System macros. See 
section 

6.3 Macros 

for more details.

Mouse Sync Mode icon

Provides automatic locked-in syncing of the remote and local mouse pointers – eliminating the need to constantly 
resync the two movements.
Click the icon to toggle between Auto Mouse Sync Mode (mouse icon with an A) and Manual Mouse Sync Mode 
(mouse icon with an M).
See section 

6.4.3 Mouse Sync Mode

 for more details.

Connect icon

Click for a list of available ports. Click to select the port you wish to connect to.

Configuration icon

Click for further configurations. See section 

6.4 Further Configuration

.

6.1 Exit Remote Location

There are two ways to exit from the remote control operations on the captured port.
1.   Click 

Back

On the toolbar interface, click the “Configuration icon” for more operation options. Click “Back” to exit remote location.
2.  Use Macros
  By default, pressing the “Exit Remote Location” hot keys (F2, F3, F4) will also exit remote location.

 Note:

 Use the updated hot keys should there be a change to this function’s hot key.

Summary of Contents for B064-000-STN

Page 1: ...000 STN 1111 W 35th Street Chicago IL 60609 USA tripplite com support Copyright 2020 Tripp Lite All rights reserved WARRANTY REGISTRATION Register your product today and be automatically entered to wi...

Page 2: ...ection 21 Information 5 System Configuration 22 5 1 User Management 22 5 1 1 Users and Groups 22 5 1 1 1 Add User 23 5 1 1 2 Copy User 25 5 1 1 3 Modify User 25 5 1 1 4 Delete User 25 5 1 2 Managing A...

Page 3: ...Interface 46 6 1 Exit Remote Location 47 6 2 Video Settings 48 6 3 Macros 49 6 3 1 Hotkeys 50 6 3 2 User Macros 51 6 3 3 Import Export Macros 55 6 3 4 Delete Macros 55 6 3 5 Search Macros 56 6 3 6 Sy...

Page 4: ...ing panel array mode Supports boundless switching when cascaded with another B064 000 STN Virtual media lets you remotely connect storage media to a target server anywhere on the network HDMI port sup...

Page 5: ...SB Keyboard Mouse Ports 4 Microphone and Speaker Ports 5 Cascade Port 6 Power Button Press once to enter Standby Mode press again to power on the unit 7 Power LED Power ON Blue Standby Orange 1 Ground...

Page 6: ...a rack where it occupies 0U to save space 1 Remove two bottom screws on the unit Use the screws to secure the mounting plate to the bottom of the unit as shown in Figure 1 Figure 1 Secure Mounting Pl...

Page 7: ...to secure the mounting plate to the bottom of the unit Figure 3 Secure Mounting Plate to Unit 2 With a user supplied screw use the mounting plate s center screw hole to mount the unit to a wall Figur...

Page 8: ...the LAN port 4 Optional Plug USB flash drives or devices into the peripheral USB ports on the front of the unit 5 Optional To cascade an additional B064 000 STN unit plug one end of a user supplied C...

Page 9: ...ent modes Console Station Mode Log into the console station My Device KVM Device Mode Log into a KVM directly 1 a To log into the console station My Device select My Device from the Address dropdown m...

Page 10: ...cess authority to add devices to or remove devices from the User Console Station 4 System Configuration System Configuration allows users with administrative access authority to manage users groups di...

Page 11: ...ction operation 3 3 Dashboard Operation The dashboard of the Remote User Console Station usually displays the connected devices in an array of monitor units Each of the units corresponds to a connecte...

Page 12: ...rimary Display and click to select the port The selected port should now be on the primary display Your keyboard and mouse can now also control the server connected to that port For control of the ser...

Page 13: ...y being monitored into different groups or select which tab group is to be displayed on the dashboard Panel array management allows users to separate available ports into different groups or select wh...

Page 14: ...s Option Description Panel Array Management This option allows you to add delete or modify panel array groups All Devices All the ports of connected KVM over IP switches are displayed on the panel arr...

Page 15: ...e icon to display more device ports up to 64 ports on a smaller scale Press the icon to display fewer device ports on a larger scale The panel array icon is also shown on the top right hand corner of...

Page 16: ...or Panel Array icon to show their corresponding options Due to their similarity tab management is used as the example below Click Tab Management or Panel Array Management for the following page This p...

Page 17: ...3 4 4 Adding a Tab 1 To add a tab click the icon A new window Tab Device Configuration will be displayed 2 Enter a name for the new tab 3 Click on the devices you wish to be in this tab group and cli...

Page 18: ...w the steps outlined in section 3 4 4 Adding a Tab 3 4 6 Editing a Tab To edit a tab click the pen icon beside Tab Name The Tab Device Configuration window will be displayed as in Adding a Tab Edit it...

Page 19: ...ve devices from the B064 000 STN The KVM over IP Remote User Console Station can manage up to 256 KVM over IP switches and is able to display snapshots of up to 16 devices Click the Device Management...

Page 20: ...ce 4 1 2 Removing a Device To remove a device from the list hover your mouse over the device An X icon will be displayed Click the X icon to remove the device The system will ask for confirmation Clic...

Page 21: ...address The IPv6 Address will be displayed when clicking the IPv6 Address section 4 If a KVM over IP Switch is also added to NetDirector AXS and has Disable Other Authentication configured in NetDire...

Page 22: ...fault device information is displayed upon entering system configuration page as shown above If an item in the side menu has a or symbol a submenu is available when expanded Expand the submenu by clic...

Page 23: ...the overall installation Configure personal working environment User Access authorized devices Configure personal working environment Click Users or Groups under User Management in the left hand side...

Page 24: ...ount lets you suspend a user s account without actually deleting it so that it can be easily reinstated in the future To require a user to change their password at the next log on select User must cha...

Page 25: ...ime creating a user with similar settings information use the Copy User function A Copy User button is shown on the top right hand corner of the configuration body Select the user you want to copy and...

Page 26: ...icon under the Modify column 3 In the configuration page select the Groups tab Assign a User to a Group 1 In the Available column select the group you want the user to be in 2 Click the icon button t...

Page 27: ...p 1 In the Available column select the members users that you want the group to have 2 Click the icon button to put the members into the Selected column thereby adding into the group 3 Repeat the abov...

Page 28: ...ect the Device tab as shown Each of the elements on this page is described below Devices The list displays the currently available device s When there is a change in the user accounts and groups for a...

Page 29: ...er group of the console station will gain the permission of the selected groups of the device User Device Management Login Information Checking this will block all selections in the Device Users Confi...

Page 30: ...m will reboot 5 2 1 Device Information Click Device under Device Management in the left hand menu to bring up the information page The Device Information page displays the name of the selected device...

Page 31: ...on 5 2 2 Network The Network page is used to specify the network environment Click Network under Device Management in the left hand menu to bring up the information page Each of the elements on this p...

Page 32: ...to ascertain its IP address see Supported KVM Switches for information DNS Server For automatic DNS Server address assignment select Obtain DNS Server address automatically To specify the DNS Server a...

Page 33: ...MS Advanced Network Management Settings The ANMS page is used to set up login authentication and authorization management from external sources Click ANMS under Device Management in the left hand menu...

Page 34: ...the same Username on both the RADIUS server and the KVM over IP Console Station Use the same Username name on both the RADIUS server and the KVM over IP console station In each case the user s access...

Page 35: ...h Without schema Only Groups in AD are matched User privileges are the ones configured for the groups he belongs to on the switch Without schema Usernames and Groups in AD are matched User privileges...

Page 36: ...for a user name from 1 to 32 The default is 6 Minimum Password Name Sets the minimum number of characters required for a password from 0 to 32 A setting of 0 means that no password is required Users...

Page 37: ...com support Click Upgrade Main Firmware under Maintenance in the left hand menu to bring up the information page To upgrade the main firmware 1 Get the latest firmware by downloading the firmware fro...

Page 38: ...om a failed upgrade situation refer to Firmware Upgrade Recovery below 5 3 2 Firmware Upgrade Recovery Should the console station s main firmware upgrade procedure fail and the console station becomes...

Page 39: ...or the file Notes Setting a password is optional If you do not set one the file can be restored without specifying a password If you do set a password make a note of it since you will need it to be ab...

Page 40: ...ble go to the directory with the backup file cfg click to select the file highlighted as shown above and click Open 3 If you set a password when you created the file key it in the Password field 4 Sel...

Page 41: ...Pull Configuration Push Pull Configuration gives you the ability to deploy or retrieve your settings to or from other console stations Click Push cfg Pull cfg under Maintenance in the left hand side m...

Page 42: ...the information The console station will restart after successfully retrieving the information 5 3 4 2 Push Configuration To push deploy a configuration from your console station Note You can deploy...

Page 43: ...e in the left hand menu to bring up the terminal page Note Expand the submenu by clicking the symbol if Terminal is not shown Available commands include GET Gets current configuration HELP Provides He...

Page 44: ...gs The system will ask for confirmation Click Yes to proceed The system will restart after the reset Click No to cancel the operation 5 3 6 2 Reset on Exit If you checked the checkbox the system will...

Page 45: ...eferences logout restart the system shut down the system or display quick information about the console station Click the User icon for its menu Option Description Change Password Click this option to...

Page 46: ...interface provides a toolbar to help you with the remote control operations on the captured port The toolbar is usually hidden To bring up the toolbar locate a down arrow symbol as shown Hover your m...

Page 47: ...o Mouse Sync Mode mouse icon with an A and Manual Mouse Sync Mode mouse icon with an M See section 6 4 3 Mouse Sync Mode for more details Connect icon Click for a list of available ports Click to sele...

Page 48: ...the local screen Notes 1 If the local and console station mouse pointers are out of sync in most cases performing this function will bring them back into sync 2 This function works best with a bright...

Page 49: ...e value the clearer the picture and the more video data goes through the network Depending on the network bandwidth a high value may adversely affect response time Set to Grayscale Check to set video...

Page 50: ...hotkey To change the hotkey for an action 1 If you are not in the Hotkeys tab click to select to go into the Hotkeys page 2 Highlight the Action and click Set Hotkey for the window dialog below 3 Pres...

Page 51: ...ronizes the local and remote mouse movements The default keys are F8 F7 F6 Video Auto Sync This combination performs an auto sync operation It is equivalent to clicking the Video Auto Sync button in t...

Page 52: ...op left of the screen 5 Press the keys for the macro To pause macro recording click Pause To resume click Pause again Clicking Cancel cancels all keystrokes Notes 1 Case is not considered typing A or...

Page 53: ...53 6 Toolbar Interface 6 When finished click Stop You will return to the Macros dialog box with your macro key presses displayed in the Macro column...

Page 54: ...of your keystrokes change their order etc 8 Click Save to save the changes or click Cancel to cancel the changes Both options will return you to the Macros dialog box 9 Repeat the procedure for any o...

Page 55: ...tion the macro runs with the default choice No Wait or Time Ctrl which is shown in the Playback Mode column You can change the default choice by clicking on the current choice No Wait in the screensho...

Page 56: ...es that match your search string appear in the list 6 3 6 System Macros System Macros are used to create exit macros for closing a session For example as an added measure of security you could create...

Page 57: ...he remote server to be heard on the client computer s speakers on or off The option is grayed out when the speaker is toggled Off Mouse Pointer Hover your mouse over the option and click to select the...

Page 58: ...The Virtual Media feature allows a removable USB drive on a user s system to appear and act as if it were installed on the remote server To mount a virtual media device 1 Click the Virtual Media icon...

Page 59: ...cted device being able to have data from the remote server written to it For the redirected device to be writable as well as readable click to put a check in the Enable Write checkbox Note If a redire...

Page 60: ...el when the user has disabled Chat Occupy Release Keyboard Video Mouse When you Occupy the KVM other users cannot see the video and cannot input keyboard or mouse data The button is shadowed when the...

Page 61: ...he names of all the logged in users are listed in this panel Your name appears in blue other users names appear in black By default messages are posted to all users To post a message to one individual...

Page 62: ...6 3 1 Hotkeys for details 3 Set the mouse speed and acceleration for each problematic server attached to the switch See the user manual of the corresponding KVM over IP switch for instructions 6 4 3 3...

Page 63: ...B Hub Ports x2 USB 2 0 Type A Female Cascade Port RJ45 Female LEDs Power Blue Max Supported Video Resolution 1920 x 1200 60 Hz Operating Temperature 32 F to 104 F 0 C to 40 C Storage Temperature 4 F t...

Page 64: ...ofits or revenue loss of equipment loss of use of equipment loss of software loss of data costs of substitutes claims by third parties or otherwise PRODUCT REGISTRATION Visit www tripplite com warrant...

Reviews: