background image

22

7. KVM Operation

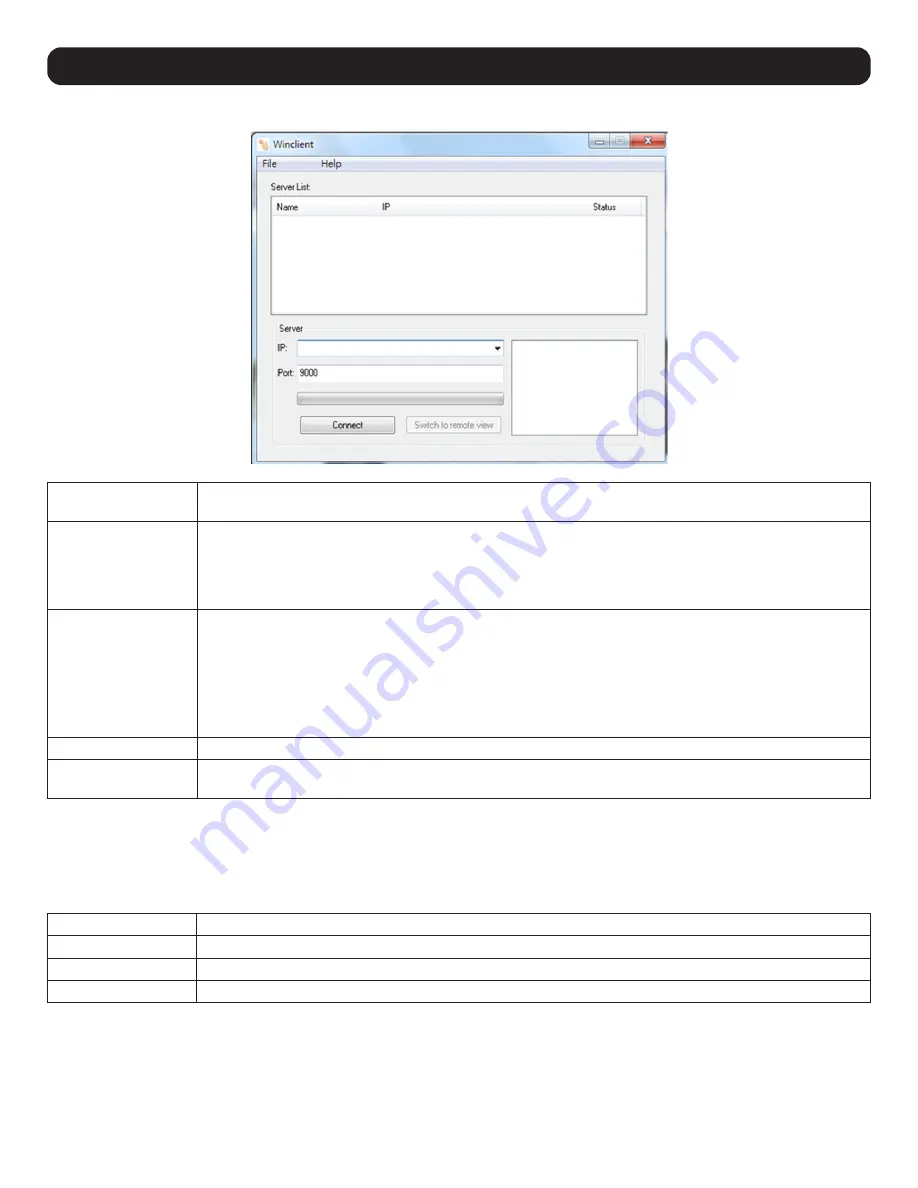
AP Windows Client Connection Screen

Menu Bar

The Menu Bar contains two menus: File and Help. The File Menu allows the operator to Create, Save and Open 
Work files. The Help Menu displays the AP Windows Client version number.

Server List

Each time the WinClient.exe file is run, it searches the User’s LAN segment for B030-008-17-IP KVM Switches 

and lists in the box any that are found. Double-click on any of the devices in this list to connect.

Note:

 For a switch to appear in the Server List, the Enable Client AP Device List check box in the Operating Mode page of the 

Web Interface’s Device Management section must be checked and the Program service port in the Network page must be set to 
the same number as in the AP Windows Client Port field.

Server

This area is used when connecting to a B030-008-17-IP KVM Switch at a remote location:
• Click on the IP drop-down and select an address from the list. If the desired address is not listed, enter the 

target IP address in the IP field and its port number in the Port field.

• Once the IP address and port number have been specified, click Connect to show a login dialog box. Enter the 

username and password as provided by your system administrator and click OK to establish a connection with 

the B030-008-17-IP KVM Switch.

• When the session has ended, click 

Disconnect 

to terminate the connection.

Message List

Lists status messages regarding the connection to the B030-008-17-IP.

Switch to Remote View

Once a remote connection with a B030-008-17-IP KVM Switch has been established, this button becomes active. 
Click the button to switch to the KVM Switch’s Web Interface Page.

The File Menu

The File Menu allows the operator to Create, Save and Open Work Files. A Work File consists of all the information specified in a Client session. 
This includes the items in the Server List and Server IP List.
Whenever a user runs the Client program, it opens with the values contained in the current Work File (i.e. values that were in effect when the 
program was last closed).

New

Allows the user to create a named work file so its values will be saved and available for future use.

Open

Allows the user to open a previously saved work file and use the values contained in it.

Save

Allows the user to save the values presently in effect as the current work file.

Exit

Exits the AP Windows Client.

Summary of Contents for B030-008-17-IP

Page 1: ...B030 DP08 17DIP B030 DP16 17DIP WARRANTY REGISTRATION Register your product today and be automatically entered to win an ISOBAR surge protector in our monthly drawing tripplite com warranty 1111 W 35...

Page 2: ...quipment is operated in a commercial environment This equipment generates uses and can radiate radio frequency energy and if not installed and used in accordance with the instruction manual may cause...

Page 3: ...r was damaged in shipping contact your dealer Read this manual thoroughly and follow the installation and operation procedures carefully to prevent any damage to the switch or to any other devices on...

Page 4: ...n Models B030 DPXX 17DIP A DisplayPort monitor capable of displaying the highest resolutions provided by any computer in the installation USB keyboard and mouse 2 3 Computers The following equipment m...

Page 5: ...users to communicate with one another and a remote user to take exclusive control of the KVM functions Panel Array Mode view all ports at the same time in a grid format Broadcast Mode support keyboard...

Page 6: ...r attached to its corresponding port is up and running and a Selection LED to indicate which port has the KVM focus Press buttons 1 and 2 at the same time for 5 seconds to perform a keyboard mouse res...

Page 7: ...rce plugs in here 2 Power Switch This is a standard rocker switch that powers the device on and off 3 External Console Section Supports an independent external KVM console for flexibility and convenie...

Page 8: ...Consideration should be given to the connection of equipment and the supply circuit as well as what effect overloading the supply circuit might have on overcurrent protection and supply wiring To hel...

Page 9: ...t When loading the rack avoid creating a hazardous condition due to uneven loading Ensure the rack is level and stable before extending a device from the rack Use caution when pressing the rail releas...

Page 10: ...be mounted in a 2 post rack installation using the optional 2 Post Rack Mount Kit model B019 000 The mounting hardware allows for the console to be opened with the drawer in any position Heavy duty 1...

Page 11: ...HDMI to DVI adapter cable such as Tripp Lite s P566 Series cables 5 5 Opening Closing the Console The console consists of two modules an LCD module located under the top cover and a keyboard touchpad...

Page 12: ...r to the diagrams in the Opening Separately section as you do the following 1 Engage the release catches and pull the top and bottom panels out until the keyboard module clicks into place Once the con...

Page 13: ...board module is 65 lb Failure to heed the instructions below can result in damage to the keyboard module CORRECT Rest your hands and arms lightly on the keyboard module as you work INCORRECT DO NOT ap...

Page 14: ...Engage the release catches located on either side of the keyboard to release the keyboard module then slide in the module slightly 2 Release the catches Using the front handle push the keyboard module...

Page 15: ...15 5 Installation 3 Rotate the LCD module all the way down then engage the rear catches to release the LCD module 4 Using the front handle push the module all the way in...

Page 16: ...screen appears 4 By default the Obtain an IP address automatically DHCP option is selected To manually assign an IP address check the radio button next to the Use the following IP address option 5 Yo...

Page 17: ...st highlight it 4 From here you can choose between the following two options 1 Obtain an IP address automatically DHCP or 2 Specify an IP address If you choose to assign your own address fill in the I...

Page 18: ...the IP address manually or be automatically assigned via DHCP server By default the IP address is set to be automatically assigned via DHCP server To manually assign an IP address check the Set IP add...

Page 19: ...y have the wrong clock setting Adjust the clock setting to eliminate vertical banding H Position Positions the display area on the LCD panel horizontally moves the display area left or right V Positio...

Page 20: ...slash and the login string along with the IP address when logging in e g 192 168 0 100 abcdefg If the IP address and or login string is not known contact your System Administrator 2 When a Security A...

Page 21: ...rt number assigned to it and click the Login button Note The default port number assigned to the KVM is 9000 6 A prompt will appear asking to enter your username and password If accessing the KVM for...

Page 22: ...number have been specified click Connect to show a login dialog box Enter the username and password as provided by your system administrator and click OK to establish a connection with the B030 008 17...

Page 23: ...t by highlighting the desired KVM and clicking the Connect button Note For a switch to appear in the Server List the Enable Client AP Device List check box in the Operating Mode page of the Web Interf...

Page 24: ...E USE OF THIS PRODUCT EVEN IF ADVISED OF THE POSSIBILITY OF SUCH DAMAGE Specifically TRIPP LITE is not liable for any costs such as lost profits or revenue loss of equipment loss of use of equipment l...

Reviews: