background image


Page 10 


POWER MANAGEMENT 


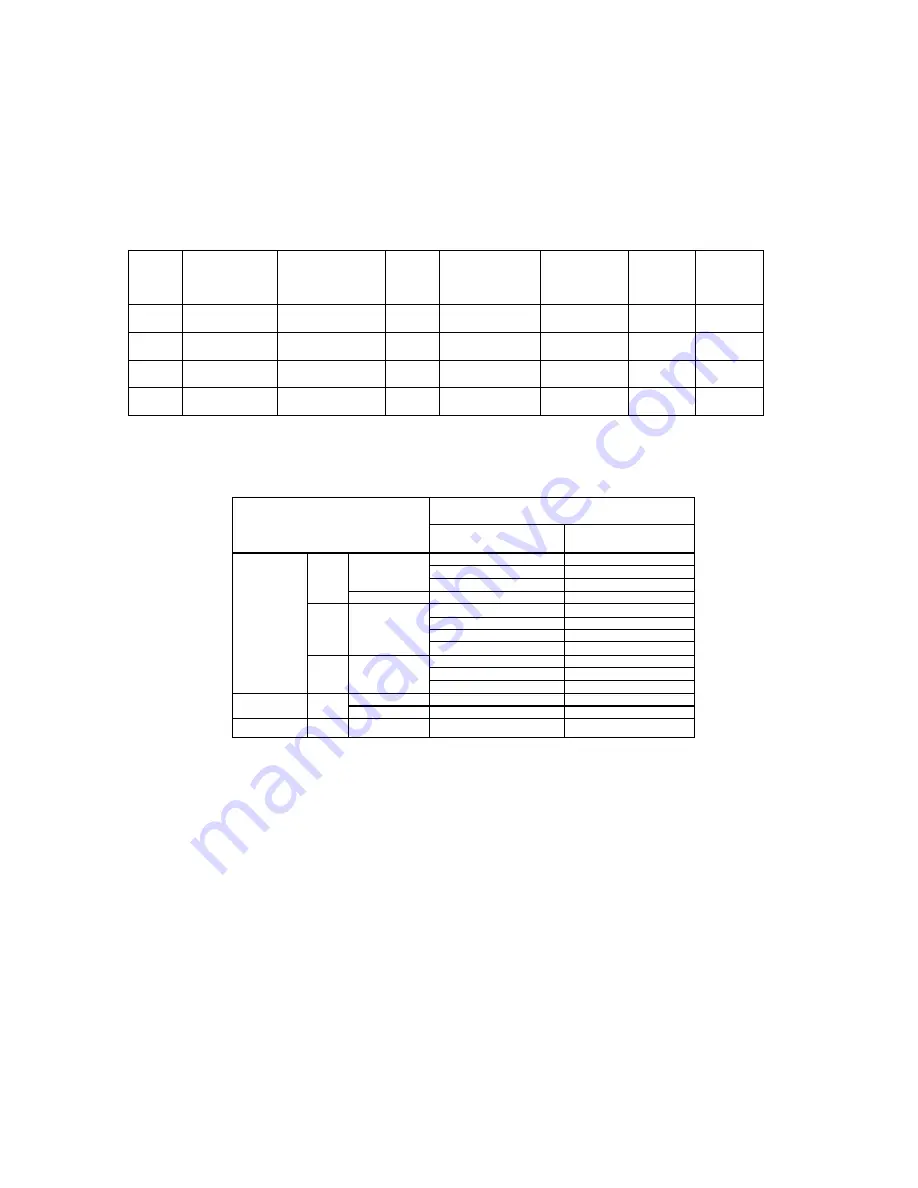
This LCD Monitor complies with the VESA DPMS (version 1.0p) power management specification. DPMS provides 

four types of power saving modes by detecting the horizontal or vertical sync signal. As well, the computer graphic 

card also needs to be DPMS compliant to utilize these modes. 


Item 

DPMS Mode  Display 

Power 

LED 

Power 

Consumption 

Recovery 

Time 

H-sync 

V-sync 

On 

Normal 

Green  Normal 

--- 

On 

On 

Stand By 

No Display 

Amber   5W 

3 sec 

< 10 KHz On 

Suspend 

No Display 

Amber   5W 

3 sec 

On 

< 10 Hz 

4   

Off 

No Display 

Amber   5W 

3 sec 

< 10 KHz < 10 Hz 


SUPPORTED TIMING 


Analog


Display Mode


Horizontal Frequency


Vertical Frequency


31.5 KHz


60.0 Hz


37.5 KHz


75.0 Hz


640 x 480


37.8 KHz


72.8 Hz


VGA


720 x 400


31.5 KHz


70.1 Hz


35.2 KHz


56.3 Hz


37.9 KHz


60.3 Hz


46.9 KHz


75.0 Hz


SVGA


800 x 600


48.1 KHz


72.0 Hz


48.4 KHz


60.0 Hz


56.5 KHz


70.1 Hz


VESA


XGA


1024 x 768


60.0 KHz


75.0 Hz


640 x 480


35.0 KHz


66.7 Hz


Macintosh


VGA


832 x 624


49.7 KHz


74.6  Hz


MS-DOS


640 x 350


31.5 KHz


70.1 Hz 


TROUBLESHOOTING PROCEDURES 

If the LCD Monitor fails to function correctly, please follow these steps for a possible solution. 


1.  Perform the adjustments according to Operating the Monitor section. 

2.  Refer to the following troubleshooting chart if you cannot resolve the problem from other sections of this Users 

Guide. 

3.  If the problem is not described below or you cannot correct the problem, stop using the monitor and contact your 

dealer or the nearest service center for further assistance. 


Summary of Contents for T3-HB17A1

Page 1: ...Trilogy Touch Technology 17 Chassis Touch Screen Monitor T3 HB17A1...

Page 2: ...HE MONITOR 3 Connecting the Monitor OPERATING THE MONITOR 4 Adjusting the Viewing Angle Operating Procedure Additional information about the On Screen Display Menu Table FOR YOUR SAFETY 8 SPECIAL NOTE...

Page 3: ...ed or as an obligation by Trilogy Touch Technology Trilogy Touch Technology shall not be liable for the accuracy of the information fitness for purpose or direct or indirect consequential damages Pate...

Page 4: ...ing angle VESA DPMS power saving feature powers off the monitor after a defined period of inactivity Digital Character Smoothing Automatic Set Up Windows 95 98 2000 XP Plug Play Compliant Versatile fu...

Page 5: ...on of the monitor If the serial COM port is a 25 pin D connector then an adaptor to 9 pin male is required In addition consideration should be given to system IRQ assignments for serial operation as t...

Page 6: ...r to the VGA port of the PC system 3 Connect the male end of the power cord into a wall socket and the female end to the Monitor 4 If your Monitor has a USB interface use the supplied USB cable to con...

Page 7: ...n to activate each selection This is accomplished through pinholes in each button except the power on off 1 Power Switch Power On Off 2 Auto Automatically optimize positions phase clock when OSD is no...

Page 8: ...on to select sub menu 5 Press or button to select sub menu item 6 Press EXIT button when finished adjusting and accept the user setting 7 Press Auto button to process auto tune function ADDITIONAL INF...

Page 9: ...ns The Auto Adjust process may take as much as 10 consecutive seconds The display image will make noticeable changes as the Auto Adjust function completes SELF TEST CHECK This product provides a self...

Page 10: ...e audio Mute Set the audio mute to be on or off Color 9300K Set the color temp to 9300K white color 7500K Set the color temp to 7500K white color 6500K Set the color temp to 6500K white color User Red...

Page 11: ...WATER Operating the monitor in close proximity to water where the water may enter the device may cause fire or electric shock BAD WEATHER CONDITIONS It is advisable not to operate the monitor during h...

Page 12: ...n becomes dark flickers or does not light up contact your dealer or the nearest service center for a backlight replacement Do not attempt to replace it yourself CLEANING WARNING If you dropped any mat...

Page 13: ...KHz 60 0 Hz 37 5 KHz 75 0 Hz 640 x 480 37 8 KHz 72 8 Hz VGA 720 x 400 31 5 KHz 70 1 Hz 35 2 KHz 56 3 Hz 37 9 KHz 60 3 Hz 46 9 KHz 75 0 Hz SVGA 800 x 600 48 1 KHz 72 0 Hz 48 4 KHz 60 0 Hz 56 5 KHz 70 1...

Page 14: ...ctivate Is the computer is ON Is the signal cable is properly connected at both ends c Power indicator is amber Is the signal timing of the computer is within the spec Display is too dark or too brigh...

Page 15: ...h the receiver is connected Consult the dealer or an experienced radio TV technician for help RADIO FREQUENCY INTERFERENCE STATEMENT Warning CANADIAN DOC NOTICE For Class B Computing Devices This digi...

Page 16: ...h cannot be a post office box The name of the dealer or distributor from which the product was purchased The ability to provide specific failure details Support is limited to the monitor Application s...

Page 17: ...with an equal product solely at Trilogy s discretion Customers must notify Trilogy Technical Support in writing within 30 days of a service incident If Trilogy determines that the product does not me...

Page 18: ...associated with transporting the Monitor In addition you are responsible for insuring the Monitor during shipment You assume the risk of loss during shipment Use the original shipping and packing mat...

Page 19: ...17 Chassis Monitor T3 HB17A1 Dimension Drawing Trilogy Touch Technology Dimensions in mm...

Reviews: