background image


www.trikdis.com 


  7     


September, 2022 


Security control panel „FLEXi“ SP3


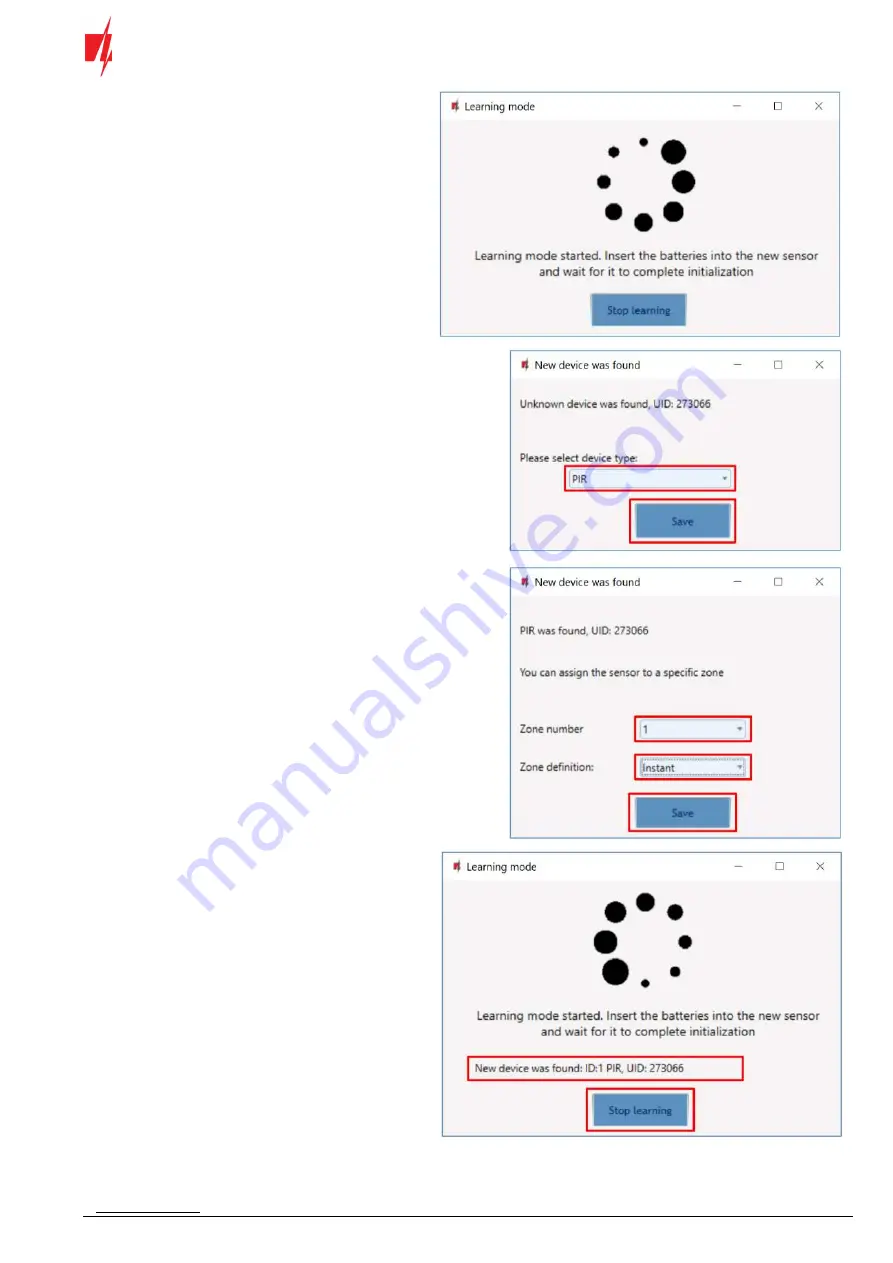
When enrolling sensors, the 

RF-HW

 module must be 

at least 1 m from the sensors.  

1.


The “

LEARN

” LED on the 

RF-HW

 module will 

flash.  

2.


RF-HW

 module - switches to learning mode. 

TrikdisConfig

 will open the sensor binding 

window.  


3.


Insert a battery into the wireless sensor (PIR, 
magnetic contact, flood detector, smoke 

detector, glass break detector, vibration sensor). 
On the 

RF-HW

 module, the “

LEARN

” LED will 

flash yellow for a short time (this indicates that 
the sensor is enrolled). A new window will open 

in 

TrikdisConfig

, in which you need to specify the 

type of sensor (PIR, magnetic contact, flood 
detector, smoke detector, glass break detector, 
vibration sensor).  

4.


Click “

Save

”.  


5.


The sensor must be assigned a “

Zone Number

” 

and a “

Zone definition

”.  

6.


Click “

Save

”.  


7.


Wireless sensor is included in the list of sensors.  

8.


The “

UID

” number must match the serial number 

of the sensor shown on the sticker on the sensor 
board.  

9.


If you need to add the next sensor, you need to 
insert a battery into it. And make the settings 
described above.  

10.


Click “

Stop learning

” to complete the registration 

of wireless sensors.  


Summary of Contents for RF-HW

Page 1: ...Application of Honeywell wireless sensors with the FLEXi SP3 control panel September 2022...

Page 2: ...d Trademarks and patents Other trade names used in this document may be trademarks or registered trademarks belonging to their respective manufacturers or retailers Manufacturer UAB Trikdis Draugystes...

Page 3: ...022 Security control panel FLEXi SP3 Contents 1 Control panel firmware replacement 4 2 Linking a wireless sensors 6 3 Linking a wireless remote controller keyfob 8 4 Linking a wireless siren 10 5 Link...

Page 4: ...re 5 Click the Open Firmware button and select the SP3_xxx2_0114 fw firmware file 6 Click the Update F12 button 7 Wait for the updates to finish 8 Disconnect the USB Mini B cable 9 Wait 1 minute 10 Co...

Page 5: ...USB Mini B cable 29 Click Disconnect 30 Wait 1 minute 31 Using TrikdisConfig remotely connect to the FLEXi SP3 control panel IMPORTANT Remote configuration will only work when FLEXi SP3 1 An activated...

Page 6: ...SP3 33 Click Configure 34 In the newly opened window click Read F4 If required enter the administrator or installer code 35 Go to the Wireless window 2 Linking a wireless sensors Click the Learn sens...

Page 7: ...for a short time this indicates that the sensor is enrolled A new window will open in TrikdisConfig in which you need to specify the type of sensor PIR magnetic contact flood detector smoke detector g...

Page 8: ...assigned to the Zones and Areas of the control panel Zones window If you set zone Type EOL T then the sensor tamper monitoring mode will be enabled Note To delete wireless sensors from the FLEXi SP3...

Page 9: ...is enrolled A new window will open in TrikdisConfig in which you need to specify the device type Keyfob 4 Click Save 5 In the Area field specify the partition of the security system that the keyfob w...

Page 10: ...4 Arm Disarm Silent alarm Panic alarm PGM control Note To delete wireless keyfob from the FLEXi SP3 s memory 1 Launch TrikdisConfig 2 Connect the FLEXi SP3 to a computer using a USB Mini B cable or c...

Page 11: ...828 1 Press and hold the 1 and 3 keys simultaneously for five 5 seconds The display alternately flashes 00 and two dashes 2 Press 1 The display alternately flashes t1 and the 2 digit House ID code 3 E...

Reviews: