background image

5. Apply compressed air at a maximum regulated

pressure of 40 psig.

6. When  draining  is  complete,  remove  the  air

hose  and  fittings  needed  to  connect  the  air
hose.

7. Close  the  domestic  water  drain  valve  on  the

cold water inlet and open the isolation valve on
the hot water outlet.

Draining Inner Tank - Option 3

1. Connect  the  suction  side  of  the  pump  to  the

domestic water drain valve using a hose and/or
piping fittings.

2. Connect  a  hose  to  the  discharge  side  of  the

pump.  Direct  the  hose  to  a  proper  drain  or  a
suitable place for drainage.

3. Open  a  hot  water  faucet  at  the  highest  point

above the water heater.

4. Open the domestic water drain valve and start

the pump to begin draining the inner tank.

5. When  draining  is  complete  stop  the  pump,

close the hot water faucet and close the domes-
tic  drain  valve.  Remove  the  pump  and  all
hoses and fittings.

Draining Outer (Boiler Water) Tank

1. Disconnect  snap  set  wiring  connection  at

water.

2. Close  boiler  water  isolation  valves  between

boiler and water heater.

3. Connect  hose  to  boiler  water  drain  valve  at

water heater.  Open and drain water to a safe
place.

4. To speed draining procedure, loosen air vent

on top of tank.

5. When draining is complete, close drain valve

and retighten air vent.

27

Summary of Contents for SMART 100

Page 1: ...onsignee 2010 49 SMART IWH Manual Warranty Registration Card must be filled out by the customer and mailed within thirty 30 days of installation in order to gain warranty coverage Retain and affix this manual near the water heater for future reference Installation and service should only be performed by a qualified installer or service technician Installations and service should be performed by a ...

Page 2: ...14 Installation Wiring Wiring Requirements 15 Circulators 15 Zone Valves 15 Snap Set Connection 15 Installation Wiring Drawings 16 21 Water Heater Start Up Filling the Inner Domestic Water Tank 22 Filling the Outer Boiler Water Tank 22 General Notes 23 Adjusting the Water Heater Thermostat 24 Water Heater Maintenance Maintenance Schedule 25 Filling Water Heater 25 Draining Water Heater 25 27 Drain...

Page 3: ...sk of being scalded Never leave them unattended in or near shower bathtub or sink Never allow small children to use a hot water faucet or draw their own bath If anyone using hot water in the building fits the above description or if local codes or state laws require specific water temperatures at hot water faucet it is recommended to install a thermostatic mixing valve at this appliance or at each...

Page 4: ...satisfy all of the following requirements 1 The heat transfer medium is potable water or contains only substances which are recog nized as safe by the U S Food and Drug Administration 2 The pressure of the heat transfer medium is maintained less than the normal minimum operating pressure of the potable water system Exception Steam complying with sec tion 1 above 3 The equipment is permanently labe...

Page 5: ...r heater or to lower floors in the structure When such a location is unavoidable a suitable drain pan with adequate drainage should be placed under the water heater The SMART Series Water Heaters are designed for vertical installation only Recommended Clearances Water heater should be installed to allow adequate clearance for servicing Zero clearance is permissible to any side of the SMART Series ...

Page 6: ...lve with extended element We recommended an 8 minimum length to ensure element senses domestic water Standard Installation Install T P relief valve in the Auxiliary con nection located behind the air vent on the top of the water heater Figure 1 page 8 or Install the T P relief valve in the run straight through leg of a tee located at the domestic hot water outlet when using the Auxiliary connec ti...

Page 7: ...on top center of water heater 2 Install automatic air vent provided with water heater using suitable pipe dope or tape 3 Once the tank is full and air has stop escaping and air vent is seated and closed screw the vent cap completely close For proper operation of the air vent ensure vent cap is tighten at all times The air vent is provided both a hygroscopic cap that prevents leakage of water due t...

Page 8: ...ns or couplings to protect hot and cold water fittings from corrosion when connecting dissimilar materials such as copper and galvanized iron pipe If copper pipe is used for domestic water con nections first solder pipe to a threaded adapter and then screw adapter into cold water inlet on top of water heater Inlet contains an internal plastic dip tube which can be damaged by heat from soldering Do...

Page 9: ...eater Systems Parallel Pipe Recirculation Systems Manifold recirculation return to all water heaters Series Piped Systems Piped return to the lead ing cold water inlet water heater Install automatic mixing valve either at the hot water outlet of water heater or each hot water faucet Failure to install automatic mixing valve where recommended will result in severe personal injury or death Boiler Pi...

Page 10: ...op Optional 9 Standard Installation Domestic Piping with Recirculation SMART Series 8 1 Shut off valve 2 Recirculation Circulator 3 Flow Check Valve 4 T P relief valve 5 Unions 6 Backflow preventer or pressure reducing valve 7 Drain valve 8 Thermal expansion tank potable 9 Recirculation dip tube 10 Thermostatic mixing valve Optional devices may be required by local codes Standard Installation Dome...

Page 11: ...onal Optional Installation Domestic Piping with Recirculation SMART Series 1 Shut off valve 2 Recirculation Circulator 3 Flow Check Valve 4 T P relief valve 5 Unions 6 Backflow preventer or pressure reducing valve 7 Drain valve 8 Thermal expansion tank potable Optional devices may be required by local codes Fig 2A 9 ...

Page 12: ...P relief valve 5 Unions 6 Backflow preventer or pressure reducing valve 7 Drain valve 8 Thermal expansion tank potable 9 Vacuum breaker 10 Mixing valve 11 Dip tube Draining per Chart 1 Optional devices may be required by local codes Drain Tube Assembly Commonwealth of Massachusetts Fig 3A Commonwealth of Massachusetts Domestic Piping SMART Series Fig 3B ...

Page 13: ... 1 6 5 Cold water inlet 1 2 4 1 3 Port Priority Valve 3 1 6 Cold water inlet 5 Fig 5 1 Shut off valves 2 Circulator 3 Expansion tank 4 Drain valve 5 Feed valve 6 Air separator Fig 4 SMART System Piping with 3 Port Zone Valve Domestic Priority SMART System Piping with 2 Port Zone Valves Domestic Priority ...

Page 14: ...ne Circulator 3 3 4 1 7 6 Cold water inlet Fig 7 Fig 6 1 Shut off valves 2 Circulator 3 Flow check valve 4 Expansion tank 5 Drain valve 6 Feed valve 7 Air separator SMART System Piping with Zone Valves Non Domestic Priority SMART System Piping with Zone Circulators 12 Installation Piping ...

Page 15: ...ic Mixing Valve Hot Water Outlet Cold Water Inlet T P Relief Valve Cold Water Inlet Isolation Valve Circulator Automatic Mixing Valve Hot Water Outlet Cold Water Inlet T P Relief Valve Cold Water Inlet Isolation Valve Recirculated Water Multiple SMART Series Water Heater System Domestic Piping Parallel Multiple SMART Series Water Heater System Domestic Piping Series Recommended for most applicatio...

Page 16: ...valves 2 Circulator 3 Flow check valve 4 Expansion tank 5 Drain valve 6 Feed valve 7 Air separator Fig 10 Multiple SMART Series Water Heater System Boiler Piping Reverse Return Balanced Flow Multiple SMART Series Water Heater System Boiler Piping Manifold Fig 11 Installation Piping ...

Page 17: ...efer to control component instructions packed with boiler for application information 4 An optional service switch may be installed in water heater electrical circuit This switch would only shut off the water heater not the home heating system Do not shut off water heater if there is a chance of freezing 5 All electrical contacts shown do not have power applied off the shelf condition See pages 15...

Page 18: ...Optima Zone Panel SZC5 with Zone Pumps Wiring Fig 12 16 ...

Page 19: ...Optima Zone Panel SCZ5 with Zone Valves Wiring Fig 13 17 ...

Page 20: ...Transformer and boiler control can burn out if isolation relay is not used Priority Relay H N High Voltage 120 V A C 24 V A C Room Thermostat Zone 1 Additional zones Additional zones may be added as shown above Transformer Power Zone Valve Zone Valve 1 2 C Water Heater Thermostat Snap Set Water Heater Zone Boiler Thermostat Terminals High Voltage Low Voltage Boiler Low Voltage Priority Relay Typic...

Page 21: ...th non isolated end switches Transformer and boiler control can burn out if isolation relay is not used 19 Typical 3 wire Zone Valve Zoning without Domestic Priority H N High Voltage 120 V A C 24 V A C Room Thermostat Room Thermostat Zone 1 Zone 2 Additional zones Additional zones may be added as shown above Transformer Power Zone Valve Zone Valve Zone Valve 1 2 C Water Heater Thermostat Snap Set ...

Page 22: ...t Terminals Priority Relay 20 Typical Circulator Zoning with Domestic Priority 2 T T 1 4 3 5 6 Circulator Zone 1 Thermostat zone 1 Honeywell R845A Relay 120 H VAC N 2 T T 1 4 3 6 Circulator Zone 2 Thermostat zone 2 5 2 T T 1 4 3 6 Water Heater Circulator Water Heater Thermostat Snap Set 5 1 2 C High Voltage Low Voltage Boiler Thermostat Terminals Typical Circulator Zoning without Domestic Priority...

Page 23: ...ator Zone 3 Thermostat zone 2 Thermostat zone 3 5 2 T T 1 4 3 6 5 High Voltage Low Voltage To Boiler 24 VAC Thermostat Leads 2 ON PRIORITY ZONING CIRCULATOR CIRC ON PR1 LIVE NEUT T T 2 1 C Water Heater Thermostat Snap Set Priority Zone Circulator Note Maximum of 4 total circulator zone when wiring 1 zone for priority Fig 20 Priority Zone Circulator Wiring ...

Page 24: ...boiler water tank by opening vent cap A on automatic air vent located on top of water heater See Fig 19 4 Follow instructions furnished with boiler to fill with water 5 When tank is full air will stop escaping and the automatic air vent will close If air vent does not seat properly water leaks out remove cap A Briefly push in valve B and release it to clean valve seat Screw cap A on completely See...

Page 25: ... valve at water heater or at each hot water faucet bath and shower outlet Selection and installation must comply with valve manufacturer s recommendation and instructions Use the lowest practical temperature set ting Check water temperature after any adjustment You must follow Adjusting the Water Heater Thermostat procedures General Notes Household water usage patterns will affect water temperatur...

Page 26: ...mophila can form in the potable water distribution sys tem if certain minimum water temperatures are not maintained Contact your local health department for more information Check water temperature at a hot water faucet immediately after first heating cycle Further temperature adjustment may be necessary as water heating system is used Recheck water temperature at faucet after adjustment When adju...

Page 27: ...eck function of field installed controls and valves See component manufacturer s instructions Review homeowner s maintenance responsi bilities and their frequencies including any not listed in the following section Homeowner monthly maintenance to include Check air vent operation Automatic air vent remove hygroscopic cap Briefly push in valve and release it to clean valve seat Screw cap on complet...

Page 28: ...ing connection at the water heater is disconnected 2 The DHW system supply isolation valve is closed 3 The outer boiler water tank pressure is less than 15 psig Reference domestic piping diagrams Figs 1 2 and 3B on page 8 and 9 Draining Inner Tank Option 1 1 Connect a hose to the domestic water drain valve at the cold water inlet The hose should extend to a drain at floor level to allow siphon ing...

Page 29: ...le place for drainage 3 Open a hot water faucet at the highest point above the water heater 4 Open the domestic water drain valve and start the pump to begin draining the inner tank 5 When draining is complete stop the pump close the hot water faucet and close the domes tic drain valve Remove the pump and all hoses and fittings Draining Outer Boiler Water Tank 1 Disconnect snap set wiring connecti...

Page 30: ...3KITTOP04 SMART 120 5 P3DW05 SMART 30 Drywell P3DW01 SMART 40 P3DW02 SMART 50 P3DW03 SMART 60 SMART 80 P3DW04 SMART 100 SMART 120 6 P3WKITDT01 SMART 30 Dip tube P3WKITDT02 SMART 40 P3WKITDT03 SMART 50 P3WKITDT04 SMART 60 P3WKITDT08 SMART 80 SMART 100 P3WKITDT09 SMART 120 7 Not shown P3WKITDT01 SMART 30 Dip Tube recirculation optional P3WKITDT02 SMART 40 P3WKITDT02 SMART 50 P3WKITDT01 SMART 60 P3WK...

Page 31: ...Replacement Parts 29 10 2 8 9 Thermostat Cover Plate Assembly Thermostat Cover Plate Assembly Located Below Thermostat Cover Plate Assembly 2 6 3 4 5 SMART ...

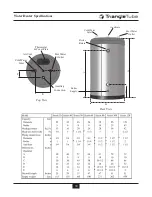
Page 32: ...Heater Specifications E F Hot Water Outlet Cold Water Inlet Auxiliary Connection Thermostat Cover Plate Air Vent Top View Rear View B A C D Cold Water Inlet Hot Water Outlet Auxiliary Boiler Return Boiler Supply ...

Page 33: ...d water inlet temperature 140ºF Domestic hot water outlet temperature 200ºF Boiler water supply temperature MODEL Boiler Heating Capacity MBH Peak Flow gal 10 min 1st Hour Flow Gal Hour Continuous Flow Gal Hour Circulator Min GPM SMART 30 115 60 235 210 8 SMART 40 130 70 270 240 9 SMART 50 180 95 370 330 12 SMART 60 320 145 635 590 21 SMART 80 340 165 690 630 24 SMART 100 380 185 775 700 26 SMART ...

Page 34: ... Multiple modulatin boiler control SCCX6 Multiple boiler control extension SZC5 Zone control panel S3S Three stage boiler control SMV Mixing valve control SIM Injection mixing control SSM Snow melt control Optima Controls Freeway Center 1 Triangle Lane Blackwood NJ 08012 856 228 8881 Fax 856 228 3584 www triangletube com sales triangletube com An Company 96 AFUE Energy Star Fully modulating Natura...

Reviews: