Burner Head
Replacement Kit
for PRESTIGE 60 through 250
Instructions:
1. Turn power to the unit “OFF” and allow unit
to cool.
2. Shut off gas supply to the inlet of the unit at
the main manual shutoff valve to the unit.
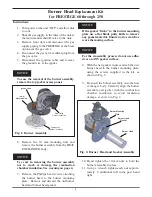
3. Remove front door and disconnect the gas
supply piping to the PRESTIGE at the brass
union near the gas valve.
4. Disconnect the gas valve rectifier plug from
the gas valve
5. Disconnect the ignition cable and remove
the ground wire at the igniter.
To ease the removal of the burner assembly,
remove the top jacket access panel.
6. Remove the 10 mm mounting nuts and
remove the burner assembly from the HEAT
EXCHANGER body.
Use care in removing the burner assembly
not to crack or damage the combustion
chamber insulation. See warning on page 4.
7. Remove the Phillips head screws attaching
the burner head to the burner mounting
plate. Remove and discard the old burner
head and burner head gasket.
If the gasket “sticks” to the burner mounting
plate use a flat blade putty knife to remove
any gasket material. Ensure not to scratch or
score the mating surface.
For the reassembly process do not use adhe-
sives on ANY gasket surface.
8. With the new gasket in place attach the new
burner head to the burner mounting plate,
using the screws supplied in the kit, as
shown in Fig. 2.
9. Re-insert the burner assembly onto the heat
exchanger body. Carefully align the burner
assembly and igniter with the combustion
chamber insulation to avoid insulation
damage, as shown in Fig. 2.
10. Hand tighten the 10 mm nuts to hold the
burner assembly in place.
11. Using a wrench tighten each nut approxi-
mately 2 additional full turns past hand
tight.
NOTICE
NOTICE
NOTICE
NOTICE
2
Burner Head
Burner Mounting
Plate
Burner Head
Gasket
Gas Piping
Union Connection
Combustion
Chamber Insulation
10 mm
Mounting Nuts
Ignition Cable
Fig. 1: Burner Assembly
Fig. 2: Burner Head and Gasket Assembly


