


Instinct
Condensate Pan Replacement
3
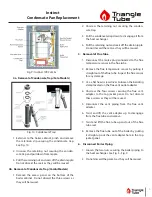
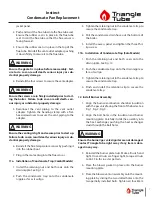
Air Inlet Elbow
Blower
Gas Valve
Igniter
2 in 1 Insulation
Venturi
Inlet Pipe
Burner
Fig. 2: Instinct 155 Burner Assembly
Air Inlet
Elbow
Blower
Gas Valve
Igniter
2 in 1 Insulation
Venturi
Inlet Pipe
Burner
Fig. 3: Instinct 199 Burner Assembly
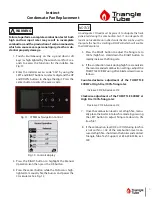
6. Remove the two screws on securing the gas valve
bracket to the heat exchanger mounting plate. Do
not discard these screws as they will be reused. Re-
move the gas valve and bracket from the boiler.
WARNING
!
Inspect the gas valve to ensure they are not damaged.
Contact Triangle Tube right away if damaged in any
way.
Fig. 4: Blower Bolt Holes
7. The two hard to reach bolt holes under the blower
housing are slotted, see Fig. 4. Fully remove the two
other 8mm bolts securing the blower to the burner
mounting plate. Unscrew the other two bolts only
as much as is needed to remove the blower/venturi
assembly.
8. Slide the blower/Venturi forward to disengage the
rear bolts and remove the blower/venturi from the
boiler. Do NOT discard the blower gaskets. Do NOT
discard the bolts as they will be reused.
WARNING
!
Inspect the blower and venturi to ensure they are not
damaged. Contact Triangle Tube right away if either is
damaged in any way.
9. Remove the two Phillips head screws securing the
burning mounting plate to the rear jacket panel.
These screws are for shipping protection and can
be discarded.
10. Remove the 10 mm burner plate mounting nuts
mounting the plate to the heat exchanger. Do not
discard the nuts as they will be reused.
11. Lift the combustion chamber insulation and burn-
er mounting plate together. Remove the insula-
tion/burner straight up from the heat exchanger
body to ensure the igniter and burner head are not
damaged.


