3
HOW TO INSTALL TREX DECKLIGHTING/
CONTINUED
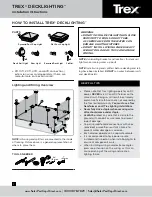
Timer Operation Instructions
1. Select the mode of operation:
» Dusk to Dawn
» 2–8 hours
» Always “ON”
» “OFF”
Program repeats daily. When power is flowing to lights,
green light above POWER is on.
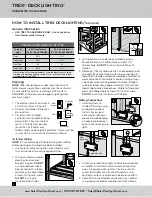
Installing Post Cap Lights
NOTE:
Install post cap lights after the railing system, post
sleeve skirt, and post sleeve have been installed.
1. Connect male lead from wiring to female connector
from cap. Also attach male-to-male connection wires
in between each splitter. Continue until all wiring
from lights is attached to splitters and connector
wires are attached in between splitters.
(See Making Connections section for details.)
2. After verifying wiring is correct by turning lights on,
attach cap to top of post with silicone caulk.
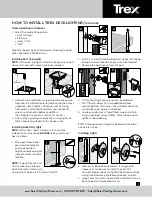
Installing Deck Rail Lights
NOTE: I
nstructions shown below are for new deck
installation and are shown
BEFORE
railing system has
been installed.
1. Place post sleeve over
pressure-treated post
and mark desired
height, centered on post
sleeve for deck rail light
location.
NOTE:
If deck boards are
not installed yet, place a
deck board on framing to
ensure post sleeve is at correct height.
2. Drill a 1" (25 mm) hole through post sleeve. Drill deep
enough to mark location on pressure-treated post.
3. Remove the post sleeve from the post.
4. Drill out existing hole on pressure-treated post
3/4" (19 mm) deep. Drill two additional holes
vertically below main hole—this will allow space for
wiring after post sleeve is attached.
5. Leave enough slack at top of lead wire and attach
lead wire to post using staples. Attach lead wire to
splitter under decking.
TIP:
To hold lead wire in place at drilled-out location,
use painters tape.
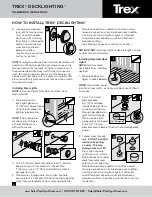
Installing Lights
6. Slide post sleeve back over post. If using a post
sleeve skirt, make sure to install the skirt first.
Connect plug on deck rail light to lead wire and tuck
wiring into previously drilled-out pockets on post.
7. Align holes for screws horizontally and attach fixture
base to post with provided screws.
2
2
3
1
6"
(152 mm)
1
1
2
Post
Post
Sleeve
3
1
2
3
4
1
5
2
2
1
6
1
7
2
www.SolarPostCapsDirect.com | (800) 878-7829 | [email protected]


