background image

26

XF 1300 BEACH

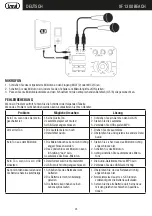
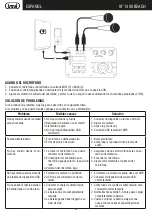
MIKROFON

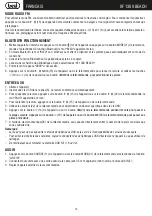
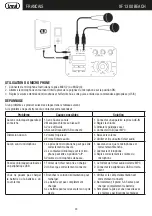
1.  Schließen Sie das mitgelieferte Mikrofon an den Eingang MIC1(2) oder MIC2(3) an;
2.  Schalten Sie das Mikrofon ein, indem Sie den Schalter am Mikrofongriff auf ON stellen;
3.  Passen Sie die Mikrofonlautstärke und den Echoeffekt mit den entsprechenden Befehlen (4/5/6) wie gewünscht an.

FEHLERBEHEBUNG

Wenn ein Problem auftritt, führen Sie die Schritte in der folgenden Tabelle.
Wenn das Problem nicht behoben werden kann, kontaktieren Sie Ihren Händler.

Problem

Mögliche Ursachen

Lösung

Kein Ton, wenn das Gerät ein-
geschaltet ist

1. Keine Quelle Ton
2. Lautstärkeregler auf Stufe 0
3. USB-Gerät angeschlossen

1. Schließen Sie ein Gerät an den AUX-IN
2. Stellen Sie die Lautstärke
3. Verbinden Sie USB spielen MP3

Verzerrter Ton

1. Die Lautstärke ist zu hoch
2. Dateifehler Audio

1. Drehen Sie die Lautstärke
2. Überprüfen Sie und spielen eine andere Datei 

Audio

Kein Ton aus dem Mikrofon

1. Die Mikrofonbuchse kann nicht richtig 

angeschlossen werden.

2. Das Zündschloss am Mikrofon kann 

in Stellung "Aus" sein.

3. Lautstärke des Bass-Mikrofon.

1. Stellen Sie sicher, dass das Mikrofon richtig 

angeschlossen ist.

2. Schalten Sie das Mikrofon.
3. richtig einstellen Die Lautstärke des Mikro-

fons

Kein Ton, wenn Sie ein USB 
einsetzen

1. Dateiformat wird nicht unterstützt
2. USB ist nicht richtig angeschlossen

1. Die Audio-Dateiformat muss MP3 sein
2. Verbinden Sie das USB-Gerät richtig

Kann nicht den Akku laden oder 
die Batterie hat eine kurzfristige

1. Schließen Sie das Netzkabel zum 

Aufladen

2. Die Batterie ist nicht vollständig 

geladen

3. Die Batterie kann haben seinen 

Lebenszyklus laufen

1. Überprüfen Sie, ob das Netzkabel richtig 

angeschlossen ist

2. Normalerweise dauert es 5-6 Stunden 

vollständig um die Batterie aufzuladen

3. Setzen Sie die alte Batterie durch eine neue 

mit den gleichen technischen Spezifika-
tionen

DEUTSCH

Summary of Contents for XF 1300 BEACH

Page 1: ... BEWEGLICHER LAUTSPRECHER Gebrauchs und Anschlusshandbuch ALTAVOZ AMPLIFICADO PORTATIL Manual para el uso y la conexión LED DISPLAY USB PLAYER XF 1300 BEACH Guida d uso User guide DISCO LIGHT 80 W MAX BT BLUETOOTH Per informazioni integrative ed aggiornamenti su questo prodotto visita www trevi it For additional information and updates of this product see www trevi it IPX4 BASS REFLEX ...

Page 2: ......

Page 3: ...TE ACHTUNG ACHTUNG DAS GERÄT NICHT ÖFFNEN IM INNERN BEFINDEN SICH KEINE VOM BENUTZERSELBSTINSTANDSETZBARENTEILEUNDAUCHKEINEERSATZTEILE FÜR JEGLICHE SERVICEARBEITEN WENDEN SIE SICH BITTE AN EINE TREVI AUTORISIERTEN KUNDENDIENSTSTELLE GEFAHR ELEKTRISCHER SCHLÄGE NICHT DER FEUCHTIGKEIT UND DEM REGEN AUSSETZEN ATENCION ATENCION NO ABRIR EL APARATO EN SU INTERIOR NO HAY MANDOS QUE PUEDAN SER MANIPULADO...

Page 4: ...heicavidialimentazioneedi collegamentosianoinstallaticorrettamente Nessuna sorgente di fiamma nuda quali candele accese dovrebbe essere posta sull apparecchio L apparecchio non deve essere esposto a stillicidio o a spruzzi d acqua e nessun oggetto pieno di liquido quali vasi deve essere posto sull apparecchio Istruire al corretto utilizzo bambini e persone con scarse conoscenze del prodotto Conser...

Page 5: ...25 Tasto EQ equalizzazioni DSP pre impostate 26 Tasti regolazione Volume generale 27 Tasti 0 tasti di inserimento diretto per inserire decine e centinaia 28 Tasti numerici 1 Display 2 Ingresso MIC 1 Chitarra 3 Ingresso MIC 2 Chitarra 4 MIC1 VOL regolazione Volume Microfono Chitarra 5 MIC2 VOL regolazione Volume Microfono Chitarra 6 Regolazione ECHO microfono 7 Ingresso AUX IN 8 Presa USB 9 Ricevit...

Page 6: ...are o diminuire il volume generale di riproduzione oppure utilizzare i tasti 26 sul telecomando 2 Ruotare la manopola MIC VOL1 4 o MIC VOL2 5 per regolare il volume del segnale sull ingresso MIC1 2 o MIC 2 3 PRE EQUALIZZAZIONI Questa unità ha un sistema di equalizzazioni audio pre impostate Premere più volte il tasto EQ 5 sul telecomando per selezionare una delle 6 equalizzazioni audio disponibili...

Page 7: ... Al termine selezionare il dispositivo XF 1300 BEACH 5 Inserire la password 0000 se richiesto 6 Premere il tasto 15 sull unità oppure sul telecomando per avviare la riproduzione e utilizzare i tasti 10 o 14 sull unità oppure i tasti 9 23 sul telecomando per la selezione dei brani RIPRODUZIONE SU INGRESSO USB 1 Accendere l apparecchio 2 Inserire una memoria USB nella presa 8 La riproduzione viene a...

Page 8: ...presa del microfono può non essere collegata correttamente 2 L interrutore di accensione sul microfono può essere in posizione spento 3 Volume del microfono basso 1 Assicurarsi che il microfono sia collegato correttamente alla presa 2 Accendere il microfono 3 Regolare correttamente il volume del microfono Nessun suono quando si inseri sce un dispositivo USB 1 Formato file non supportato 2 USB non ...

Page 9: ...olo del cassonetto barrato riportato sull apparecchiatura indica che il prodotto alla fine della propria vita utile deve essere raccolto separatamente dagli altri rifiuti L utente dovrà pertanto conferire l apparecchiatura integra dei componenti essenziali giunta a fine vita agli idonei centri di raccolta differenziata dei rifiuti elettronici ed elettrotecnici oppure riconsegnarla al rivenditore a...

Page 10: ...ervice center Always check before recharging the appliance that the power and connection cables are installed correctly No naked flame sources such as lighted candles should be placed on the appliance The appliance must not be exposed to dripping or splashing water and no objects filled with liquids such as vases must be placed on the appliance Instruct children and people with poor knowledge of t...

Page 11: ... Buttons Increase or Decrease Volume 27 0 Direct Entry Buttons To enter tens and hundreds 28 Number Buttons For Numeric Entry REMOTE CONTROL 1 LED Display 2 Connector for Microphone 1 or Guittar 3 Connector for Microphone 2 or Guittar 4 Volume knob for Mic 1 input 5 Volume knob for Mic 2 input 6 Echo knob Effect adjustment for Mic and Guitar input 7 AUX Input 8 USB Port 9 Receiver for Remote Contr...

Page 12: ...set audio equalization system Press several times EQ button 5 on the remote control to select one of the 6 available audio equalizers or select it directly using the corresponding button among those indicated on the unit 16 and 18 and which is best suited to the current sound reproduction SETTING TONE TREBLE AND BASS To separately adjust the bass and treble sound 1 Press the VOLUME knob 17 on the ...

Page 13: ...ol the word PAUS will appear on the display 4 To resume playback press the 15 on the unit or on the remote control 5 Use the buttons 22 on the remote control to select a specific folder in the USB memory 6 Press the 14 button on the unit or the button 9 23 on the remote control while listening to go to the next track Press the 10 button on the unit or the 23 button on the remote control to skip to...

Page 14: ... correctly Unable to charge or the battery works only for short duration 1 Connect with power cord to charge 2 Battery not fully charged 3 Battery life may have ended 1 Check if power cord connected properly 2 Extend charging time normally it takes 5 6 hour to fully charge 3 Replace old batteries with the same specification as the old batteries Speaker makes loud noises 1 Microphone switched on bu...

Page 15: ... less than 25cm Appropriate separate collection for the decommissioned equipment for recycling processing and environmentally compatible disposal helps prevent negative impact on the environment and human health and promotes recycling of the materials making up the product Illegal dumping of the product by the user entails the application of administrative sanctions stated in Legislative Decree n ...

Page 16: ...harger l appareil que les câbles d alimentation et de connexion sont correctement installés Ne placez aucune source de flamme nue telle que des bougies allumées sur l appareil L appareil ne doit pas être exposé à des gouttes d eau ni à des éclaboussures d eau et aucun objet contenant des liquides tels que des vases ne doit être placé sur l appareil Demandez aux enfants et aux personnes ayant une f...

Page 17: ...eur de télécommande 10 Bouton précédente 11 Bouton SOURCE sélection de fonction 12 Bouton Bluetooth 13 Bouton LIGHTS activation désactivation des LED avant arrière Disco Light 14 Bouton suivante 15 button Lecture Pause appui long pour le suivi des dossiers 16 Pré égalisation DSP NORMAL POP ROCK 17 Réglage du volume général en appuyant dessus pour régler les graves et les aigus 18 Pré égalisation D...

Page 18: ...ture ou utilisez les touches 26 de la télécommande 2 Tournez le bouton MIC VOL1 4 ou MIC VOL2 5 pour régler le volume du signal à l entrée MIC1 2 ou MIC 2 3 PRE EGALISATION Cette unité dispose d un système d égalisation audio prédéfini Appuyez plusieurs fois sur le bouton EQ 5 de la télécommande pour sélectionner l un des 6 égaliseurs audio disponibles ou sélectionnez le directement à l aide du bo...

Page 19: ...s ENTRÉE USB 1 Allumez l appareil 2 Insérez une clé USB dans la prise 8 La lecture commence automatiquement 3 Pour suspendre la lecture appuyez sur le bouton 15 de l appareil ou sur le bouton 24 de la télécommande le mot PAUS apparaîtra à l écran 4 Pour reprendre la lecture appuyez sur le bouton 15 de l appareil ou de la télécommande 5 Utilisez les boutons 22 de la télécommande pour sélectionner u...

Page 20: ...o 1 Baissez le volume 2 Vérifier et lire un autre fichier audio Aucun son du microphone 1 La prise de microphone ne peut pas être correctement connecté 2 Le contacteur d allumage sur le micro phone peut être en position off 3 Volume du microphone de basse 1 Assurez vous que le microphone est correctement branché 2 Allumez le microphone 3 Réglez correctement le volume du microphone Pasdesonlorsquev...

Page 21: ...uipements électriques et électroniques DEEE Ce symbole de poubelle sur roues sur le produit indique que à la fin de sa durée de vie doit être collecté séparément des autres déchets L utilisateur doit donc prendre le contrôle à distance intègre les éléments essentiels qui ont obtenu à sa vie dans les centres de collecte différenciés appropriés pour les déchets électroniques et électro technique ou ...

Page 22: ...skabel korrekt installiert sind Stellen Sie keine offenen Flammen wie z B brennende Kerzen auf das Gerät Das Gerät darf keinem tropfenden oder spritzenden Wasser ausgesetzt werden Es dürfen keine mit Flüssigkeiten gefüllten Gegenstände z B Vasen auf dem Gerät abgestellt werden Weisen Sie Kinder und Personen mit unzureichenden Kenntnissen des Produkts an sie richtig zu verwenden Bewahren Sie dieses...

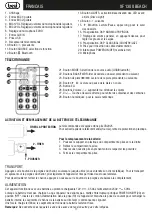
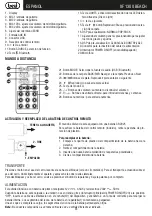
Page 23: ...edienungsempfänger 10 Taste vorheriger 11 SOURCE Taste Funktionsauswahl 12 Taste Bluetooth 13 Taste LIGHTS Aktivierung Deaktivierung der vorderen hinteren LEDs Disco Light 14 Taste weiter 15 taste Wiedergabe Pause Taste gedrückt halten Ordnerauswahl 16 DSP vor der Entzerrung NORMAL POP ROCK 17 Stellen Sie die allgemeine Lautstärke ein und drücken Sie sie um die Bässe und Höhen einzustellen 18 Pre ...

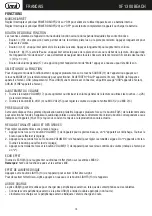
Page 24: ...gabelautstärke zu erhöhen oder zu verringern oder verwenden Sie die Tasten 26 auf der Fernbedienung 2 Drehen Sie den Regler MIC VOL1 4 oder MIC VOL2 5 um die Lautstärke des Signals am Eingang MIC1 2 oder MIC 2 3 einzustellen PRE EQUALIZER Dieses Gerät verfügt über ein voreingestelltes Audio Entzerrungssystem Drücken Sie mehrmals die EQ Taste 5 auf der Fernbe dienung um einen der 6 verfügbaren Audi...

Page 25: ...alten Sie das Gerät ein 2 Stecken Sie einen USB Speicher in die Buchse 8 Die Wiedergabe startet automatisch 3 Um die Wiedergabe zu unterbrechen drücken Sie die taste 15 am Gerät oder die taste 24 der Fernbedienung Auf dem Display erscheint das Wort PAUS 4 Um die Wiedergabe fortzusetzen drücken Sie taste 15 am Gerät oder auf der Fernbedienung 5 Wählen Sie mit den Tasten 22 der Fernbedienung einen b...

Page 26: ...tärke 2 Überprüfen Sie und spielen eine andere Datei Audio Kein Ton aus dem Mikrofon 1 Die Mikrofonbuchse kann nicht richtig angeschlossen werden 2 Das Zündschloss am Mikrofon kann in Stellung Aus sein 3 Lautstärke des Bass Mikrofon 1 Stellen Sie sicher dass das Mikrofon richtig angeschlossen ist 2 Schalten Sie das Mikrofon 3 richtig einstellen Die Lautstärke des Mikro fons Kein Ton wenn Sie ein U...

Page 27: ...er Richtlinie 2012 19 EU über die Entsorgung von Elektro und Elektronik Altgeräte WEEE Dieses Symbol der Mülltonne auf dem Produkt weist darauf hin dass das Produkt am Ende seiner Lebensdauer getrennt von anderemAbfallgesammeltwerdenmuss DerBenutzermussdaherdieFernbedienungdazubringen diewesentlichenBestandteile die zu seinem Leben geführt haben in die entsprechenden differenzierten Sammelstellen ...

Page 28: ...to desconecte inmediatamente el enchufe de la toma de corriente y lleve el aparato al centro de asistencia autorizado TREVI más cercano Siempre compruebe que los cables de alimentación y de conexión estén instalados correctamente antes de encender el aparato El aparato no debe exponerse a goteos o salpicaduras de agua Los objetos que contengan líquidos como floreros debe ser colocado en la unidad ...

Page 29: ...erior 11 Botón SOURCE selección de función 12 Tecla Bluetooth 13 Tecla LIGHTS activación desactivación de los LED delan teros traseros Disco Light 14 tecla siguiente 15 Tecla botónReproducir Pausa presionando selec ción de carpeta 16 DSP pre ecualización NORMAL POP ROCK 17 Ajustando el volumen general presionándolo para ajustar los tonos graves y agudos 18 DSP de pre ecualización CLASSICAL COUNTRY...

Page 30: ...VOLUMEN 1 Gire la perilla VOLUME 17 para aumentar o disminuir el volumen general de reproducción o use las teclas 26 en el control remoto 2 Gire la perilla MIC VOL1 4 o MIC VOL2 5 para ajustar el volumen de la señal en la entrada MIC1 2 o MIC 2 3 ECUALIZADOR Esta unidad tiene un sistema de ecualización de audio preestablecido Presione varias veces el botón EQ 5 en el control remoto para selecciona...

Page 31: ...ncienda el aparato 2 Inserte una memoria USB en el zócalo 8 La reproducción comienza automáticamente 3 Para pausar la reproducción presione el botón 15 en la unidad o el botón en el control remoto la palabra PAUS aparecerá en la pantalla 4 Para reanudar la reproducción presione 15 en la unidad o en el control remoto 5 Use los botones 22 en el control remoto para seleccionar una carpeta específica ...

Page 32: ...ivo de audio 1 Bajar el volumen 2 Comprobar y reproducir otro archivo de audio No hay sonido desde el mi crófono 1 La toma de micrófono no se puede conectar correctamente 2 El interruptor de encendido en el micrófono puede estar en la posición off 3 Volumen del micrófono bajo 1 Asegúrese de que el micrófono está conec tado correctamente 2 Encender el micrófono 3 Ajuste correctamente el volumen del...

Page 33: ...os de aparatos eléctricos y electrónicos RAEE Este símbolo de contenedor de ruedas en el producto indica que al final de su vida útil debe ser recogido separadamente de los demás residuos El usuario debe por lo tanto tomar el control remoto integra los componentes esenciales que llegaron a su vida útil a los centros adecuados de recogida de residuos electrónicos y electrotécnicos o devolverlo al d...

Page 34: ...l testo completo della dichiarazione di conformità UE è disponibile al seguente indirizzo internet www trevi it Simplified EU Declaration Of Conformity Hereby TREVI S p a declares that equipment type Power portable speaker with trolley model XF 1300 BEACH is in compliance with Directive 2014 53 EU The full text of the EU declaration of conformity is available at the following internet address www ...

Page 35: ......

Page 36: ...Trevi S p A Strada Consolare Rimini San Marino 62 47924 Rimini Rn Italia Tel 0541 756420 Fax 0541 756430 www trevi it e mail info trevi it Made in CHINA ...

Reviews: