background image


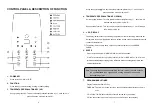
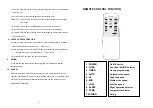
CONTROL PANEL & DESCRIPTION OF FUNCTION


1.  POWER KEY     

Press to turn unit "ON" or "OFF". 

2.  FUNCTION     

Press this key to select cooling, heating, or dehumidifying.


3.  TEMPERATURE REGULATION


KEY (UP) 


   During cooling function

This key raises the preset temperature by 1

  each time it is   

pressed and the maximum limit is 30


7


During heating function

This key raises the preset temperature by 1

  each time it is     

pressed and the maximum limit is 25

4.  TEMPERATURE REGULATION KEY (DOWN)  


During cooling function

This key lowers the preset temperature by 1

  each time it is 

pressed and the minimum limit is 17

During heating function

This key lowers the preset temperature by 1

  each time and 

the minimum limit is 15

5.  L.E.D. DISPLAY


  The display indicates the current setting temperature or the timer setting. When the set 

temperature or the timer is adjusted, the new setting is shown then the display returns the 

current set temperature. 


The display is also used to show error codes should a fault occur, see ERROR 

CODES. 

6.  SPEED    

Press to select either LOW, MEDIUM, HIGH or AUTO fan speed. 

          If "AUTO" is selected (During cooling function),”HIGH” or "MEDIUM" or “LOW" will be 

  selected automatically according to the difference between setting temperature and 

 ambient


temperature. 


7. PROGRAMMABLE


TIMER


Programmable timer ON/OFF key.   

        TIMER-ON: The timer-on is used to turn on the unit automatically after the set time is 

over. 

1. Press the "TIMER" key at stand-by status to set the time you desired. 

2. Once the set hour has come to an end, the unit will turn on automatically. 

Note: In heating function and dehumidifying function,


this key is invalid because 

the unit is 

defined

 to be high speed in heating mode and low speed in 

dehumidifying mode.   

Summary of Contents for PC26-AMEII

Page 1: ...mps of electricity to have its compressor operational To avoid the household electricity block out please do not use any extension cord for this unit 9 This unit is for indoor cooling heating and dehu...

Page 2: ...distance of 500mm minimum must be kept between the filter side of the unit and wall or any other obstacles 3 When this appliance starts to defrost the word DF will be displayed on the LED 3 CONGRATULA...

Page 3: ...slides out of the foam base 5 Remove the air outlet and take out the exhaust hose as the picture 6 Install the exhaust hose on the unit before operating the unit CONTENTS 1 Air conditioner unit 2 Remo...

Page 4: ...temperature or the timer setting When the set temperature or the timer is adjusted the new setting is shown then the display returns the current set temperature The display is also used to show error...

Page 5: ...after 2 hours 2 While in heating mode press the SLEEP key to set the temperature It decreases 1 after an hour and at most decreases 2 after 2 hours 3 Press the SLEEP key again can cancel the setting...

Page 6: ...e connect a drain hose to the drain hole and lead the water to the outside in order to intensify dehumidifying capacity When the water tank is full E4 will be displayed on the display panel Please rem...

Page 7: ...nd the color of the machine may soon fade out HELPFUL HINTS The unit is fitted with a special thermal cut off device Please ensure the unit is not placed against objects which will obstruct air intake...

Page 8: ...ling Heating 1100W 950W 1700W 1500W Cooling Capacity 2600W 4000W Heating Capacity 2600W 4000W Moisture Removed 50liters day 70liters day Refrigerant R410A R410A Dimensions mm 300Wx526Dx624H 300Wx550Dx...

Reviews: