background image


17


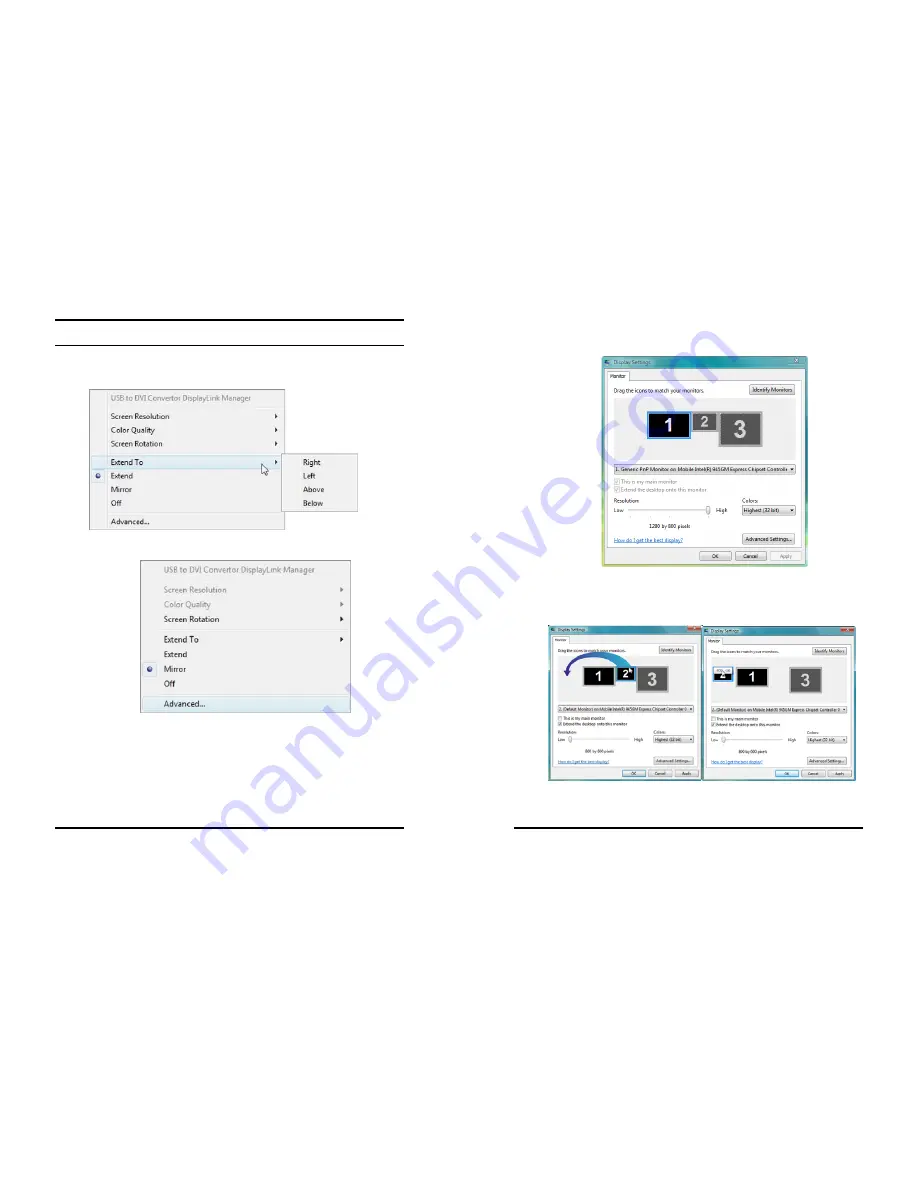
Configuring Extend Mode 

1.


Select 

Right

Left

Above

, and 

Below

 from the Extend To 

submenu to choose where to extend your desktop. Or 


2.


Select Advanced from the menu to activate Display Settings. 


18


3.


Display Settings window now opens. To move the position of a 
display, click and hold the monitor icon you wish to move. 


4.


Drag it to the desired position. The display will be highlighted 
with a blue border whilst you are moving the display to its new 
position 


Summary of Contents for TU2-DVIV

Page 1: ......

Page 2: ... case the user will be required to correct the interference at his own expense CE Mark Warning This is a Class B product In a domestic environment this product may cause radio interference in which case the user may be required to take adequate measures VCCI Warning This is a product of VCCI Class B Compliance 8 TABLE OF CONTENTS INTRODUCTION 1 FEATURES 1 SYSTEM REQUIREMENT 2 UNPACKING AND SETUP 3...

Page 3: ...cs card VGC Full flexibility to clone or extend desktop display space Static interactive and video content Auto display identification using VESA compliant protocols Fully USB 2 0 bus powered User interfaces already built in to OS Support up to six monitors at the same time via own adaptor Supports 16 bit and 32 bit True Color depth High definition displays up to UXGA 1600 x 1200 2 System Requirem...

Page 4: ...The USB to DVI I VGA Adapter The TU2 DVIV adapter allows you to connect monitors to your computer using a USB connection 4 z DVI Male to VGA Female Adapter This adapter will convert your DVI port to a classic VGA port allowing you to connect your VGA monitor to the TU2 DVIV s DVI port z USB Cable USB 2 0 Cable mini USB Connector Connects to the computer and the TU2 DVIV z CD Rom The CD contains th...

Page 5: ...will appear 2 Click on Install Utility Driver button to install the control software to your PC 3 When prompt for permission to continue Click Continue to go to the next step 4 After reading the License Agreement click I Accept to continue The installation will start 6 5 Wait a few moments for the process to complete 6 When the process is finished click Yes to reboot 7 Plug in the TU2 DVIV and a m...

Page 6: ...stall the control software to your PC 3 When prompt for permission to continue Click Continue to go to the next step 4 After reading the License Agreement click I Accept to continue The installation will start 8 5 Wait a few moments for the process to complete 6 Plug in the TU2 DVIV and the system will found a new hardware of the TU2 DVIV ...

Page 7: ...ecting the Adapter Connecting to DVI monitor Connect the DVI monitor with the USB to DVI I VGA Display Adapter as shown 10 Connecting toVGA monitor Connect the VGA monitor with the DVI to VGA adapter then to the USB to DVI I VGA Display Adapter as shown Connecting to USB port Connect the USB cable and the USB to DVI VGA Display Adapter as shown ...

Page 8: ... TU2 DVIV adapters Monitors connect to graphics adapters via standard VGA DVI cables Multiple monitors using powered USB hub PC connects to a standard powered USB hub Three monitors are connected to the USB hub via TU2 DVIV adapters Monitors connect to graphics adapters via standard VGA DVI cables 12 Note A typical PC can run up to six monitors The exact number depends on the type of content being...

Page 9: ...p the USB to DVI Convertor Manager menu USB to DVI Convertor Manager menu allows you to configure basic functions of your additional screens including screen resolution color quality screen rotation and extend mirror and off mode 14 Screen Resolution To setup the screen resolution select an available resolution from the Screen Resolution submenu as shown ...

Page 10: ...ated Left Rotated Right Upside Down from the Screen Rotation submenu Choose Normal to return the screen to the original orientation 16 Screen Positioning If your computer is connected to more than two monitors you can assign each of the monitors to a different mode Extend Mode If your computer is connected to more than two monitors you can assign each of the monitors to a different mode Select Ext...

Page 11: ...op Or 2 Select Advanced from the menu to activate Display Settings 18 3 Display Settings window now opens To move the position of a display click and hold the monitor icon you wish to move 4 Drag it to the desired position The display will be highlighted with a blue border whilst you are moving the display to its new position ...

Page 12: ...our secondary monitor To activate Mirror Mode select Mirror from the menu Off Mode To disable the secondary monitor select Off from the menu 20 Identify the Monitors To identify the active monitor click the Identify Monitors button A number will be shown on the screen to identify the active monitor ...

Page 13: ...plicable warranty period TRENDnet shall at its option and expense repair the defective product or deliver to customer an equivalent product to replace the defective item All products that are replaced will become the property of TRENDnet Replacement products may be new or reconditioned TRENDnet shall not be responsible for any software firmware information or memory data of customer contained in s...

Page 14: ...ATTEMPTS TO REPAIR OR MODIFY OR ANY OTHER CAUSE BEYOND THE RANGE OF THE INTENDED USE OR BY ACCIDENT FIRE LIGHTNING OR OTHER HAZARD LIMITATION OF LIABILITY TO THE FULL EXTENT ALLOWED BY LAW TRENDNET ALSO EXCLUDES FOR ITSELF AND ITS SUPPLIERS ANY LIABILITY WHETHER BASED IN CONTRACT OR TORT INCLUDING NEGLIGENCE FOR INCIDENTAL CONSEQUENTIAL INDIRECT SPECIAL OR PUNITIVE DAMAGES OF ANY KIND OR FOR LOSS ...

Reviews: