TRENDnet TEW-840APBO Quick Installation Manual Download Page 5

3

Phase 2: TEW-840APBO Unit #1 Hardware Setup and Configuration

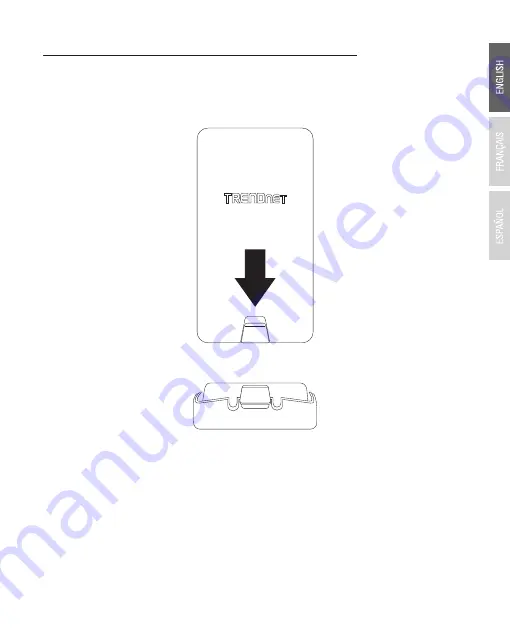
1. Remove the cover of the access point by pulling and holding the bottom tab in the vertical 
  direction down (based on the access point orientation below) and sliding the cover below 
  away from the access point.

Pull and hold tab

Summary of Contents for TEW-840APBO

Page 1: ...TEW 840APBO V1 Quick Installation Guide...

Page 2: ...Table of Contents 2 Hardware Setup and Configuration 3 Hardware Installation 1 English 1 Before You Start...

Page 3: ...EW 840APBO Quick Installation Guide Note The TEW 840APBO does not support IEEE 802 3at af PoE standards You must use the proprietary passive power over Ethernet injector that is supplied with the TEW...

Page 4: ...lt Gateway 192 168 10 1 Primary DNS 192 168 10 1 Wireless Channel Default 48 Note Configure and connect the access points before mounting The initial configuration should be completed in a testing env...

Page 5: ...and Configuration 1 Remove the cover of the access point by pulling and holding the bottom tab in the vertical direction down based on the access point orientation below and sliding the cover below a...

Page 6: ...onnect one end of the cable to the LAN1 PoE port Model TEW 840APBO A IP Address 192 168 10 100 Subnet Mask 255 255 255 0 User Name admin Password admin Mode WDS AP SSID TRENDnet840_XXXX WPA2 Key 840XX...

Page 7: ...Using another network cable connect one end to the LAN port on the included PoE injector 6 Connect the other end of the network cable to your computer s Ethernet port 7 Attach the power cord to the Po...

Page 8: ...me and Password are case sensitive 12 In the left hand menu under System Manager click on Account 13 Under Account Settings change the default administrator password by typing in the current password...

Page 9: ...s section enter the IP Address 192 168 10 50 and Subnet Mask 255 255 255 0 then click Save at the bottom of the page When prompted to apply settings at the bottom right of the page click Apply to comm...

Page 10: ...n 1 In Step 15 under enter the IP Address 192 168 10 51 and IPv4 Settings Subnet Mask 255 255 255 0 then click Save at the bottom of the page When prompted to apply settings at the bottom right of the...

Page 11: ...Note This is the SSID of TEW 840APBO 1 from Phase 2 Step 2 7 Under Wireless Security 5GHz in the Passphrase field enter the WPA2 key of TEW 840APBO 1 and click Save Note This is the WPA2 key of TEW 84...

Page 12: ...the left hand menu under Overview click Connections and the Connection Status should display Associated 2 Make sure both TEW 840APBO 1 and TEW 840APBO 2 access points are powered on approximately 15...

Page 13: ...O 1 192 168 10 50 then click Start 5 Ping replies and 0 packet loss will indicate as successful point to point bridge connection between the TEW 840APBO 1 and 2 Note If the connectivity test fails wai...

Page 14: ...push until the cover clips into place and is secured The cover includes cable openings to route the connected Ethernet cable s when installing 2 Insert the included fasteners through the holes located...

Page 15: ...nted you can connect the RJ 45 cables from each access point to your network Note When set to WDS station mode the TEW 840APBO features WiFi signal strength connectivity LEDs located on the back of th...

Page 16: ...ENGLISH FRAN AIS ESPA OL 14 Completed Installation Reference Building 1 Building 2 Internet Modem Router...

Page 17: ......

Page 18: ......

Page 19: ...nt still complies with the e i r p limits as appropriate Avertissement Industry Canada statement This device complies with ISED s license exempt RSSs Operation is subject to the following two conditio...

Page 20: ...vigueur La violation de cette regle peut conduire a de serieuses penalites federa Consulter le manuel d utilisation 5 Avertissement Professional installation instruction This product is designed for s...

Page 21: ...roducts Only This product is to be connected only to PoE networks without routing to the outside plant The Manufacturer is not responsible for any radio or TV interference caused by unauthorized modif...

Reviews: