TRENDnet TEW-828DRU User Manual Download Page 28


© Copyright 2015 TRENDnet. All Rights Reserved. 


TRENDnet User’s Guide


TEW-828DRU 

25


Note: 

Before configuring WDS, please ensure the following first: 

1. Make sure different IP addresses are assigned to each WDS supported wireless device 
used for bridging. (ex. 192.168.10.1,192.168.10.2, 192.168.10.3) to avoid IP address 
conflict. See 

page 30

 for changing the LAN IP address. 

2. If you are using more than one WDS supported router, please make sure the LAN 
DHCP server is enabled on only one and disabled on all others to avoid IP address 
conflict. See 

page 31

 for DHCP server options. 

3. Configure the same wireless channel and use the same on all WDS supported wireless 
devices. See 

page 10

 for configuring basic wireless settings. 

4. Configure the same wireless security and key on all WDS supported devices. See page 
15 for configuring wireless security settings. 


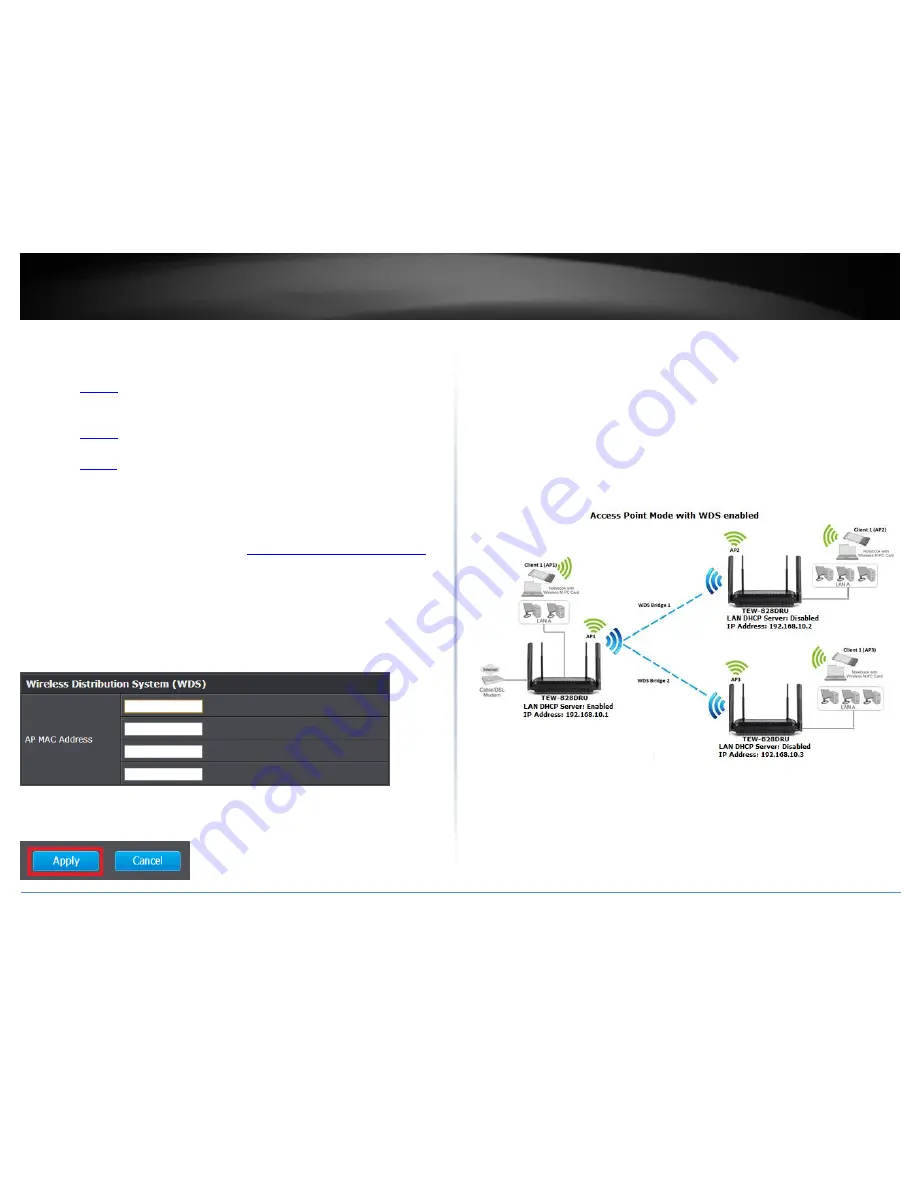
To configure WDS bridging between TEW-828DRU routers: 

1. Log into your router management page (see “

Access your router management page

” 

on page 9). 


2. Click on 

Advanced > Wireless (2.4GHz


or 

5GHz

),


and click on 

WDS


3. Next to 

Wireless Distribution System (WDS)

, in an empty field, enter the MAC 

address of the other WDS supported wireless device you are bridging. (e.g. 

00:11:22:AA:BB:CC)


4. To save changes, click 

Apply

Note: 

If you would like to discard the changes, click 

Cancel 

before you click 

Save


For additional routers, make sure to disable the DHCP server first on all additional 
routers and configure the LAN IP address to be different on each router. You will 
connect devices to the LAN ports 1-4 only on all additional routers and the WAN port is 
not used. Then, repeat the steps for additional routers you are bridging.   


In the diagram below, the blue color represents the WDS wireless bridged connections 

between the routers. The green color represents access point mode connections 

between wireless client devices and the routers. 


Summary of Contents for TEW-828DRU

Page 1: ...TRENDnet User s Guide Cover Page...

Page 2: ...le SSID 23 Wireless bridging using WDS Wireless Distribution System 24 Advanced Settings 26 Steps to improve wireless connectivity 27 Advanced Router Settings 28 Change your router login password 28 M...

Page 3: ...Router Maintenance Monitoring 53 Reset your router to factory defaults 53 Router Default Settings 53 Backup and restore your router configuration settings 54 Reboot your router 54 Upgrade your router...

Page 4: ...erSpeed USB 3 0 share port deliver extraordinary networking speed and range Easy Setup Get up and running in minutes with the intuitive guided setup Simultaneous Tri Band Three concurrent WiFi bands m...

Page 5: ...Gbps use with a 1 3 Gbps 802 11ac wireless adapter 802 11n 2 4 GHz TurboQAM speeds requires clients with TurboQAM support Product Hardware Features Rear View No Item Description 1 USB 3 0 Port Connec...

Page 6: ...device connected Application Diagram The router is installed near the modem typically supplied by your ISP Internet Service Provider and physically connected to it from the router s Internet port to...

Page 7: ...tions How to set up a home network 1 For a network that includes Internet access you ll need Computers devices with an Ethernet port also called network port or wireless networking capabilities A mode...

Page 8: ...if required by ISP MAC Address ___ ___ ___ ___ ___ ___ Clone your PC MAC Address Optional 4 PPTP Protocol of Physical Connection Dynamic IP DHCP or Static IP PPTP Server _____________________ e g 215...

Page 9: ...uter to your modem 4 Connect your modem to the router Internet port yellow 5 Position the antennas as shown for optimal wireless coverage 6 Connect your computer to one of the router LAN ports 7 Conne...

Page 10: ...ype and configure your Internet settings Select your Internet connection type and click Next Note Dynamic IP DHCP is typical for most Internet services You can verify your settings with your Internet...

Page 11: ...onnect them to one of the available LAN ports labeled 1 2 3 4 on your router Note If you encounter issues connecting to your network there may be a problem with your computer or device network setting...

Page 12: ...p 192 168 10 1 Your router will prompt you for a user name and password 2 For added security the router is preconfigured with a unique password You can find the Password on a sticker on the top of the...

Page 13: ...urity section will display the current security settings configured for your wireless networks It is strongly recommended to enable security on your wireless networks Connected Devices The connected d...

Page 14: ...abled Recommended allows wireless devices to search and discover your wireless network name also called SSID broadcasted by your router o Disabled Turns off the ability for wireless devices to find yo...

Page 15: ...hould be turned on To define a new schedule click Add New and refer to page 36 Create Schedules After you have created a new schedule you will be returned to the page to apply the new schedule If you...

Page 16: ...primary Wireless Client Isolation When this option is checked wireless client devices connected to your guest network s will be restricted from accessing other guests Internet Access Only When this o...

Page 17: ...he guest network IP address settings should different from your local LAN network IP address settings Default 192 168 10 1 255 255 255 0 IP Address Enter the new guest network IP address e g 192 168 1...

Page 18: ...pply for the filter or block 6 Schedule The schedule function allows you to define a schedule when the wireless should be turned on To define a new schedule click Add New and refer to page 36 Create S...

Page 19: ...If you device is not listed please refer to your computer or device documentation to find the IP address Note Clicking Cancel will discard your settings and clear all fields Schedule The schedule fun...

Page 20: ...Add MAC Filter Rule manually enter the MAC Address ex e g 00 11 22 AA BB CC in the field to allow or block depending on the action you chose in previous step Note If the network device is connected to...

Page 21: ...to This setting provides the router with the ability to detect wireless devices using either WPA or WPA2 encryption Your wireless network will automatically change the encryption setting based on the...

Page 22: ...re and click Apply to save the changes Note Please note that WEP security is only available when 802 11 Mode is set to 802 11b g only 2 4GHz or 802 11a ac only 5GHz Also note that using WEP will disab...

Page 23: ...WPA protocol and designed to increase security Selecting WPA WPA2 WPA2 Mixed WPA2 recommended The following section outlines options when selecting WPA WPA2 or WPA2 Mixed Enterprise EAP or RADIUS This...

Page 24: ...sily connect your wireless devices to your network Push Button Configuration PBC method o RECOMMENDED Hardware Push Button method with an external button located physically on your router and on your...

Page 25: ...client device indicating WPS was successful You can click Stop WPS to cancel the process or click PBC Again to restart the WPS process PIN Personal Identification Number Advanced Wireless 2 4GHz or 5G...

Page 26: ...ss client devices to connect and access your network resources and access the Internet using a single SSID The diagram below shows your router in Access Point mode and clients connecting to your route...

Page 27: ...orted wireless routers and access points configured in WDS mode to bridge groups of network devices together wirelessly Simultaneously the router will also function in access point mode allowing wirel...

Page 28: ...ecurity settings To configure WDS bridging between TEW 828DRU routers 1 Log into your router management page see Access your router management page on page 9 2 Click on Advanced Wireless 2 4GHz or 5GH...

Page 29: ...protocol A wireless device that needs to send data will send a RTS before sending the data in question The destination wireless device will send a response called Clear to Send CTS The RTS Threshold d...

Page 30: ...formance so if your wireless signal is weak place the router in several locations and test the signal strength to determine the ideal position 2 Building materials can have a large impact on your wire...

Page 31: ...ess the router management page using the User Name admin and the new password instead of the predefined default password If you reset the device to defaults you will need to access the router manageme...

Page 32: ...dvanced Setup IPv6 IPv6 Internet Protocol Version 6 is a new protocol that significantly increases the number of available Internet public IP addresses due to the 128 bit IP address structure versus I...

Page 33: ...ces on your network see page 56 or refer to your computer or device documentation to find the MAC address 5 To save changes click Apply Note If you would like to discard the changes click Cancel Chang...

Page 34: ...o save settings DHCP Server Enable or Disable the DHCP server DHCP Start IP Changes the starting address for the DHCP server range e g 192 168 10 20 DHCP End IP Changes the ending address for the DHCP...

Page 35: ...view the DHCP reservation settings Hostname Enter a name of the device you will assign the DHCP reservation rule MAC Address Enter the MAC Media Access Control address of the computer or network devic...

Page 36: ...ve changes click Apply Note If you would like to discard the changes click Cancel Enable disable Application Layer Gateways ALG Advanced Firewall ALG You may want to configure your router to allow com...

Page 37: ...ress one that can be used to view home IP Camera and other devices on your local area network Note First you will need to sign up for one of the DDNS service providers listed in the Server Address dro...

Page 38: ...ttings section Note Time is specified in 24 hour format Automatically synchronize time using NTP Check the Enable NTP Server option to set your router date and time to synchronize with an NTP Network...

Page 39: ...ations Port Trigger Gaming Port Range Forwarding 1 Log into your router management page see Access your router management page on page 9 2 Click on Advanced and click on Administrator then click on Sc...

Page 40: ...P addresses outside of the range specified 6 Protocol Select the protocol type to filter TCP UDP 7 Destination Port Range Enter the port number or range of port numbers to apply in the firewall rule e...

Page 41: ...ng for network connectivity testing Both of these settings can be left at default Enabled 4 Then specify your BW Max or total bandwidth for each Class Setting Inbound and Outbound Note You can use an...

Page 42: ...Settings section 5 Enter the IP address you assigned to the computer or network device to expose to the Internet 6 To save changes click Apply Virtual Server Advanced Firewall Virtual Server Virtual...

Page 43: ...Time Settings and see page 36 Create Schedules to create a schedule Click Add to add the access rule to the Virtual Server Rules List Note Clicking Cancel will discard your settings and clear all fiel...

Page 44: ...Enable Check the option to enable the port trigger rule Match Protocol Select the protocol for the firewall ports required for your device TCP UDP or Any TCP and UDP Match Port Range Enter the ports o...

Page 45: ...t UDP Ports Enter the UDP port you would like to set Note Please refer to the device documentation to determine which ports and protocols are required You should assign a static IP address to the devi...

Page 46: ...networks through other routers Generally different networks can be determined by the IP addressing assigned to those networks Generally speaking and for the case of an example your network may have 1...

Page 47: ...he default Internet facing interface WAN Port check the Enabled option under the Default Internet Setting and enter the VID to assign By default the default Internet interface is set to an untagged VL...

Page 48: ...click on USB then click on Samba Server 3 Review the setting on Samba Server Information section Click Apply to save settings Server Status Select enabled or disable for the feature Server Name You c...

Page 49: ...not discover the USB storage automatically you can access these files under your network map or by typing routerIPaddress usb_A1 ex 192 168 10 1 usb_A1 on your browser s or file explorer address bar P...

Page 50: ...ansferring data using FTP It is recommended to leave these settings as default Western European 4 Review the administrator settings required for your FTP server Click Apply to save settings User Name...

Page 51: ...penVPN client software supports operating systems such as Windows XP and later 32 bit 64 bit and Linux One major benefit to using the SSL protocol for VPN is that most networks allow the SSL protocol...

Page 52: ...es will need to be installed on the VPN client computer later on in order to establish VPN connectivity Default Filename client ovpn Note Please do not change the filename for Windows installation If...

Page 53: ...d TRENDnet User s Guide TEW 828DRU 50 4 If prompted to run the file click Run 5 At the installation window click Next 6 At the license agreement window review the license agreement and click I Agree 7...

Page 54: ...TEW 828DRU 51 8 At the install location window click Install 9 At the prompt to install the TAP Windows adapter click Install 10 At the installation completion window click Next 11 Make sure to unche...

Page 55: ...y icon will appear in the bottom right corner Right click the icon to display the configuration menu 15 After right clicking the icon the menu will appear Click Connect to establish your VPN connectio...

Page 56: ...accessing your router management page OR Router Management Page 1 Log into your router management page see Access your router management page on page 9 2 Click on Advanced and click on Administrator t...

Page 57: ...page on page 9 2 Click on Advanced and click on Administrator then click on Settings Management 3 Next to Import Settings section and Settings File Location click Browse 4 A separate file navigation...

Page 58: ...ere fixed that you may have been experiencing 1 If a firmware upgrade is available download the firmware to your computer 2 Unzip the file to a folder on your computer Please note the following Do not...

Page 59: ...Ping Click the WAN Ping Respond drop down list and Enabled to allow your router to respond to ping requests from the Internet You can also choose Disabled to block WAN ping requests from the Internet...

Page 60: ...e hard or soft reboot or reset Internet Configuration Connected Type Displays the current WAN connection type applied WAN IP Address The current IP address assigned to your router WAN port or interfac...

Page 61: ...ays the current 2 4GHz wireless network name and security mode of multiple SSID2 assigned to your router Guest Network Security Mode Displays the current 2 4GHz wireless network name and security mode...

Page 62: ...n activity information on the functionality of your router or for troubleshooting purposes 1 Log into your router management page see Access your router management page on page 9 2 Click on Advanced a...

Page 63: ...Settings Management Export Import configuration Reset to factory default o Reboot o Time o Schedule o Router Status o IPv6 Status o System Log o Advanced Network UPnP o Client Status Setup o LAN Sett...

Page 64: ...band with option for internet access only Up to 2 additional SSIDs per band Dynamic DNS support for dyn com and no ip com Samba FTP server support Implicit and Explicit Beamforming Access Control Wir...

Page 65: ...dBm typical 11 Mbps 802 11g 75 dBm typical 54 Mbps 802 11n 2 4 GHz 68 dBm typical 600 Mbps 802 11n 5 GHz 68 dBm typical 450 Mbps 802 11ac 55 dBm typical 1300 Mbps Wireless Channels 2 4 GHz 1 11 5 GHz...

Page 66: ...automatically and click OK Note If you are experiencing difficulties please contact your computer or operating system manufacturer for assistance Q I am not sure what type of Internet Account Type I h...

Page 67: ...ote If you are experiencing difficulties please contact your computer or operating system manufacturer for assistance How to configure your network settings to obtain an IP address automatically or us...

Page 68: ...work settings can be used as general guidelines however it is strongly recommended that you consult your computer or operating system manufacturer directly for assistance on the proper procedure for c...

Page 69: ...t on a circuit different from that to which the receiver is connected Consult the dealer or an experienced radio TV technician for help FCC Caution Any changes or modifications not expressly approved...

Page 70: ...for indoor usage to reduce potential for harmful interference to co channel mobile satellite systems les dispositifs fonctionnant dans la bande 5150 5250 MHz sont r serv s uniquement pour une utilisat...

Page 71: ...tax and other fees WARRANTIES EXCLUSIVE IF THE TRENDNET PRODUCT DOES NOT OPERATE AS WARRANTED ABOVE THE CUSTOMER S SOLE REMEDY SHALL BE AT TRENDNET S OPTION REPAIR OR REPLACE THE FOREGOING WARRANTIES...

Page 72: ......

Reviews: