background image


29 -


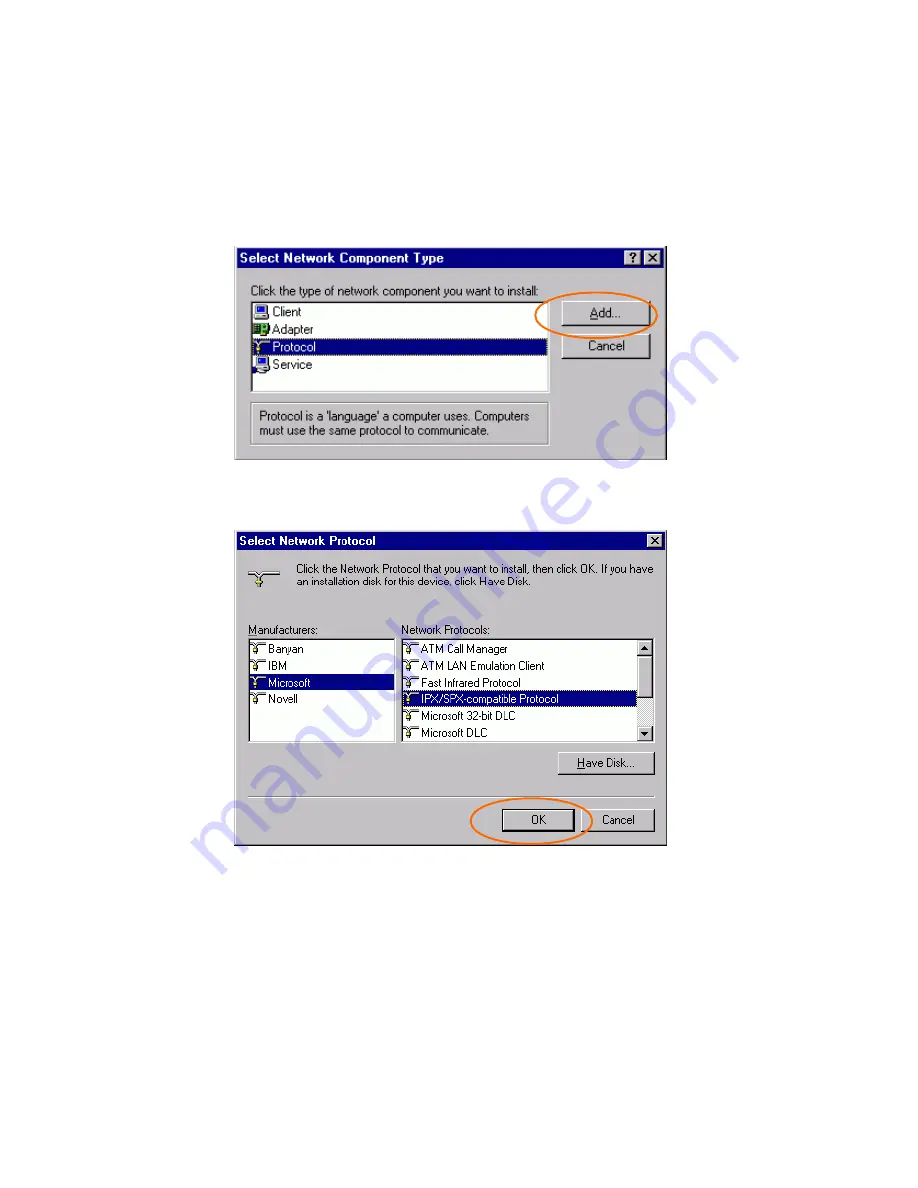
If any components are missing, click on the 

Add


button to add them in.  All the protocols and 
clients required and listed above are provided by 
Microsoft.   
3.  After clicking 

Add

, highlight the component 

you need, click 

Add


4.  Highlight 

Microsoft

, and then double click 

on the item you want to add. Click 

OK


5.  For making your computer visible on the 

network, enable the 

File and Print Sharing

6.  Click the 

Identification

 tab.  Make up a 

name that is unique from the other 
computers' names on the network.  Type the 
name of your workgroup, which should be 
the same used by all of the other PCs on the 
network.   

Summary of Contents for TEW-222CF

Page 1: ...Doc No 090402 02 TEW 222CF IEEE802 11b 11Mbps CompactFlash Card User Guide...

Page 2: ...d can radiate radio frequency energy and if not installed and used in accordance with the instructions may cause harmful interference to radio communications However there is no guarantee that interfe...

Page 3: ...ork 2 The Access Point Network 3 LED INDICATORS 3 FOR WINDOWS CE3 0 5 SOFTWARE INSTALLATION 5 HARDWARE INSTALLATION 7 NETWORK CONNECTION 8 CONFIGURATION UTILITY 11 Network Status Icon Icon Menu 11 The...

Page 4: ...20 In Windows 98 20 In Windows ME 22 In Windows 2000 24 In Windows XP 26 NETWORK CONNECTION 28 In Windows 98 ME 28 In Windows 2000 XP 31 CONFIGURATION 34 Use Manufacturer s Configuration Utility 34 Us...

Page 5: ...ons and based on the IEEE 802 11b standard offering a data rate of 11Mbps in a wireless LAN environment It is a high speed wireless network card that connect directly to your PDA or Notebook with a pa...

Page 6: ...power save mode Easy to install and configure Wireless Network Options The Peer to Peer Network This network installation lets you set a small wireless workgroup easily and quickly Equipped with Wire...

Page 7: ...and Internet access much more conveniently With Wireless Comp actFlash Cards you can connect wireless LAN to a wired global network via an Access Point LED Indicators Link Orange On Blink Access Point...

Page 8: ...er to Peer Mode Glow forming a Basic Service Set or joining to a Basic Service Set Blink searching for other wireless LAN cards in the wireless network Act Green ON OFF Transmitting receiving wireless...

Page 9: ...your PC to make an active connection Caution DO NOT insert the Wireless CompactFlash Card into the PDA BEFORE installing the configuration utility 1 Insert the device driver CD into the CD ROM drive 2...

Page 10: ...6 4 Click Next to continue 5 Click OK 6 Click Finish...

Page 11: ...CompactFlash Card into the PDA Then use the Settings on your Windows CE to configure the network settings Hardware Installation Insert the Wireless CF card into the Windows CE based PDA by aligning th...

Page 12: ...ction Once the driver has been installed you must make some changes to your network settings 1 Go to Start Settings Connections Click on Network Adapters 2 Highlight PRISM 11Mbps Wireless LAN Adapter...

Page 13: ...information will be automatically assigned Then click ok Use server assigned IP address If your network does not support DHCP select Use specific IP address You may need to enter the IP address and o...

Page 14: ...10 4 A message as below may appear saying you must remove and re insert the Wireless CompactFlash Card to have the changes take affect Click OK...

Page 15: ...driver successfully go to Start Programs Click on PRISM Settings the Network Status icon will appear in the task bar Network Status Icon Icon Menu The Status Icon Icon Link Status Green indicates a st...

Page 16: ...o enable or disable the wireless radio Remove Status Icon Removes the Utility icon from the PDA s system tray Each time you power on your PDA the icon will reappear Wireless Network Status Advanced Co...

Page 17: ...work Current Channel It displays the selected channel that is currently used There are 14 channels available depends on the country Enable Radio Disable Radio Click this button to enable disable the w...

Page 18: ...ays the link quality of the connection between the Wireless CompactFlash Card and the Access Point or Peer to Peer type it connects Signal Strength It displays the signal strength of the connection be...

Page 19: ...t to the same network The default name is ANY To change the Network Name simply enter a new name in the field Network Type It displays the type of BSS Access Point allows the Adapter to communicate wi...

Page 20: ...ithm Under the drop down box you can choose to have WEP encryption Disabled 64 bit or 128 bit Create Keys with Passphrase A Passphrase can be entered to generate four keys used for WEP For the easiest...

Page 21: ...setting is the configuration key used in accessing the wireless network via WEP encryption Use WEP Key The default key field can be used for specifying which of the four encryption keys to transmit da...

Page 22: ...work BSSID A set of wireless stations is referred to as a Basic Service Set BSS Computers in a BSS must be configured with the same BSS ID Channel It shows the selected channel that is currently used...

Page 23: ...Rescan Search for all available networks Clicking on the button the device will start to rescan and list all available sites Connect To connect with a new access point highlights the desired one in th...

Page 24: ...he Wireless CF card is then turning into a conventional PCMCIA type II PC Card 2 Align the PC Card toward the PC Card slot with brand label facing upward as shown below Software Installation In Window...

Page 25: ...21 2 Insert the device driver CD ROM into your CD ROM drive Click Next 3 Select CD ROMdrive and click Next 4 Click Next...

Page 26: ...nish to complete the installation 7 Click Yes to restart your computer In Windows ME 1 Once the Wireless LAN Adapter is well connected to your computer Windows ME will automatically detect the new dev...

Page 27: ...23 2 Insert the device driver CD ROM into your CD ROM drive on your system Select Removable Media Floppy CD ROM and click Next 3 Click Next...

Page 28: ...Finish 5 Click Yes to restart your computer In Windows 2000 1 Once the Wireless LAN Adapter is well connected to your computer Windows 2000 will automatically detect the new device Click Next 2 Selec...

Page 29: ...25 3 Insert the device driver CD ROM into your CD ROM drive Select CD ROM drive and click Next 4 Click Next to continue 5 In Digital Signature Not Found window click Yes to continue...

Page 30: ...Once the Wireless LAN Adapter is well connected to your computer Windows XP will automatically detect the new device ClickInstall from a list and click Next 2 Insert the device driver CD ROM into your...

Page 31: ...27 3 Click Continue Anyway to proceed 4 Click Finish The software installation for this network device is now completed...

Page 32: ...stalled you must make some changes to your network settings In Windows 98 ME 1 Go to Start Settings Control Panel Network 2 Make sure that you have all the following components installed Wireless LAN...

Page 33: ...ent you need click Add 4 Highlight Microsoft and then double click on the item you want to add Click OK 5 For making your computer visible on the network enable the File and Print Sharing 6 Click the...

Page 34: ...connecting to a Netware server share level can be set to User level access control 8 When finished reboot your computer to activate the new device 9 Once the computer has restarted and Windows has boo...

Page 35: ...you should see the names of the other PCs on the network In Windows 2000 XP 1 For Windows 2000 Go to Start Settings Control Panel Network and Dial up Connections Local Area Connection Properties For W...

Page 36: ...NWLink IPX SPX NetBIOS Compatible Transport Protocol Internet Protocol TCP IP 3 If any components are missing click on the Install button to select the Client Service Protocol required After selectin...

Page 37: ...33 4 For making your computer visible on the network make sure you have installed File and Printer Sharing for Microsoft Networks 5 When finished you must restart your computer to complete installatio...

Page 38: ...Use Windows XP s Wireless Configuration Utility section to use the configuration Use Manufacturer s Configuration Utility After installing the Wireless CompactFlash Card s driver successfully the Netw...

Page 39: ...dio On Wireless Radio Off These two items allows you to enable or disable the wireless radio Remove Status Icon Removes the icon from the taskbar Each time you power on your PC the icon will reappear...

Page 40: ...te Current Channel It displays the selected channel that is currently used There are 14 channels available depends on the country Disable Radio Click this button to disable the wireless radio The Wire...

Page 41: ...r type it connects OK Click OK to save your changes Cancel Click Cancel to ignore the previous setting Apply Click Apply to activate the settings Configuration The Configuration tab allows to set para...

Page 42: ...communicate with a wired network which employing an Access Point Peer to Peer allows PC to PC station to station communication without employing an Access Point Note For the detailed illustration abou...

Page 43: ...mmunication all wireless devices must share the identical encryption key on the same network Item Description Encryption WEP security WEP is a data privacy mechanism based on a 64 bit 128 bit shared k...

Page 44: ...s setting is the configuration key used in accessing the wireless network via WEP encryption Use WEP Key The default key field can be used for specifying which of the four encryption keys to transmit...

Page 45: ...wireless stations is referred to as a Basic Service Set BSS Computers in a BSS must be configured with the same BSS ID Channel It shows the selected channel that is currently used Network Type It disp...

Page 46: ...works Clicking on the button the device will start to rescan and list all available sites Connect To connect with a new access point highlights the desired one in the left list box and clicks on the C...

Page 47: ...l Panel Network Connections 2 In Network Connections window right click the Wireless Network Connections icon and select Properties Note Double click the Wireless Network Connection icon and you can a...

Page 48: ...the Wireless Networks tab Use Windows to configure Use Windows to configure Note Once you enable windows configuration there will be only two tabs Status and About You can only use Windows XP s Wirel...

Page 49: ...iguration utility to configure the wireless settings make sure the check box is not enabled then click the Network Status icon in the taskbar Available networks Displays all available networks Configu...

Page 50: ...Preferred networks From available network s listed above you can select preferred one s in an order that you can arrange The marked one is the currently used network Move up Move the selected network...

Page 51: ...y after you click on OK in the Wireless Network Connection Properties window Remove Highlight the unwanted network listed in the Preferred networks box and click the button to remove it Properties Hig...

Page 52: ...ns Operating Temperature 0 65 ambient temperature Storage Temperature 20 75 ambient temperature Operating humidity 95 maximum non condensing Storage humidity 95 maximum non condensing Frequency Range...

Page 53: ...49 Supported OS For Notebook PC Windows 95 OSR2 98 ME 2000 XP NT For Handheld Pocket PC Windows CE EMC Certification FCC Part 15 in US EN300328 and EN300826 301489 17 in Europe...

Reviews: