©
Copyright
2
TRENDn
Set
up
DH
Advanced
>
Se
DHCP
(Dynam
your
router
to
specific
device
keep
track
of
t
future
referen
“
Virtual
Serve
“
Special
Appli
1.
Log
into
you
on
page
9).
2.
Click
on
Adv
3.
Review
the
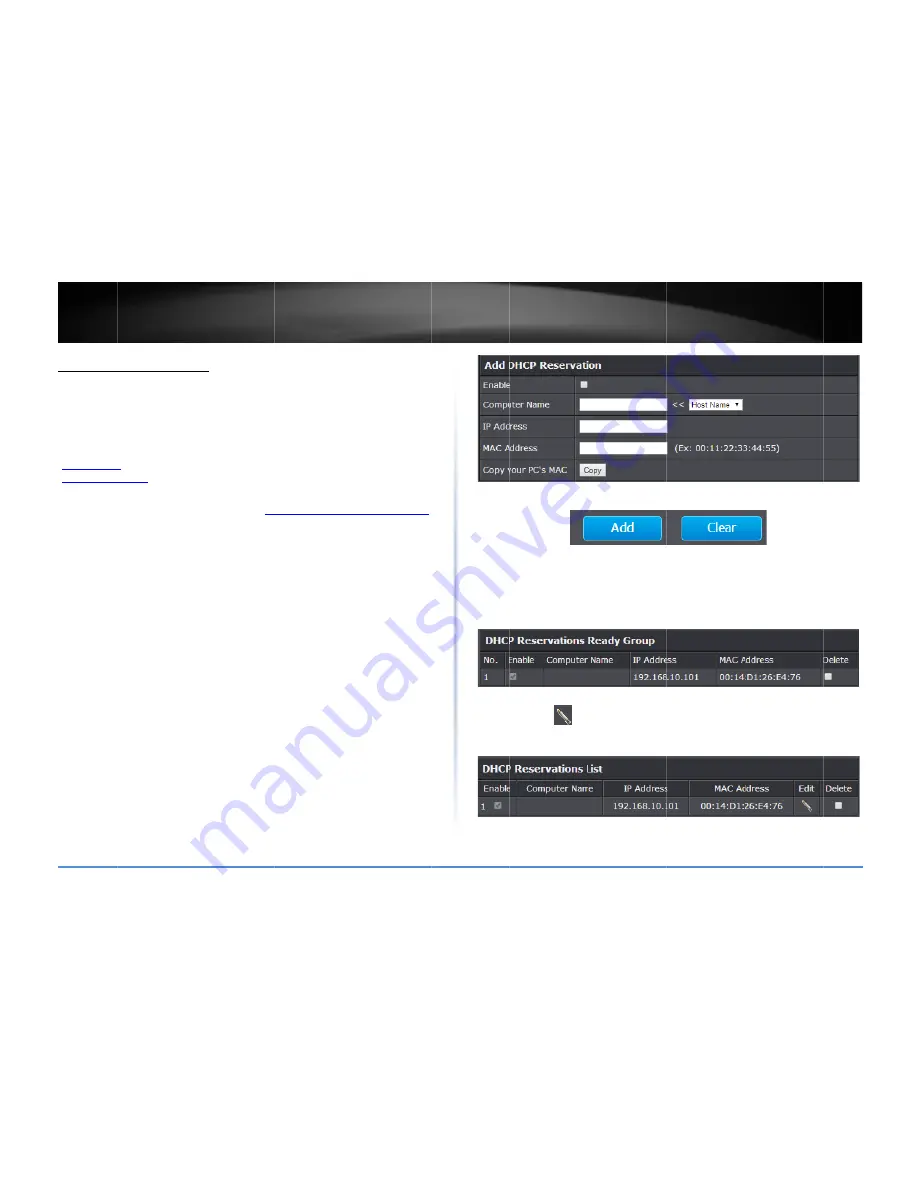
Enab
Comp
reser
from
comp
IP
Ad
192.1
Note
availa
host
n
MAC
or
ne
Note
comp
Copy
field,
2014
TRENDnet.
All
net
User’s
Gu
HCP
reservatio
etup
>
LAN
Settings
mic
Host
Configurat
o
assign
a
fixed
IP
a
e
on
your
network.
the
IP
addresses
us
nce
or
configuratio
r
”
on
page
36)
or
s
cations
”
on
page
3
ur
router
managem
vanced
and
click
o
DHCP
reservation
ble
–
Enable
or
Disa
puter
Name
–
Ente
rvation.
Note:
You
an
available
comp
puter’s
host
name/
ddress
–
Enter
the
I
168.10.101)
:
You
can
click
the
able
computer
in
th
name/IP
address
in
Address
–
Enter
th
etwork
device
to
as
:
You
can
click
Clon
puter’s
MAC
addres
y
your
PC’s
MAC
–
T
you
can
click
Copy
l
Rights
Reserved.
uide
on
s
ion
Protocol)
reser
address
from
the
D
.
Assigning
a
fixed
I
sed
on
your
netwo
n
such
as
virtual
se
special
applications
38).
ment
page
(see
“
Ac
n
Setup
,
then
click
settings.
able
the
DHCP
rese
er
a
name
of
the
de
can
click
the
Comp
puter
in
the
DHCP
s
/IP
address
informa
IP
address
to
assig
Computer
Name
d
he
DHCP
server
list
nformation
into
the
he
MAC
(Media
Ac
ssign
to
the
reserva
ne
your
PC’s
MAC
A
ss
into
the
MAC
ad
To
copy
your
curre
y
.
rvation
(also
called
HCP
server
IP
addr
IP
address
can
allo
ork
by
your
comput
erver
(also
called
p
s
(also
called
port
t
ccess
your
router
m
k
on
LAN
Settings
.
ervation.
evice
you
will
assig
puter
Name
drop
‐
do
server
listing,
click
>
ation
into
the
fields
n
to
the
reservatio
drop
‐
down
list
to
se
ting,
click
>>
to
cop
e
fields.
ccess
Control)
addr
ation.
(e.g.
00:11:2
Address
to
copy
the
ddress
field.
ent
computer’s
MA
Static
DHCP)
allow
ress
range
to
a
w
you
to
easily
ters
or
devices
for
ort
forwarding,
see
triggering,
see
management
page
”
gn
the
DHCP
own
list
to
select
>>
to
copy
the
s.
on.
(e.g.
elect
from
an
py
the
computer’s
ess
of
the
compute
2:AA:BB:CC)
e
current
AC
address
to
the
ws
e
”
er
Click
Ad
Note:
C
You
wil
tempor
DHCP
re
the
ent
entries
Delete
.
Under
t
You
can
entry
to
Delete
A
To
save
Note:
If
dd
‐
Saves
the
rese
Click
Clear
discards
l
see
the
new
reser
rary
list
until
you
sa
eservation
entries
ries
will
appear
un
in
the
list
or
check
the
DHCP
Reservat
n
click
the
icon
o
remove
and
click
All
to
delete
all
DH
e
changes
when
mo
f
you
would
like
to
rvation.
and
erases
the
cur
rvation
added
to
th
ave
changes
by
clic
which
will
appear
der
the
DHCP
Rese
k
the
Delete
option
ions
List,
n
to
edit
the
reserv
Delete
Selected
to
HCP
reservation
ent
odifying
a
reservati
discard
the
change
rrent
information.
he
DHCP
Reservati
cking
Apply
.
You
ca
in
this
list.
Once
yo
ervations
list.
You
c
,
next
to
the
entry
vation
or
check
the
o
delete
the
reserv
tries
from
the
list.
ion,
click
Save
.
es,
click
Clear.
TEW
‐
828D
ons
Ready
Group.
T
an
continue
to
add
ou
have
saved
the
s
can
click
Reset
to
c
to
remove
and
clic
e
Delete
option
nex
vation.
You
can
also
DRU
29
This
is
a
more
settings,
clear
the
ck
xt
to
the
o
click
Summary of Contents for AC3200
Page 1: ...TRENDnet User s Guide Cover Page ...
Page 64: ......


