background image

-26-

CRT MK2

EXAMPLE APPLICATION

Producing a Shield

Construct an actual size template of the
design from 6mm MDF or plywood ensuring
that it is accurate and free from
imperfections.

Fix the template to the back of the workpiece
to be used using screws or double sided
tape.

Rough cut the workpiece to the shape of the
template using a band saw or jigsaw leaving
2-3mm oversize.

Fit a ball bearing guided trimmer cutter.

Lay the workpiece (with template fitted) face
down on the table surface.  Adjust the height
of the cutter. Ensure that the ball bearing will
contact the template and the cutting edge of
the cutter will machine the full edge of the
workpiece.

Fit the profiling top guard and adjust height to
give a 6mm gap between the top of cutter
and underside of template.

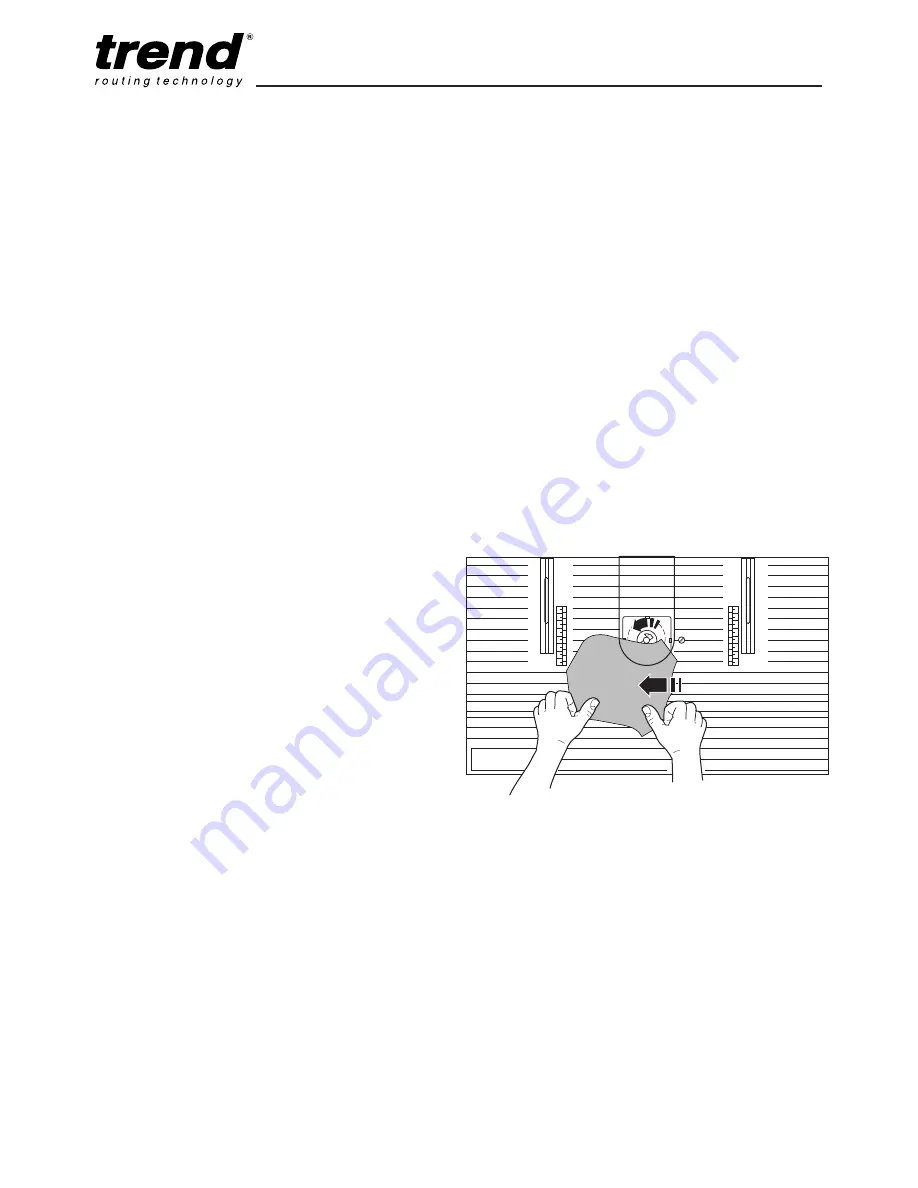
Switch router on and position the workpiece
against the lead-on pin as shown.  The
workpiece should not contact the cutter. 

Rout the shield using the procedure
described on the previous pages.

Useful advice

If natural woods are used, consideration should
be given to break-out of short grain which will
effect your decision as to where to start the
routing operation in order to prevent it.

Moulding the Shield

A suitable ball bearing guided cutter should be
chosen to mould the shield. 

Fit chosen moulding cutter and adjust height
of cutter to achieve shape required. 

If the full edge of the workpiece is to be
machined, leave the template attached to the
workpiece so as to provide a guide for the
ball bearing. Otherwise the template can be
removed, providing there is sufficient edge for
the ball bearing to follow.

Repeat the same routing procedure as

before. 

If the profile required involves excessive removal
of material, it is advisable to take two passes
with the cutter. First reduce the height of the
cutter protruding from the table, this in effect,
reduces the amount of material which will be
removed, or fit a larger ball bearing, if one is
available for that particular cutter.

The second pass can then be made to give the
required finish.

Carrying out this two stage routing operation has
many advantages.

Improved finish on workpiece

Less load on cutter and router

Far less risk of workpiece snatching

Definition of Snatching

This can be described as the cutter catching the
workpiece and projecting it away from the
direction of rotation. The workpiece is often
taken from the operator's hands and projected
across the work area. It can have potentially
dangerous consequences if the cutter is
unguarded and/or the operator's hands are too
close to the cutter. Damage to the cutter can
also be caused.

The following precautions should be made to

Summary of Contents for CRT MK2

Page 1: ...CRAFTSMAN ROUTER...

Page 2: ..._______24 Profile Working Procedure___________24 25 Producing a Shield ________________26 27 Spare Parts Spare Parts List ___________________28 30 Spare Parts Diagram _______________31 34 Maintenance...

Page 3: ...Pushstick 12 Table extensions 13 Insert rings ITEMS ENCLOSED 1 x Table top 4 x Legs 1 x Back fence and fittings 1 x Workpiece Support and fittings 1 x Tenon Block and fittings 1 x Top guard and fittin...

Page 4: ...Trendicote PTFE spray Do not use PTFE spray on plastic components Cutter shanks should be inserted into the collet at least 3 4 of shank length to prevent distortion A distorted collet should be disc...

Page 5: ...4 CRT MK2 ASSEMBLY Assemble the parts as show in A to N For identification all fixings are illustrated as actual size x16 x16 x18 A B ACTUAL SIZE x18...

Page 6: ...5 CRT MK2 x2 x2 x2 x2 C D E x2 PLEASE NOTE Nut is fitted reversed x1 x1 x1 x2...

Page 7: ...fitting to plate IMPORTANT Carry out the following re drilling only if required Re drilling Router Base Only Invert and stand your router onto a suitable surface Place the fixing plate facing upwards...

Page 8: ...these operations then a local engineering shop will be able to carry them out accurately for you Re drilling both Fixing Plate and Router Base Invert the router and lay the fixing plate onto the uptur...

Page 9: ...C44 F x 2 KRESS FM6955 3 G x 2 LYNX RT 800 A 3 G x 2 MAFELL LO50E 65E 1 2 H x 3 MAKITA RP0910 1110C 1 E x 2 METABO OF528 3 G x 2 METABO OF1028 OFE1229 G x 2 METABO OF1612 OFE1812 G x 2 NUTOOL NPT850 3...

Page 10: ...0B D x 2 A x 4 CRT FP C CRT FP D G M6x25mm F M6x12mm E M6x10mm I M8x20mm H M6x35mm D M5x16mm ATLAS COPCO OFSE2000 12 F x 3 CASALS FT750 1000E FT2000VCE 12 F x 3 DRAPER R1900V 12 F x 3 FREUD FT1000E FT...

Page 11: ...s four holes at the bottom mounting Firmly secure the table assembly to a workbench or workboard using self tapping screws not provided If a workboard is used this will allow quick mounting and remova...

Page 12: ...11 CRT MK2 x1 x1 x1 x1 x1 x1 x1 x1 x2 x4 x2 J K L...

Page 13: ...ug the router into the socket IMPORTANT Always remove the plug of the No Volt Release Switch from the power source before making any adjustments Insert Rings For router cutter diameters up to 50mm ins...

Page 14: ...be used in the lowered position Cutter Rotation Feed Direction Feed Direction Always work with constant medium rate Feeding too slow will results in burn marks and excessive heat build up of the cutt...

Page 15: ...e front of the slot For panel grooving i e routing of grooves away from the edge of the workpiece the fastening bolts should be to the rear of the holes and slots Workpiece Support The workpiece suppo...

Page 16: ...e diameter of 39mm and inside diameter of 32mm The hose adaptor Ref CRT 3 is a three piece design that allows the hose to swivel freely Assemble the hose adaptor onto the end of the hose as shown and...

Page 17: ...k fence When adjusted to suit the width and thickness of the workpiece they ensure the workpiece is held down onto the surface to obtain accurate machining of the workpiece Remove back fence from tabl...

Page 18: ...but allow it to slide freely It is important to check that the entire length of the workpiece will travel between the fence and the support without binding This is done simply by holding the workpiece...

Page 19: ...r Stand CRT FS Always mount the routing table on a work table bench or on the optional floor stand IMPORTANT Please do not fit top screws until CRT MK2 is fitted to the floor stand Once CRT MK2 is pla...

Page 20: ...19 CRT MK2 Enclosure Kit CRT EK x32 x32 x1 x1 x1...

Page 21: ...Lower guard and check it will retract freely over the workpiece Adjust the spring pressure clamps if fitted to suit the thickness and width of the timber Ensure that you have the pushstick within easy...

Page 22: ...bolts and lower the guard over the cutter Make the cut by sliding the straight edge of workpiece against the fence Use the pushstick as shown Full edge moulding using the Workpiece Support The workpi...

Page 23: ...the mitre bar slot before using mitre fence Stopped Moulding Right hand A and left hand B stops constructed from scrap timber must be attached to the back fence using clamps These stops limit the mov...

Page 24: ...d the end to be cut is resting on the table Clamp workpiece in this position by tightening the wing nut on the clamp rod while making sure that clamp plate stays orientated on the workpiece Slide push...

Page 25: ...top as shown and tightened with a flat screwdriver The pin is used as a guide for the workpiece when the cut is first made Correct working procedure for this is critical especially when using large di...

Page 26: ...re of the workpiece against the bearing Do not use too much pressure If you wish to stop routing halfway through the operation Simply slide the workpiece away from the cutter before switching off the...

Page 27: ...cutter should be chosen to mould the shield Fit chosen moulding cutter and adjust height of cutter to achieve shape required If the full edge of the workpiece is to be machined leave the template atta...

Page 28: ...ense then take two or three passes Ensure the cutter always has sharp cutting edges Useful advice Do not reduce pressure of the workpiece or let go of it Always keep both hands on the workpiece and ke...

Page 29: ...MK2 16 17 1 Back Fence WP CRTMK2 17 18 1 Safety Guard WP CRTMK2 18 19 1 Guard Pivot Pin WP CRTMK2 19 20 1 Workpiece Support WP CRT 20 21 1 Push Block WP CRT 21 22 1 Clamp Rod UNC5 16 18 WP CRT 22 23 1...

Page 30: ...1 Spanner 9 5mm A F Pressed Steel WP SPAN 95P 94 1 Manual MANU CRT 96 1 Plastic Pushstick PUSHSTICK 1 CRT EK 5 32 Nut Star Washer UNF10 30 WP CRTMK2 05 37 1 Screw Self Tapping 4 8mm X 12 7mm PH WP CRT...

Page 31: ...1 Workpiece Support Knob UNC1 4 20 WP CRT 31 71 1 Vertical Support Fence Body Only WP CRT 71 72 1 Guide Track For Vertical Support WP CRT 72 73 2 Wedge For Vertical Support WP CRT 73 74 2 Bolt For Gui...

Page 32: ...31 CRT MK2 40 39 41 18 35 31 3 19 3 25 5 8 4 5 20 24 30 3 17 34 4 30 3 35 33 52 36 29 23 22 21 27 26 51 11 15 10 37 6 53 50 91 92 CRT MK2 ACCESSORIES SPARE PARTS DIAGRAM v2 0 10 1999...

Page 33: ...46 42 47 43 48 44 49 45 32 CRT MK2 28 7 38 9 1 9 28 7 16 7 12 5 5 2 13 7 2 7 14 7 5 7 13 7 5 12 32 7 5 2 5 7 5 2 5 7 5 CRT FP A CRT FP B CRT FP C CRT FP D v2 0 10 1999 96 93 CRT MK2 94...

Page 34: ...33 CRT MK2 7 76 5 75 75 7 5 78 79 7 77 5 78 79 7 75 7 5 78 79 7 78 79 5 7 75 5 68 56 89 70 67 66 67 65 64 63 88 CRT FS CRT 10 v2 0 10 1999 97 98 99 CRT 3...

Page 35: ...34 CRT MK2 7 5 81 5 85 5 82 85 84 87 86 80 7 5 7 83 81 CRT EK 31 3 72 71 73 74 CRT 5 62 56 61 59 58 9 55 57 CRT 2 95 v2 0 10 1999...

Page 36: ...keep the table clean After operation clean the woodchip dust and waste away from the table Do not use PTFE spray on the plastic components of the table Guarantee The router table carries a manufactur...

Page 37: ...36 CRT MK2 NOTES...

Page 38: ...ver trendm co uk WWW _____www trendmachinery co uk MANU CRT v5 0 Copyright Trend 2002 No part of this publication may be reproduced stored or transmitted in any form without prior permission Our polic...

Reviews: