


Instruction manual TREJON OPTIMAL UPX plough (2010)
14
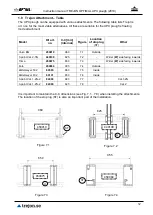
1.9 Support plates
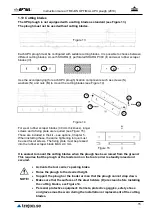
The UPX plough is equipped with two support plates, which can be adjusted using a crank
(size NV19) to the desired position. Remove the ring pin (1) and lock plate (2) from the adjustment
screw (3) before carrying out height adjustment
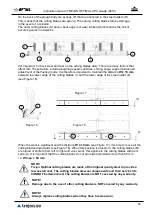
– see Figure 8. Use the crank (4) for height
adjustment 360° = 5 mm
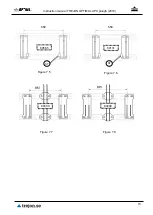
– see Figure 9. Restore the lock plate (2) and ring pin (1) to lock the
adjustment screw (3) following height adjustment
– see Figure 10.
Figure 8
Figure 9
Figure 10
When ploughing for the first time or when the roadway is soft, it can be an advantage to raise
the UPX plough (X
≥ 0) (see Figure 11). This is done to prevent unnecessary wear on the cutting
blades and to avoid cutting up gravel.
After ploughing a few times or once the roadway has frozen and become hard, you are recommended
to lower the UPX plough by adjusting the support plates upwards to the same level (X = 0) as the
cutting blades (see Figure 12).
Better ploughing results are achieved once this has been done.
NOTE!
Always replace damaged or worn support plates in time
– Trejon art. no. 144636.
If the plate comes loose, the support leg will also be damaged. This is NOT
covered by any warranty.
NOTE!
Make sure that the support plates are the same height on both sides.
Damage due to incorrect adjustment is NOT covered by any warranty.
Figure 11
Figure 12
4
1
2
3
3
1
2