background image

Main Assembly

Parts Needed

SC-6- Slide Component 2-  

(1)

Hardware  Needed

SHK-2- 5/16” USS Flatwasher- 

(24)

SHK-4- 5/16” x 1” Hex Bolt- 

(12)

SHK-6- 5/16” Nylon Locknut- 

(12)

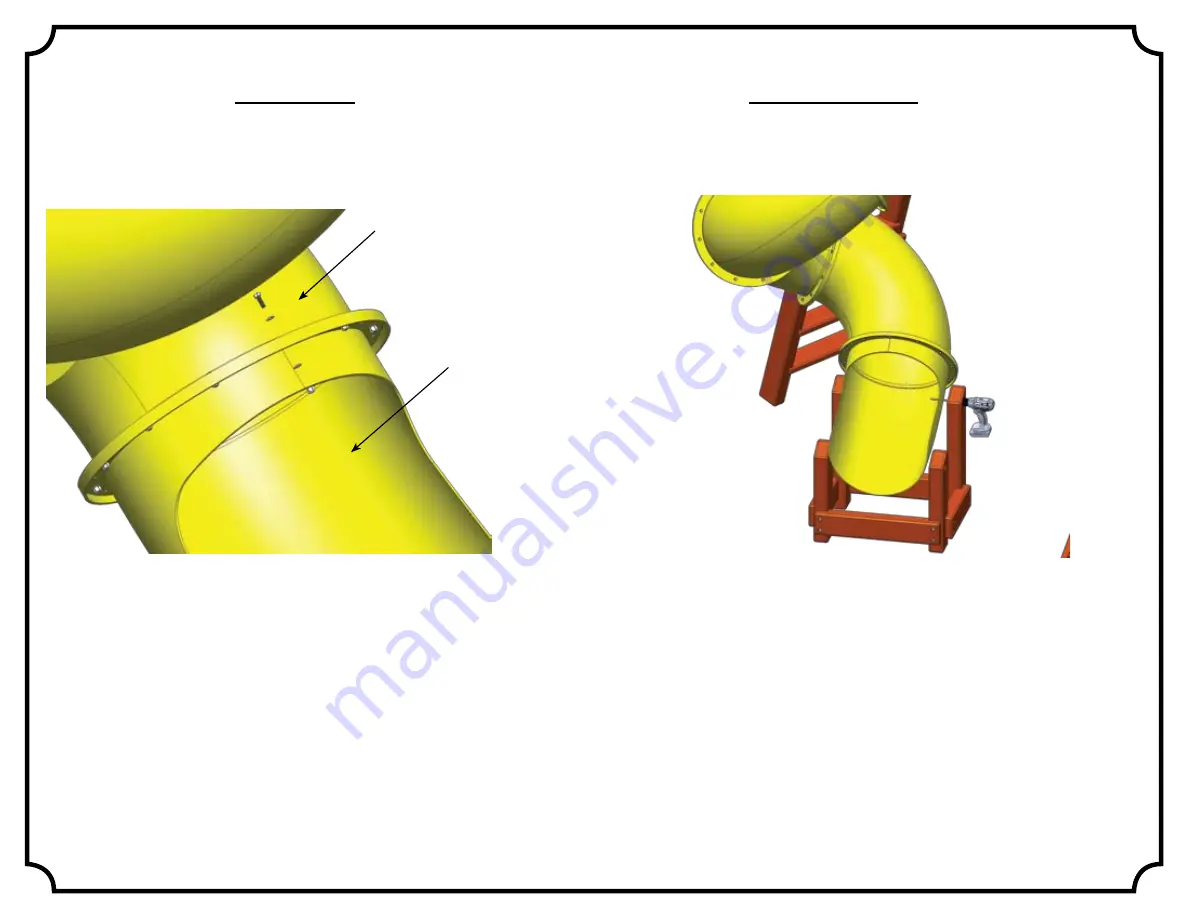
Step:

  For the SC-6 we want it to be level.  Making the exit an 

exit.  To do this we can line up the seams straight up and down 

like in the very first assembly or we can line up the inner seams 

of SC-5 and SC-6, then rotate COUNTER CLOCKWISE 2 holes.

Then using (2) SHK-2’s (5/16” Flatwashers), (1) SHK-4 (5/16” x 

1” Hex Bolt), and (1) SHK-6 (5/16” Nylon Locknut) for each hole 

we are going to lag down the part. 

SC-5

Step:

  To finish the Deluxe Spiral we only have 2 steps left.  The 

first is to take a 9/16” drill bit and drill a hole throught the slide 

where we will connect it to the pre assembled base from the first 

page of the asssembly.  This can be tricky so its best to take this 

step and the next step and repeat both for each hole connecting 

SC-6 to the pre built assembly.  Take note that the slide is a hard 

plastic but it can be streched to complete our mission.

Summary of Contents for 5.4 Deluxe Spiral Slide

Page 1: ...Socket 1 8 1 4 and 9 16 Drill Bits Phillips Head Screw Bits An Adult with two Adult Helpers Please familiarize yourself with the install manual parts components and general construction process of yo...

Page 2: ...ground Surfacing Materials is on the next page A resilient surface should be installed after the swing set has been completely assembled according to these instructions The swing set must rest on soli...

Page 3: ...lippery soles Avoid ponchos scarves hoods loose fitting clothing neckties and any clothing with a drawstring Serious injury could result should any part of the children s clothing become entangled in...

Page 4: ...4 and 3 8 lag bolts must have pre drilled holes 1 1 2 to 2 deep Use a 1 8 drill bit for the 1 4 lag bolts and 1 4 drill bit for 3 8 lag bolts Use pre drilled holes in facias as a reference for placin...

Page 5: ...orted critical heights which varied from 10 feet to greater than 12 feet It is recommended that persons seeking to install shredded tires as a protective surface request test data from the supplier sh...

Page 6: ...40 1 00074 40 1 00028 40 1 00002 40 1 00061 40 1 00059 40 1 00011 1 2 USS Flatwasher 3 8 uss flatwasher 1 2 split lockwasher 1 2 hex nut 1 2 acorn nut 3 8 x 5 hex lag screw 3 8 x 3 1 2 hex lag screw 1...

Page 7: ...00127 20 Spiral Slide Brace QTY 2 DLX Spiral Slide Legs Bundle SLB 2 17 4 00128 30 Spiral Slide Brace QTY 2 SLB 3 17 4 00129 Left 24 Spiral Slide Leg QTY 1 SLB 4 17 4 00130 Right 24 Spiral Slide Leg...

Page 8: ...UR BOLTS AND SCREWS HARDWARE VIEWS SHOWN ABOVE ARE 1 1 SCALE AND CAN BE USED TO MATCH HARDWARE SIZES SHB 1 40 1 00083 1 2 USS FLatwasher QTY 4 SHB 2 40 1 00082 3 8 USS Flatwasher QTY 22 SHB 3 40 1 000...

Page 9: ...e bottom of bolt USE THE RULER TO MEASURE YOUR BOLTS AND SCREWS HARDWARE VIEWS SHOWN ABOVE ARE 1 1 SCALE AND CAN BE USED TO MATCH HARDWARE SIZES SHK 1 40 1 00082 3 8 USS Flatwasher QTY 12 SHK 2 5 16 U...

Page 10: ...e Components SC 1 Slide Component 1 QTY 1 SC 2 Slide Component 2 QTY 1 SC 3 Slide Component 3 QTY 1 SC 4 Slide Component 4 QTY 1 SC 5 Slide Component 5 QTY 1 SC 6 Slide Component 6 QTY 1 SC 7 Slide Co...

Page 11: ...Lock nuts we lag down Slide Component 1 to the Slide Panel Then our 1st sub assembly will be done and we can set it to the side for now Parts Needed SC 1 Slide Component 1 1 SC 7 Slide Panel 1 SLB 1 2...

Page 12: ...Board 2 Step 1 Assembly 1 Hardware Needed 1 4 x 2 Hex Lag Bolts 4 w Loft Hardware Bundle 1 4 USS Flatwashers 4 w Loft Hardware Bundle SHK 6 3 8 x 5 Hex Lag Screw 6 SHK 2 3 8 USS Flatwasher 6 SFB 1 SF...

Page 13: ...x 1 Hex Bolt and 1 SHK 6 5 16 Nylon Lock nut for each hole we are going to lag down the part Depending on which way the unit is facing the step may be reversed SC 1 SC 2 Inner Seam Inner Seam SC 2 SC...

Page 14: ...ashers 1 SHK 4 5 16 x 1 Hex Bolt and 1 SHK 6 5 16 Nylon Locknut for each hole we are going to lag down the part Depending on which way the unit is facing the step may be reversed SC 3 SC 4 Step Again...

Page 15: ...hen using 2 SHK 2 s 5 16 Flatwashers 1 SHK 4 5 16 x 1 Hex Bolt and 1 SHK 6 5 16 Nylon Locknut for each hole we are going to lag down the part SC 5 Step To finish the Deluxe Spiral we only have 2 steps...

Page 16: ...to the base using a SHB 8 3 8 x 3 1 2 Car riage bolt SHB 1 1 2 USS Flatwasher SHB 2 3 8 USS Flat washer SHB 3 3 8 Split Lockwasher SHB 4 3 8 Hex Nut SHB 5 3 8 Acorn Nut We are going to snug the slide...

Reviews: