4
Contact Traxxas for assistance: 1-888-TRAXXAS. 972-613-3300 (outside USA). E-Mail us at [email protected]
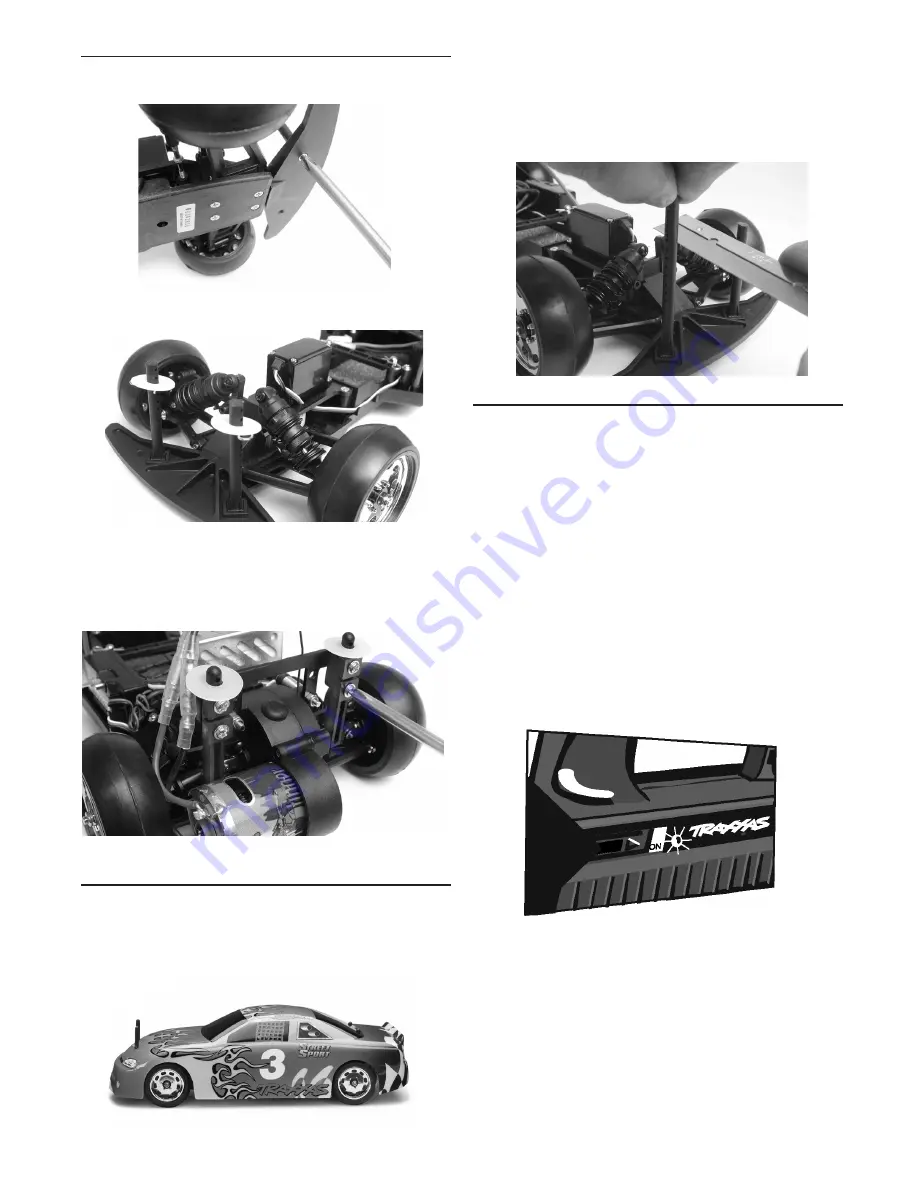
INSTALLING THE BODY MOUNTS
Attach the front body posts to the front bumper with the two
3x10mm countersunk self tapping screws provided.
Place the body clip in the fifth hole from the bottom of the front
body mounts. Place a body washer over the front posts.
Attach the rear body mount posts onto the body mount base with
the supplied body mount clamps and 3x14mm washerhead self
tapping screws. Two body mount clamps and two 3x14mm WST
screws are required to secure each body posts to the body post
base. Body height adjustment is accomplished by loosening the
screws and adjusting the body posts to the appropriate height.
INSTALLING THE BODY
You may now install the body. Adjustments may be necessary in
order to attain the proper body height and ample wheel clear-
ance. If necessary, raise or lower the rear body posts to attain the
proper body height (see figure A-1).
The front body posts are longer than necessary so that an alter-
nate body shell may be used. You may choose to leave the body
posts long to accommodate a variety of body shells, but it hinders
the scale appearance of the model. If you’d like to cut the body
posts to the proper size you may do so by cutting the excess
material off with a pair of wire cutters. For a neater finish, use a
hobby saw as shown in the photo (see figure A-2).
RADIO SYSTEM OPERATION
Your radio system was pre-adjusted before it left the factory;
however, the adjustment should be checked prior to running the
model. These instructions are for Traxxas radio systems only.
1) Before you ever turn your radio system on, you must “clear”
your frequency. Clearing your frequency means checking to be
sure that no one else in the area is operating on the same
channel as you. There are six different channels numbered 1
through 6. Each of the six channels is represented by a color.
Look at the crystal on the back of the transmitter to determine
which of the channels your model is operating on.
2) Always turn the transmitter on first, before you plug in the bat-
tery pack in the model.
TIP: Always turn the transmitter on
first and off last.
Slide the transmitter switch to the “on” posi-
tion. A steady red light should illuminate.
A flashing red light
indicates weak batteries.
Weak batteries will limit the range
of the radio signal between your transmitter and receiver. Loss
of the radio signal can cause you to lose control of the car.
3) Elevate the model so that the rear tires are off the ground. Plug
the nicad battery in the model into the speed control. The servo
and speed control should jump and move to their idle (neutral)
position.
CAUTION:
When nicad batteries begin to lose their charge,
they will fade much faster than alkaline dry cells. Stop
immediately at the first sign of weak batteries. Never turn the
transmitter off when the battery pack is plugged in. The model
could run out of control.
4) If the motor started running when you turned the model on,
then slowly adjust the trim control on the transmitter until the
motor stop. If a large adjustment of the trim control on the
Figure A-1
Figure A-2


