background image

26

 Operation 

© Travis Industries 

4/11/22- 1566 

AGP Stove 

Changing the TSTAT Program 

This heater comes with three TSTAT programs built in.  Each program is unique and allows you to modify your 
thermostat setting to your preference.  The stove is shipped pre-programmed in TSTAT program 1. 

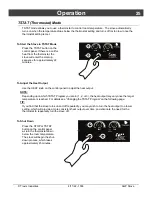
How to Tell Which TSTAT Program You Are In 

When the heater is placed in thermostat mode (TSTAT button pressed), the BLUE light will flash once, twice, or 
three times.  This will let the operator know which thermostat program the heater in.  One blue flash indicates 
thermostat program 1.  Two blue flashes indicate program 2.  Three blue flashes indicate program 3. 

Switching Between Program 1, 2, and 3 

Each time you press the “STOP” and “TSTAT” buttons simultaneously while the unit is cold, the TSTAT program 
will toggle to the next program.  Continue to press these two buttons until the blue Auto-Fan LED light flashes the 
program you wish to use. 

Thermostat Program 1 

When the thermostat stops calling for heat (the thermostat is open) the thermostat “steps down” to a lower heat 
setting.  The heater will stay at this setting for 15 minutes.  If the thermostat does not call for heat, the thermostat 
will “step down” again to a lower setting (or off).  At any time if the thermostat calls for heat  (thermostat is 
closed) during this cycle, the heater will resume at the HEAT output setting set at the control board. 


Heater Set at  


HIGH


If thermostat calls for heat 
(thermostat closed)          

Heater runs at setting set on 
control panel dial. 

If thermostat stops calling for heat (thermostat open) 

Heater goes to MEDIUM.   If after 15 minutes 
thermostat still open, heater goes to MEDIUM-LOW.  If 
after 15 minutes thermostat still open, heater goes to 
LOW.  If after 15 minutes thermostat still open, heater 
turns off. 

Heater Set at  


MEDIUM


If thermostat calls for heat 
(thermostat closed)          

Heater runs at setting set on 
control panel dial. 

If thermostat stops calling for heat (thermostat open) 

Heater goes to MEDIUM-LOW.  If after 15 minutes 
thermostat still open, heater goes to LOW.  If after 15 
minutes thermostat still open, heater turns off. 

Heater Set at  


MEDIUM-LOW


If thermostat calls for heat 
(thermostat closed)          

Heater runs at setting set on 
control panel dial. 

If thermostat stops calling for heat (thermostat open) 

Heater goes to LOW.  If after 15 minutes thermostat 
still open, heater turns off. 

Heater Set at  


LOW


If thermostat calls for heat 
(thermostat closed)          

Heater runs at setting set on 
control panel dial. 

If thermostat stops calling for heat (thermostat open) 

Heater will run for 15 minutes.  If thermostat still open, 
heater turns off. 

NOTE:

 This program is not recommended for areas with little heating requirements (mild climates, small 

rooms, etc.). 

Thermostat Program 2 

In Thermostat Mode Program 2 when the thermostat stops calling for heat (the thermostat is open) the 
following happens: 


The burn rate decreases to Level 1 (low) for 15 minutes. If there is no call for heat during that time… 


The unit turns off. 

If there is a call for heat by the thermostat (the thermostat is closed) at any point during this cool-down period 
then the burn rate resumes corresponding with the setting on the control panel. 

Thermostat Program 3 

In Thermostat Mode Program 3 when the thermostat stops calling for heat (the thermostat is open) the 
following happens: 


The burn rate decreases to Level 1 (low) and remains at this level until there is a call for heat by the thermostat 
(the thermostat is closed), then resumes corresponding with the setting on the control panel.


Summary of Contents for AGP FS

Page 1: ...y or even death Contact local building or fire officials about restrictions and installation inspection requirements in your area Save these instructions Tested and Listed by ASTM E1509 ULC S627 French language manuals at lopistoves com Manuels de langue Française à lopistoves com Installer After installation give this manual to the home owner and explain the operation of this stove Consumer Retai...

Page 2: ... make the installation and operation of your new heater an easier and more enjoyable experience We offer our continual support and guidance to help you achieve the maximum benefit and enjoyment from your heater Important Information No other AGP pellet stove has the same serial number as yours The serial number is on the safety label on the back of the appliance This serial number will be needed i...

Page 3: ...n Example Interior Vertical Installation 16 Installation Example Class A Chimney Retrofit17 Installation Example Masonry Fireplace Hearth Stove 18 Installation Example Zero Clearance Metal Fireplace Hearth Stove 19 Installation Example Freestanding Masonry Chimney 20 Safety Notice 21 Location of Controls 21 Loading Pellets 22 Starting the Heater for the First Time 22 Curing the Paint 22 Manual Mod...

Page 4: ...thin the space required for charging and ash removal Do not unplug the heater if you suspect a malfunction Press the STOP button and periodically inspect the heater Do not alter this appliance in any way Ashes should be placed in a metal container with a tight fitting lid The closed container of ashes should be placed on a noncombustible floor or on the ground well away from all combustible materi...

Page 5: ...pliance The heater will not operate during a power outage This heater must be connected to a standard115 V 60 Hz grounded electrical outlet Do not use an adapter plug or sever the grounding plug Do not route the electrical cord underneath in front of or over the heater Keep foreign objects out of the hopper The exhaust system must be completely airtight and properly installed The pellet vent joint...

Page 6: ...essary NEVER USE SUBSTITUTE MATERIALS FOR ANY PURPOSE ON THIS APPLIANCE Establish a routine for fuel wood burner and firing techniques Check for creosote build up daily until you know how often to clean the appliance for safe operation Be aware that the hotter the fire the less creosote is deposited and weekly cleaning may be necessary in mild weather even though monthly cleaning may be enough in ...

Page 7: ...g Start Up Sequence 350 approximately Watts during Operation 250 approximately Fuel This heater is designed and approved for pelletized wood fuel only all grades Travis Industries Inc recommends using only fuel that is certified by the Pellet Fuels Institute PFI Emissions This heater meets the 2020 U S EPA s emission limits for pellet stoves Report 0028PS108E Tested to ASTM E2779 10 ASTM 2515 11 C...

Page 8: ...ation of this pellet heater and notify your insurance company before proceeding with the installation Packing List Items Required Pellet Vent chimney or chimney liner materials dependent upon installation location Installation Options Residential or Mobile Home see the section Mobile Home Requirements Alcove Compatible see the section Alcove Installation Horizontal or Vertical Vent Outside Air Com...

Page 9: ...here the ceiling height is less than 7 2 134 M it must follow the requirements in the section Alcove Installation Requirements HINT REDUCING CLEARANCES Clearances may be reduced by methods specified in NFPA 211 listed wall shields pipe shields or other means approved by local building or fire officials Heater and floor protection must be installed on a level secure floor Floor Protection Requireme...

Page 10: ...the vent manufacturer NOTE If an interior vertical vent is used the stove to back wall dimension is determined by the vent being used This dimension will vary depending on the brand of pellet vent used To determine the distance from the back wall to the stove connect the Tee and add the vent clearance The floor protection must extend 2 51mm beyond the pipe all vent clearances must be met ...

Page 11: ...of elbows one tee with two 90 elbows one tee with one 90 and two 45 elbows etc Maximum Venting Distance The vent must have a support bracket every 5 1 524 M of pellet vent when on the exterior of a structure NOTE Travis Industries recommends a minimum vertical vent of 5 to ensure adequate draft during a power outage 0 F eet 5 F eet 10 F eet max 0 Feet 5 Feet 10 Feet 15 Feet 20 Feet 25 Feet 30 Feet...

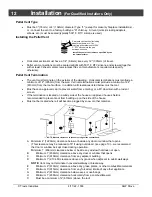
Page 12: ...ded to prevent soot from building up on the side of the house Must not be located where it will become plugged by snow or other material A Minimum 4 1220mm clearance below or beside any door or window that opens This clearance may be reduced to18 if using outside air see page 13 we recommend the door or window be kept closed during operation Minimum 1 458mm clearance below or beside any window tha...

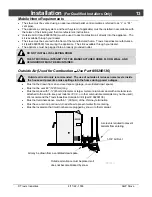
Page 13: ...RED HOME FLOOR WALL AND CEILING ROOF MUST BE MAINTAINED Outside Air Used for Combustion Use Part 99200136 Outside air is strongly recommended The use of outside air reduces noise levels inside the house and prevents smoke spillage into the home during power outages Must not be drawn from an enclosed space garage unventilated crawl space Must not be over 48 1220mm long Must be made with 1 45mm diam...

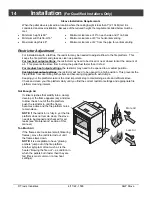
Page 14: ...gh heat output settings the restrictor will need to be opened to a high position This prevents the fire platform from over filling with pellets and becoming clogged with ash clumps Keeping your fire platform clean is the most important step to maintaining a safe and efficient stove Check and clean your fire platform daily until you find the correct restrictor settings and appropriate fire platform...

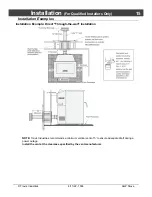
Page 15: ...1566 AGP Stove Installation Examples Installation Example Direct Through the wall Installation NOTE Travis Industries recommends a minimum vertical vent of 5 to ensure adequate draft during a power outage Install the vent at the clearance specified by the vent manufacturer ...

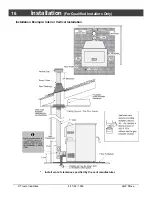
Page 16: ...16 Installation For Qualified Installers Only Travis Industries 4 11 22 1566 AGP Stove Installation Example Interior Vertical Installation Install vent at clearance specified by the vent manufacturer ...

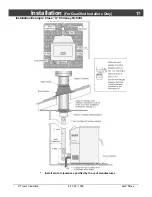
Page 17: ...Installation For Qualified Installers Only 17 Travis Industries 4 11 22 1566 AGP Stove Installation Example Class A Chimney Retrofit Install vent at clearance specified by the vent manufacturer ...

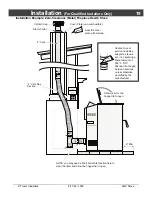
Page 18: ...Vertical Cap Cover Plate non combustible Silicone Seal the cover plate with silicone NOTE you may need a short horizontal section here to clear the lintel and allow the hopper lid to open Lintel Seal each vent section including adapters elbows etc by injecting a liberal amount of 500 F RTV silicone into the gap 500 F RTV Silicone Allow room for the hopper lid to open between sections unless otherw...

Page 19: ...Cover Plate non combustible Silicone Seal the cover plate with silicone NOTE you may need a short horizontal section here to clear the lintel and allow the hopper lid to open Allow room for the hopper lid to open Seal each vent section including adapters elbows etc by injecting a liberal amount of 500 F RTV silicone into the gap 500 F RTV Silicone between sections unless otherwise specified by the...

Page 20: ...ufacturer 6 Min L Vent Sections L Vent Storm Collar Vertical Cap Cover Plate non combustible Silicone Seal the cover plate with silicone Clean Out Access Seal each vent section including adapters elbows etc by injecting a liberal amount of 500 F RTV silicone into the gap 500 F RTV Silicone L Vent Flex Section Vent Clearance between sections unless otherwise specified by the manufacturer ...

Page 21: ...ND IN SOME CASES SMOKE SPILLAGE INTO THE ROOM SEE THE MAINTENANCE SECTION FOR DETAILS DO NOT USE CHEMICALS OR FLAMMABLE FLUIDS TO START THIS HEATER DO NOT OVERFIRE THIS HEATER Attempts to achieve heat output rates that exceed heater design specifications can result in a house fire or permanent damage to the heater Location of Controls The control panel is located at the top back of the stove as sh...

Page 22: ...un if the lid is open Starting the Heater for the First Time Start the Heater Let it Burn for 1 Hour THEN OPEN THE DOOR The stove paint is cured through heat To prevent it from bonding to the door gasket you must burn the heater for approximately 1 hour then open and close the door to break any bonding Curing the Paint This stove uses heat activated paint that will emit some fumes while starting t...

Page 23: ... on the control panel to the left lower heat or right higher heat The HEAT knob adjusts the rate of pellets feeding into the stove TSTAT STOP HEAT FAN AUTO FAN LOW HIGH www travisproducts com GLASS AND SURFACES OF UNIT CAN GET HOT ENOUGH TO CAUSE SEVERE BURNS KEEP CHILDREN AND PETS AWAY WARNING START LOW HIGH TSTAT STOP HEAT FAN AUTO FAN LOW HIGH www travisproducts com GLASS AND SURFACES OF UNIT C...

Page 24: ...on the control panel to automatically adjust the fan speed based on the feed rate into the hopper This allows for more efficient operation TSTAT STOP HEAT FAN AUTO FAN LOW HIGH www travisproducts com GLASS AND SURFACES OF UNIT CAN GET HOT ENOUGH TO CAUSE SEVERE BURNS KEEP CHILDREN AND PETS AWAY WARNING START LOW HIGH TSTAT STOP HEAT FAN AUTO FAN LOW HIGH www travisproducts com GLASS AND SURFACES O...

Page 25: ...rature is reached For details see Changing the TSTAT Program on the following page TIP If you find that the stove turns on and off repeatedly you may wish to turn the heat output to a lower setting which will provide a more consistent heat output over time and eliminate the need for the thermostat to repeatedly turn the stove off To Shut Down Press the STOP or TSTAT button on the control panel or ...

Page 26: ...fter 15 minutes thermostat still open heater goes to LOW If after 15 minutes thermostat still open heater turns off Heater Set at MEDIUM If thermostat calls for heat thermostat closed Heater runs at setting set on control panel dial If thermostat stops calling for heat thermostat open Heater goes to MEDIUM LOW If after 15 minutes thermostat still open heater goes to LOW If after 15 minutes thermos...

Page 27: ...uring a power outage After a power outage or when plugging the heater in the exhaust blower will run for approx 15 minutes This is a safety feature used to vacate smoke in case of a power outage Manual Mode If a power outage occurs when the unit is hot it will enter the start up sequence If the unit has cooled it will enter a cool down phase exhaust blower will run up to 20 minutes to ensure smoke...

Page 28: ...r fire platform Adjust door hinge and latch Check for air leaks Removing Flyash This heater was designed to allow for easy flyash removal with the included tools However to ease maintenance several pellet stove owners have purchased vacuums specifically made to remove flyash Furthermore some of these vacuums are heat resistant to allow for flyash removal while it is still warm DO NOT USE A STANDAR...

Page 29: ... stove tools may be stored on the hooks on the back of the stove To use the hooks for the first time bend the hooks with a screwdriver or needle nose pliers then hang the tools on the hooks as shown below Opening the Door MAKE SURE THE HEATER HAS FULLY COOLED APPROXIMATELY 45 MINUTES BEFORE OPENING THE DOOR AND CONDUCTING SERVICE Turn the handle clockwise and pull to open the door as shown below ...

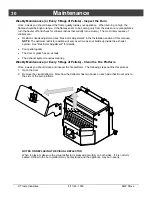
Page 30: ...rictor position will vary over time as soot builds up inside the exhaust system See Restrictor Adjustment for details Poor pellet quality The door or glass has an air leak The exhaust system requires cleaning Weekly Maintenance or Every 5 Bags of Pellets Clean the Fire Platform Once a week you should clean and inspect the fire platform The following steps outline this process 1 Open the door 2 Rem...

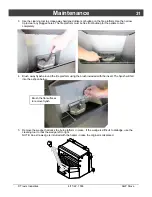
Page 31: ... for the pellets to burn completely 4 Brush away flyash around the fire platform using the brush included with the insert The flyash will fall into the ashpan below 5 Remove the wedge that locks the burn platform in place If the wedge is difficult to dislodge use the cleaning tool to rock the wedge left to right NOTE An extra wedge is included with the heater in case the original is misplaced Brus...

Page 32: ...32 Maintenance Travis Industries 4 11 22 1566 AGP Stove 6 Remove the burn platform from the platform holder 7 Clean the inside of the burnpot holder ...

Page 33: ... appliance is in use To clean follow the directions below 1 With the door closed pull the stove grill up and forward as shown below NOTE Use both hands on the grill Using one hand in the middle of the grill may cause it to warp 2 Hook the cleaning tool onto the heat exchange scraper rod as shown below 3 Move the scraper rod back and forth a few times to clean the heat exchange tubes ...

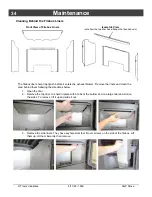
Page 34: ...sh before it enters the exhaust blower Remove the liners and clean the area behind them following the directions below 1 Open the door 2 Remove the top liner It is held in place with 3 tabs at the bottom and one large tab and slot on the sides To remove lift it up and slide it out 3 Remove the side liners They have keyhole slots that fit over screws on the side of the firebox Lift them up tilt the...

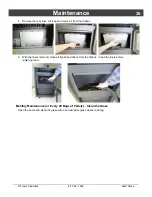
Page 35: ...it up and remove it from the firebox 5 With the liners removed clean all flyash and debris from the firebox Clean the liners before replacing them Monthly Maintenance or Every 20 Bags of Pellets Clean the Glass Open the doors and clean the glass with a non abrasive glass cleaner and rag ...

Page 36: ...hpan will accumulate ash as you use the appliance See the steps below to empty the ashpan 1 Rotate the ashpan handle clockwise and pull it down to access the ashpan 2 Slide the ashpan forward Use the built in rod to lift the ashpan out of the firebox NOTE Do not use the ashpan handle to pull the ashpan out instead use the lip on the front of the ashpan 3 Remove the ashpan from the appliance and pr...

Page 37: ...lets Clean the Lower Exhaust Duct 1 With the ashpan removed see page 36 remove the ashpan guide as shown below Clean the area under the ashpan guide 2 Remove the exhaust duct cover as shown below Press up on it and lift it out 3 Remove the exhaust channel cover plate and gasket 11 32 nut driver ...

Page 38: ... Industries 4 11 22 1566 AGP Stove 4 Clean the exhaust channel with the bottle brush or vacuum 5 Clean the combustion blower with the bottle brush or vacuum NOTE Take care to prevent damaging the combustion blower impellers ...

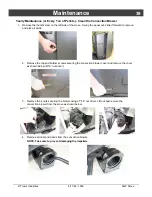
Page 39: ...e it forward to remove and place it aside 2 Remove the top and bottom screws securing the convection blower cover and remove the cover as shown below 5 16 nut driver 3 Remove the 2 nuts securing the blower using a 7 16 nut driver Lift out and remove the convection blower from the stove as shown below 4 Remove all dust and debris from the convection blower NOTE Take care to prevent damaging the imp...

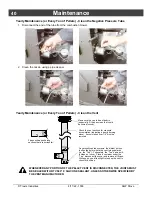
Page 40: ...ERWISE SPECIFIED BY THE VENT MANUFACTURER Check the vent sections for creosote accumulation indicating a poorly burning stove Accumulation over 1 4 must be removed On vertically vented systems the dirtiest portion is often the point where the vent turns upwards i e the Tee Fortunately the Tee has a built in clean out cover Place a container under the Tee disconnect the cover and remove all flyash ...

Page 41: ... chisel is designed to shear pellets during operation As the chisel becomes dull over time it will make it harder for the appliance to shear pellets and could shorten the life of the feed motor We recommend that the chisel be replaced every two years or 4 to 6 tons of pellets to help ensure proper operation of the appliance To remove the chisel first remove all pellets from the hopper Turn the app...

Page 42: ...iciently Press the STOP button to clear the error code Verify the appliance is clean free of ash and debris and the room blower operates clean if necessary Clean the burn platform then restart the appliance RED GREEN LIGHTS FLASH ALTERNATELY Appliance ran out of fuel or hopper lid not fully closed In rare cases the metering motor or system disc may have malfunctioned Press the STOP button to clear...

Page 43: ...ermostat Power Cord Ground Hot fuse Common Black White Red W h i t e White White White White White Brown Black Red Black Black Brown Brown Black Black Red Black Black Green Orange Orange Gray Gray Control Board Encoder Molex Convection Blower Push Auger Motor Metering Auger Motor Igniter Flow Switch Exhaust Blower Ceramic System Disc 120 NO Hopper Lid Switch Hopper Snap Disc 200 NC Safety Snap Dis...

Page 44: ... and attach them to these wires orientation does not matter Make sure the wires do not contact hot or moving components See the instructions included with the thermostat for further details Outside Air Kit See the instructions included with the outside air kit for full details 3 8 Screws Cover Plate 1 1 4 screws 1 1 4 Screws 1 3 4 Diameter Flex Duct Select a location between framing members for th...

Page 45: ...Safety Label 45 Travis Industries 4 11 22 1566 AGP Stove ...

Page 46: ...ur authorized Travis retailer before installation 5 Travis Industries will not be responsible for inadequate performance caused by environmental conditions such as nearby trees buildings rooftops wind hills or mountains or negative pressure or other influences from mechanical systems such as furnaces fans clothes dryers etc 6 This Warranty is void if a The unit has been operated in atmospheres con...

Page 47: ...rchased the appliance a copy of your receipt showing the date of the appliance s purchase and the serial number on your appliance At that time you may be asked to ship your appliance freight charges prepaid to TRAVIS INDUSTRIES INC TRAVIS INDUSTRIES INC at its option will repair or replace free of charge your appliance if it is found to be defective in material or workmanship within the time frame...

Page 48: ...ing Masonry Chimney 20 Installation Example Interior Vertical Installation 16 Installation Example Masonry Fireplace Hearth Stove 18 Installation Example Zero Clearance Metal Fireplace Hearth Stove 19 Installation Options 8 Installing the Pellet Vent 12 Introduction 2 Loading Pellets 22 Location of Controls 21 Manual Mode 23 Maximum Venting Distance 11 Mobile Home Requirements 13 Opening the Door ...

Reviews: