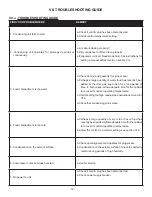
Traulsen centerline CLUC-27R-SD Owner'S Manual Download Page 3

-2-

II.  RECEIPT INSPECTION

III. INSTALLATION (continued)

II. a - RECEIPT INSPECTION 

All Centerline products are factory tested for performance 
and are free from defects when shipped. The utmost care 
has been taken in crating this product to protect against 
damage in transit. 
You should carefully inspect your Centerline unit for damage 
upon delivery. If damage is detected, you should save all the 
crating materials and make note on the carrier’s Bill of Lading 
describing this. A freight claim should be filed immediately. If 
damage is subsequently noted during or immediately after 
installation, contact the respective carrier and file a freight 
claim. Under no condition may a damaged unit be returned 
to Traulsen without first obtaining written permission (return 
authorization). You may contact Traulsen customer care at 
(800) 333-7447 and select option 2 to request a return.

III. INSTALLATION

III. a - LOCATION

Select a proper location for your Centerline unit, away from 
extreme heat  or cold. Allow enough clearance between the 
unit and the side wall in order to make use of the door stay 
open feature at 120° (self-closing feature operates up to 90°). 
The door(s) must be able to open a minimum of 90° in order 
to make use of the maximum clear door width available.

NOTE: Do not install the cabinet without casters

.

III. b - PACKAGING

All Centerline units are shipped from the factory bolted to a 
sturdy wooden pallet and packaged in a durable cardboard 
container.
To  remove  the  wooden  pallet,  first  if  at  all  possible,  we 
suggest that the cabinet remain bolted to the pallet during 
all transportation to the point of final installation. The bolts 
can then be removed with a 5/8” socket wrench by tipping 
or otherwise raising the unit to allow access to them. 

NOTE: Traulsen does not recommend laying the unit 
down on its front or side or back. However, if you must 
only lay unit on the front of side, not the back and please 
be certain to allow the unit to remain in an upright 
position afterwards for 24 hours before plugging it in 
so that the compressor oils and refrigerant may settle.

III. c - INSTALLING LEGS OR CASTERS

A set of 4” high casters are supplied standard for all compact 
undercounter and prep table units. These are shipped from 
the factory inside a cardboard box which is secured inside 
the cabinet. 


THE CABINET MUST BE BLOCKED AND 

STABLE BEFORE INSTALLING CASTERS.

The “Stem” casters are installed by threading them firmly into 
the cabinet bottom at each corner (see figure 1). For levelling, 
turn the casters counterclockwise to raise it, clockwise to 
lower it. Level the unit from front to back as well as side to 
side in this manner. The caster bolts are tightened using a 
1/2” socket wrench. Casters with locks should be installed 
in the front for easy access to locking mechanism.
Legs & 6” casters are available in lieu of 4” casters as an 
optional accessory kit for the same models. These are 
shipped inside a separate cardboard box containing four 
(4) casters/legs.
To install the legs or casters, first raise and block the cabinet 
a minimum of 7” from the floor. For installing legs, thread the 
legs into the threaded holes on the bottom of the cabinet (see 
figure 2). Be certain that all legs are tightly secured. When 
the unit is set in its final position, it is important for proper 
operation that the unit be level. The legs are adjustable for 
this purpose; turn the bottom of the leg counterclockwise 
to raise it, clockwise to lower it. Level the unit from front to 
back as well as side to side in this manner.

Fig. 1

Summary of Contents for centerline CLUC-27R-SD

Page 1: ... centerlinefoodequipment com Form Number TR36231 Part Number 375 60363 00 Revision Date 06 09 20 OWNER S MANUAL Please Note This manual is intended for use with the above referenced equipment manufactured after May 01 2020 Instructions for the installation operation and maintenance of all Centerline by Traulsen Compacts Undercounter Refrigerators Freezers Prep Tables and Mega Tops ...

Page 2: ...TAG LOCATION The serial tag is a permanently affixed label on which is recorded vital electrical and refrigeration data about your Centerline product as well as the model and serial number This tag is located in upper right interior compartment on all compact models I b READING THE SERIAL TAG Model The model of your Traulsen unit S N Serial Number The permanent ID of your Traulsen unit Refrigerant...

Page 3: ...with a 5 8 socket wrench by tipping or otherwise raising the unit to allow access to them NOTE Traulsen does not recommend laying the unit down on its front or side or back However if you must only lay unit on the front of side not the back and please be certain to allow the unit to remain in an upright position afterwards for 24 hours before plugging it in so that the compressor oils and refriger...

Page 4: ...g unit area For your safety and protection all units supplied with a cord and plug include a special three prong grounding plug on the service cord Select only a dedicated electrical outlet with grounding plug for power source NOTE DO NOT UNDER ANY CIRCUMSTANCES CUT OR REMOVE THE ROUND GROUNDING PRONG FROM THE PLUG OR USE AN EXTENSION CORD III g POWER SUPPLY The supply voltage should be checked pr...

Page 5: ...an optional backsplash that must be installed on site To do so please follow the directions below 1 Install backsplash as shown in figure 5 The backsplash is attached with self drilling Philips head screws The outer most holes are used to install bumpers 2 Align the outer holes used for the bumpers to attach the backsplash Attach the backsplash with the just the outer holes and bumpers temporarily...

Page 6: ... after a short time or temp delay whichever comes first After completion the total refrigeration system operation is then resumed During defrost operation heat is confined to the coil enclosure to prevent any significant rise in temperature within the food zone The fan delay control function upon termination of a defrost cycle is two fold First to prevent blowing warm air into the food storage are...

Page 7: ...ing Depending on the level of cleaning drawer model interior fittings may require a tool to facilitate cleaning The drawer frame may be removed without tools V b CLEANING THE INTERIOR cont d To remove the drawers the lock tab must be unlocked by sliding the lock tab forward and then up to loosen the slides see figure 8 Then the drawer can be pulled out easily from the slides To remove the middle s...

Page 8: ...e bracket pin and plastic bushing will remain in the top hinge bracket V e DOOR RE HINGING cont d Carefully lay the door down on a padded flat surface The door must be rotated 180 to mount on the other side of cabinet Remove top bushing and bottom hinge cartridge and install on opposite ends Using the newly obtained bottom hinge bracket follow the steps in reverse order to re hinge the door NOTE T...

Page 9: ...ory completely ready for use VI a INFORMATION MENU The information available in this menu is displayed only if enabled see Configuration Parameters displayed only if ACC 0 Access to menu and information displayed Press and immediately release button With button or select the data to be displayed Press button to display value Toexitfromthemenu pressbutton orwaitfor10seconds Initiate Stand By Keeping...

Page 10: ... duration is influenced by a series of parameters Time termination T2 NO and T3 different from 2EU the evaporator temperature is not monitored and defrost will last as long as time DTO Temperature monitoring of one evaporator T2 YES and T3 different from 2EU In this case if the sensor T2 measures the temperature DLI before the time DTO elapses defrost will be terminated in advance VI c INITIATING ...

Page 11: ...A Evap Fan 16A resistive 4 FLA 12 RLA 8A resistive 4 FLA 12 RLA Defrost 16A resistive 4 FLA 12 RLA 16A resistive 4 FLA 12 RLA Auxiliary loads 1 7A resistive 7A resistive Auxiliary loads 2 7A resistive 7A resistive Input NTC 10KΩ 25 C LAE Part No SN4 Measurement Range 0 5 within the measurement range Operating Conditions 10 50 C 15 80 r H CE Approvals and Reference Norms EN60730 1 EN60730 2 9 EN550...

Page 12: ... increase CRN defrost is based off of compressor run time time is based off of DAT DFT 0 250 Time interval among defrosts in x10 minutes When this time has elapsed since the last defrost a new defrost cycle is started Each number is multiplied by 10 minutes 0 250 indicates 0 2500 minutes DAT 0 100 hours Frost accumulation timeout DFB NO YES Defrost timer backup With DFB YES after a power interrupt...

Page 13: ...n stop in x10 seconds With FT2 0 the fans remain on all the time FT3 0 180 Timed fan run in x10 seconds With FT3 0 and FT2 0 the fans remain off all the time ATM NON ABS REL Alarm threshold management NON all temperature alarms are inhibited the following parameter will be ACC ABS the values programmed in ALA and AHA represent the real alarm thresholds REL the alarm threshold is obtained by the su...

Page 14: ...ON DOR ALR IISM RDS DI1 digital input operation NON digital input 1 not active DOR door input ALR when the input is on an alarm is generated if AHM STP the compressor is stopped and the defrosts are suspended IISM when the input is on the controller will use group 2 parameters RDS when the input is on a defrost is started remote control D1A OPN CLS DI1 digital input activation OPN on open CLS on c...

Page 15: ...rator temperature measurement OS3 12 5 12 5 Probe 3 offset AHM NON ALR STP Operation in case of high condenser alarm NON high condenser alarm inhibited ALR in case of alarm HC flashes in the display and the buzzer is switched on STP in addition to the alarm symbols displayed the compressor is stopped and defrosts are suspended AHT 50 110 Condensation temperature alarm referred to T3 probe TLD 1 30 ...

Page 16: ...S AND WIRING DIAGRAM Indications Control Wiring Diagram Thermostat output Fan output Defrost output Activation of 2nd patameter set Alarm Manual activation Increase button Exit Stand by button VI CONTROL BASICS continued ...

Page 17: ...n both cases allow adequate time for the cabinet to recover its normal operating temperature c Control setting too high readjust per instructions on section VI b d Check that condensing coil is clean 4 Food compartment is too cold a Perhaps a large quantity of very cold or frozen food has recently been added Allow adequate time for the cabinet to recover its normal operating temperature b Adjust t...

Page 18: ...n Other 3 Symbol 4 WEEE Symbol 5 Safety Symbol 6 Sanitation Symbol 7 Energy Symbol 8 Customer QR Code Other 4 Device Part Number PartNum UL NSF Notes SCAN FOR SERVICE INFO COMPONENTS COMPOSANTS COMPONENTES COMP AMPS EVAP FAN AMPS COND FAN AMPS LIGHT WATTS DEF HTR AMPS CTRL AMPS DOOR HTR AMPS MIN AMPS MAX AMPS 370 60297 00 REV A 11 20 14 4401 Blue Mound Rd Ft Worth TX 76106 800 825 8220 Input Power...

Page 19: ...rs or installation by unauthorized third parties Additionally the Equipment is intended only for commercial use and should not be used by consumers or households or in any non commercial application This Domestic Warranty does not apply to and shall not cover any Equipment that is installed or used in any way in any residential or non commercial application No warranties express or implied are pro...

Page 20: ...Number 375 60363 00 Revision Date 06 09 20 Traulsen All Rights Reserved 4401 Blue Mound Road Fort Worth Texas 76106 USA Phone 800 825 8220 Service Fax 817 740 6757 E mail service traulsen com Website centerlinefoodequipment com ...

Reviews: